
Fed up with the sound of rumbling from his wind turbine, Chris Mardon makes an anti-vibration mount for a quieter time on board his boat
How to make an anti-vibration mount for your wind turbine
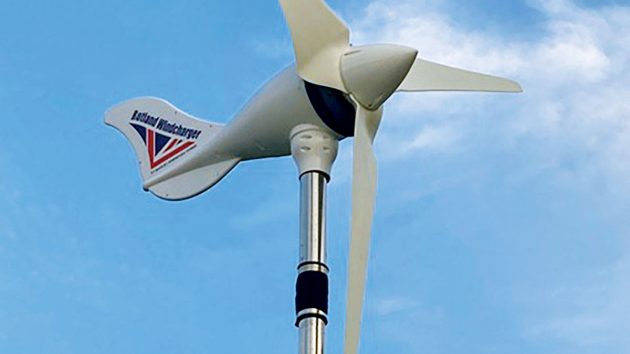
I was initially pleased with my Rutland wind turbine. It produced plenty of charge into my batteries when the wind blew and it was acceptably quiet to those sitting in the cockpit.
But my opinion changed when the wind blew up one night while we were trying to sleep at anchor.
The turbine produced a deep, loud rumbling noise throughout the boat.
Many other boat owners have told me they suffered from the same loud structural rumbling noise through their boats – it seems most wind turbines produce structural noise.

Diagram showing how Chris Mardon built his anti-vibration mount
So when I changed my Rutland for a more powerful Air Breeze turbine I added my own anti-vibration mount to reduce the noise.
I made and installed it 12 years ago for the Air Breeze and it’s still going strong with my new Rutland WG1200.
I have no sound level readings but structural noise down below has reduced significantly from a loud, intrusive rumbling to being totally quiet in wind strengths up to 10 knots.
At 15 knots it becomes a gentle background hum. At 25 knots we know it’s there but it’s nowhere near as loud as the wind in the rigging.
Materials you’ll need to make an anti-vibration mount
- 500mm length of 25mm diameter strong, thick-walled stainless tube.
- Pencil erasers of a man-made material (rather than natural rubber which will harden and perish with age). Those labelled as ‘plastic’ have lasted very well. n
- Synthetic rubber sheet 150 x 60mm and 5mm to 7mm thick.
- An offcut of acrylic canvas.
- Two hose clips to fit around the turbine mast plus canvas.
- Cyanoacrylate glue, like Super Glue.
How to make the anti-vibration mount
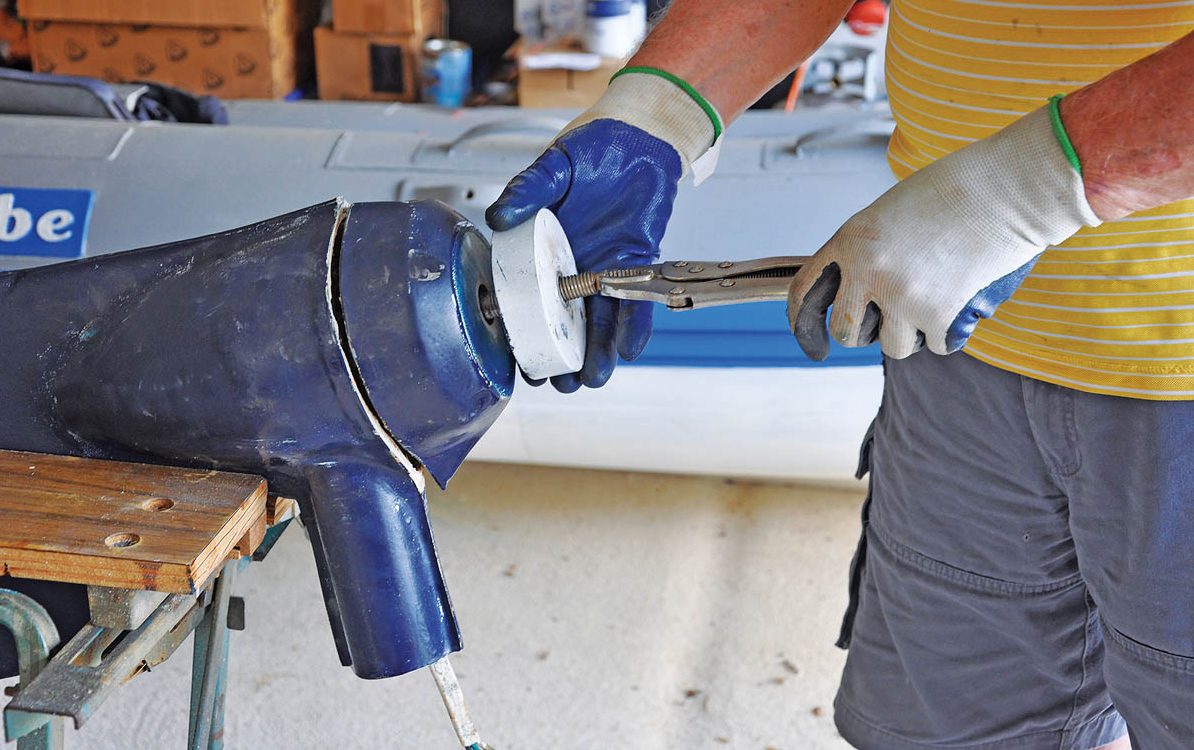
Take your 500mm length of 25mm stainless tube and, using some good quality 80- to 100-grit emery or wet & dry paper (not glass), give its outside surface a good rub down until all its shiny surface has been scuffed off.
You’re going to stick pieces of rubber onto the outside of the tube and to ensure good contact between rubber and stainless steel the surfaces must be clean, dry and recently scuffed.
Use a degreaser such as methylated spirit to remove your fingerprints.
From your erasers cut blocks 15mm long to stick on the outsides of the tube as shown in my drawing.
The thickness of the blocks will depend on the respective diameters of the outside of the 25mm tube and the inside of your mast tube.
So if your mast’s inside diameter is 45mm (say) and the inside tube has exactly 25mm outside diameter you’ll have a 10mm gap all round between the inner and outer tubes.
The blocks must be cut to fit snugly without any sloppiness, and will only be stuck to the outer surface of the inside tube, not to the outer mast.
You can now start sticking them to the outer surface of the 25mm tube.
You could hold the rubber in position until the Super Glue sets (about 30 seconds depending on temperature) but I preferred to use a spring clamp.
Remember to clean your fingerprints off the stainless surface each time before applying Super Glue.
Glueing rubber
Stick four rubber blocks around the top and four around the bottom of the tube diametrically opposite each other and equally spaced around the tube.
Take care to stick the second row of four blocks down at the same level so they’ll all be in contact with the rubber rings that are to fit between the upper and lower mast sections.
The gap between the two middle sets of middle rubber blocks should be about 2mm to 3mm more than the thickness of two layers of rubber sheet.

Holding rubber blocks while the Super Glue sets, Credit: Chris Mardon
For example, if your rubber sheet (from which you’ll cut your rubber rings) is 5mm thick (say) then two layers of rubber rings will be 10mm thick.
Adding 2mm for clearance would give the gap of 12mm between the two sets of middle blocks.
Why eight blocks below the rubber rings? The maximum horizontal load on the rubber blocks is at the top of the base section of the mast so the extra blocks will take the greater load.
At least 30 minutes after fixing the last rubber block I suggest you test all the glue bonds by trying to pull the rubber blocks off the inside tube with your fingers.
Better to find a failed bond now than after it’s in the mast.
Rubber rings
The two synthetic rubber rings are what attenuates the turbine structural noise from the base section of the mast.
The softer and thicker the rings the better.
I used 5mm rubber sheet a little harder than a rubber pencil eraser and it worked very well. Bear in mind that the rubber rings have to carry the whole weight of the turbine on their surface where they are in contact with the mast tube wall, a relatively small area.
Mark out and cut the rubber rings from the rubber sheet.
The inside hole will be the same diameter as the outside diameter of the inner tube and the outer diameter of the rings should be 2mm more than the outside diameter of your mast.
This oversize will obviate any tendency to compress the rubber rings inside the mast.
One diametric cut through the ring (see my drawing) will allow it to be opened up and fitted around the inside tube.
Make sure the rings are placed so that their cuts are on the opposite side of the tube to each other.
Cutting the mast
Next, cut a length from the top of the turbine mast.
If your turbine clamps onto the outside of the mast the length of the mast you cut off should be about 250mm.
If your turbine fits inside the top of the mast you should add the depth it occupies inside the mast to the 250mm.
This ensures the top of the inside tube will be lower than the outer mast tube to clear the turbine’s inner boss.
The mast must be cut square. I wrapped masking tape over the cut line and used a metal cutting disk on my angle grinder.
To join the top and base mast sections put the rubber rings around the centre of the 25mm inside tube and push it, with all its rubber blocks attached, into the base section of the mast using plenty of liquid detergent to lubricate it if necessary until the rubber rings come to rest on the top of the mast base section.
Now slip the mast top section over the inner tube.
Gaiter joint
A gaiter with its clips will serve to hold the top and base mast sections together and keep the weather out.
Clamp two stainless Jubilee clips around your mast, one below the rubber rings and one above.
The gaiter is cut from a scrap of acrylic canvas as commonly used in sprayhoods and dodgers.
Continues below…
How I lost the battle with my wind turbine – and nearly lost my arm in the process
Wind generators provide an additional power source for keeping batteries topped-up, but they have the downside that the noise generated…

Repairing a broken boat wind generator
Andy Pag takes apart a Rutland WG1200 turbine to see if he can get it turning smoothly again
How to dismantle and repair a seized wind generator at home
I confess, I’m frequently guilty of surrendering to the old adage, ‘If it ain’t broke, don’t fix it!’ But I…

Which battery is best for my boat? How to increase battery capacity on board
With more and more electrical gear going on board the modern cruising yacht there comes a time when the battery…
Cut a piece approximately 80mm x 200mm. Fold over a 20mm wide flap along the 200mm edge; repeat with an identical flap along the opposite edge so they meet in the middle.
You should now have a canvas piece 40mm wide (double thickness with edges meeting in the middle) by 200mm long.
Wrap this around the mast at the rubber rings to give equal coverage of the top and base mast sections.
Fold the exposed cut end of the gaiter inwards and tuck it under itself to form a clean, fray-free end.
Slip the Jubilee clips over the gaiter, work out any wrinkles from the canvas and then tighten the clips.
Finally, the turbine can be attached to the top of your anti-vibration mast.
If it works as well as mine does you’ll have many undisturbed nights of good sleep without having to turn off your wind turbine.
Enjoy reading How to make an anti-vibration mount for your wind turbine?

A subscription to Practical Boat Owner magazine costs around 40% less than the cover price.
Print and digital editions are available through Magazines Direct – where you can also find the latest deals.
PBO is packed with information to help you get the most from boat ownership – whether sail or power.
-
-
-
- Take your DIY skills to the next level with trusted advice on boat maintenance and repairs
- Impartial in-depth gear reviews
- Practical cruising tips for making the most of your time afloat
-
-
Follow us on Facebook, Instagram, TikTok and Twitter