Getting to grips with replacing a stern shaft seal on a Contessa 32, Ben Lowings explains how it can be done with the boat in the water
The assembly of a boat shaft seal comprises a sleeve that wraps the propeller shaft as it comes out of the stern tube which points in from the hull.
The seal (the black ring in the photo opposite) essentially works like a stuffing box or stern gland. It aims to be as frictionless as possible.
The outer surface is stationary and the other surfaces rotate around inside.
When the engine is running, raw water comes through a valve inlet at the top of the seal ring. This water lubricates the seal and keeps it cool.
According to one manufacturer, Tides Marine, with the engine on idle, 4.5lt of raw water is fed to its SureSeal each minute.
This volume rises with the throttle. Advertised pressure is a minimum of two pounds per square inch.
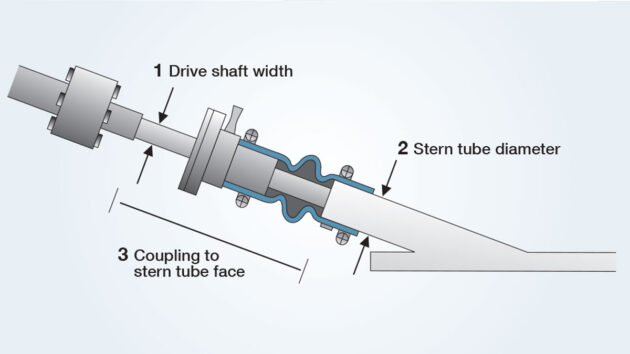
Diagram of a stern shaft seal. Credit: Maggie Nelson
A rubber hose is clamped over the connection from the seal to the stern tube.
The hose has bellows to cope with movement in the drive shaft, and it eases vibration from engines mounted on flexible blocks.
The assembly is designed to be highly but not completely watertight. Seals are resistant to heat.
They also resist damage caused by shaking and chemical corrosion. This corrosion needs monitoring; it’s likely to be the cause of the excessive drippage.
A seal must be adjusted for a shaft to be cleaned.
Creating an inlet for seawater might imply this is only a job for when your boat is hauled out of the water.
But it can be done afloat – though it has to be done quickly. A professional marine engineer is recommended.
Not all seals or shafts are the same. Nor are they accessible in the same way.
Stern tubes, hulls, props and rudder set-ups all vary.
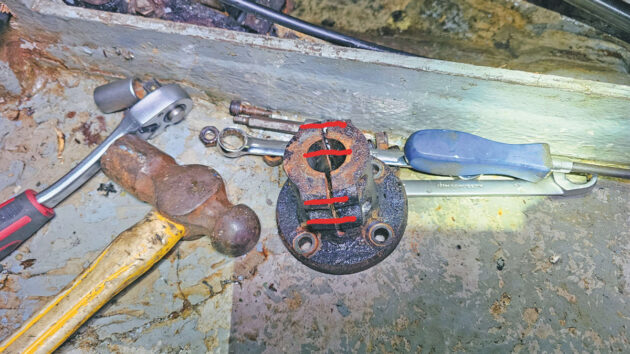
Drive shaft coupling removed. The red lines show the passage of the securing bolts. Credit: Ben Lowings
The following is based on a new install after an initial clean-up was insufficient on a 1979 Contessa 32.
Some boat owners replace shaft seals as routine. They take account of annual maintenance schedules and adjust for the boat’s age.
Engineers might suggest five years between servicing and replacement.
A stuffing box could easily go eight years without work on it. Some boat owners change seals when leaking is considered excessive.
The face of the seal ring on the set-up illustrated is meant to drip into the engine tray and then the bilge at a rate of one drip every 20 minutes to an hour when not rotating.
As with most practical repair projects on a boat, the information is out there and YouTube instructions abound.
If you have time to research and absorb the information, plus the time to implement the instructions, there’s no reason why you can’t do this job yourself.
Self-sufficient boaters boast they carry everything they need to repair everything aboard.
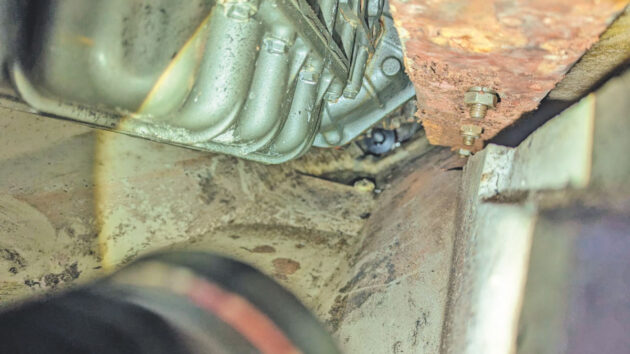
Looking aft under the engine mounts to the shaft seal. Water levels are visible under the seal and under the engine. Credit: Ben Lowings
That said, there are limits. At the minimum level of engineering knowledge required to operate safely, knowing how to change an impeller could save your life.
This procedure is probably only as complicated as that.
But the consequences of being unable to plug a hole in the bottom of the boat are serious, very much so in a seaway when waves might be surging up from aft.
Professionals do this job a lot. One business might change more than 40 shaft seals in two years.
As such they’re likely to know far more than you about what they’re dealing with; they’re more likely to help you avoid a costly haul-out.
When changing the seal in the water, they’re less likely to panic, which is the worst thing, because you’re not actually stopping the leak.
When removing a log impeller (for, say, winterising) it’s relatively easy to become transfixed – even for a moment – by green water bubbling up through the hole before you screw in the blanking plug.
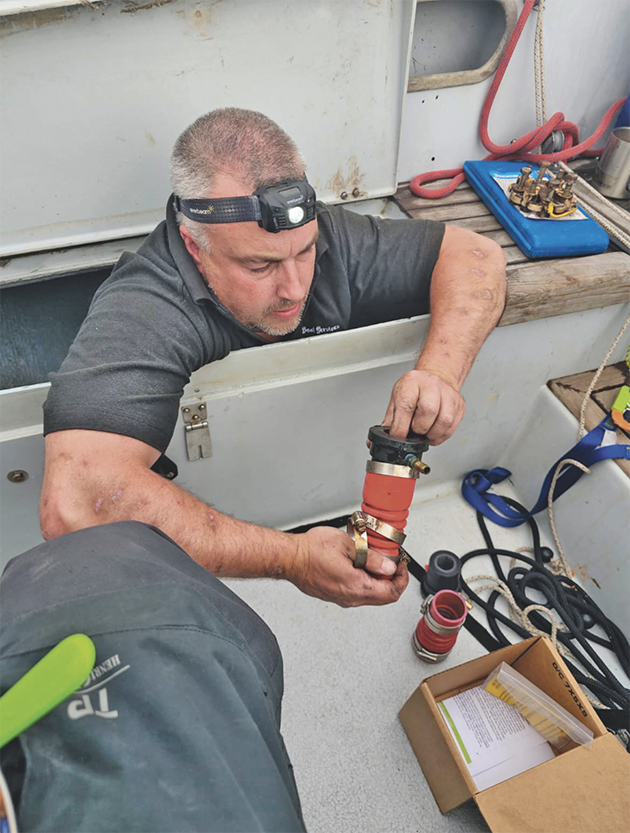
Removing the ring from the old shaft seal assembly. Credit: Ben Lowings
For this job use a portable fluoro tube light. Get an assistant to hold it.
Engine spaces are dark at best. Stern shafts opposite the access panel are in the darkest spot. If there are two of you to carry out this job it helps.
Should water come in at a rate of knots then a tea towel wrapped in plastic can serve as a temporary bung.
On a bigger boat, water comes in a little quicker. Sometimes a bilge pump might cope.
You could stem the flow with your hand, although that is a compromising situation which prevents you from ‘deploying other resources’.
It’s good to let the bilge pump kick in and stay buoyant.
If the water is coming in too fast the bilge pump needs to kick in or you need to bail; continue with the job only when you’ve caught back up.
The black pipe goes into the seal ring, the rubber hose is double-clamped at either end.
Take off the hose clamps. Cut them off if need be. Even after you cut the old hose clips the water won’t come in until you remove the hose.
Disassembling the boat shaft seal
The old rubber can be cut off. Then you unbolt the engine coupling and move the prop shaft aft.
Couplings which split then move along don’t have to be picked out with a puller.
Depending on the boat you’ll need space to get spanners in. A flexible connection socket set will be handy for the bolts on the coupling.
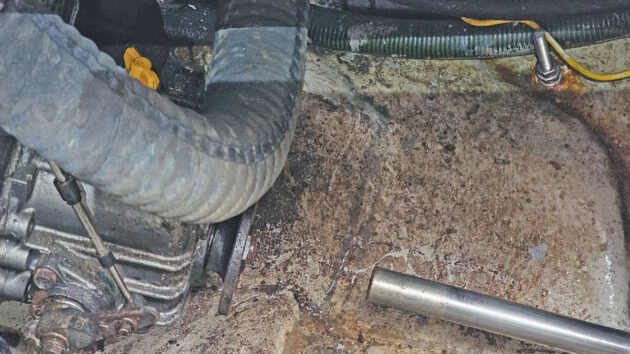
The prop shaft moved back down to the right after decoupling from the engine. Credit: Ben Lowings
For a stuffing box two big grips are required to undo the locknut, pack the stuffing and do it back up slightly. Make sure it’s all going to come loose.
In this case, the shaft slid back only a few inches.
There were only eight inches between prop and rudder so it should not be slid back too much.
You need enough to grab the shaft and work it back inward.
A couple of pullers are needed to pull the end off the seal. Tap it with a hammer and slide it out of the way.
You undo the seal and slide it up the shaft.
Replacing the boat shaft seal
Take the calcium deposits and limescale off the shaft using a clean dishcloth.
Sandpaper with a super fine grain also works to remove deposits. In this case, the shaft seal ring was in a worn state, but with the shaft cleaned the seal was slid back down into place.
The engine was run in gear after cleaning the shaft and there proved to be minimal water leaking in.
The following day, however, it was decided to change the shaft seal completely as the leaking had begun again.
More cleaning was not going to do the job so a replacement kit was ordered. Proprietary heavy-duty hose and new clamps come together as a kit.
Make sure you have the right shaft and stern tube size.
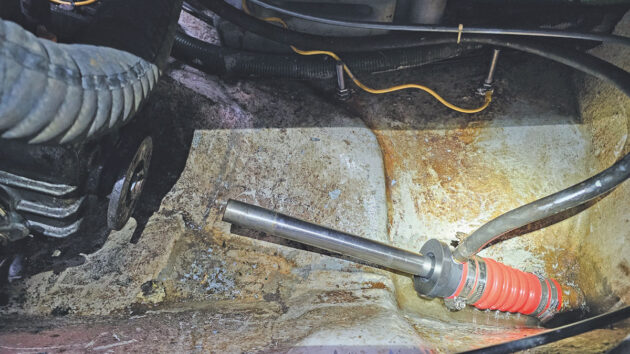
Shaft seal assembly showing the water feed. The black pipe goes into the seal ring, the rubber hose is double-clamped at either end. Credit: Ben Lowings
You measure the shaft with pipe callipers to establish the replacement seal size.
In this case, the part was a Tide Marine SeriesOne (Imperial) shaft diameter x stern tube OD 1in x 1¾in.
The new hose is slid onto the prop shaft, and then the two clamps are tightened.
A flexi shaft flathead screwdriver will help tighten the new Jubilee clamps on the hose.
Then the shaft goes back into the seal and into the coupling to the transmission.
Thanks to James Smith of JDS Boat Services in Portland, Steve Dauncey, Mike Hatton and Colin McEwan.
Boat propeller: How to choose the right one for your boat
The correct prop can have a dramatic effect on your boat's performance. Ali Wood learns how you can save fuel,…
What causes a propeller to go pinkish in colour?
While Rod Stuart was scrubbing his boat, he saw the anode had fallen off and his propeller was turning a…
Propeller antifoul: Our expert’s top tips for sticking paint to a prop
Andy Peach writes: “What’s the best preparation and antifouling paint to use on a propeller and P-bracket? “I’d heard that…
Replacing gearbox oil seals: step-by-step
Outboard engine gearbox oil seals are vulnerable to damage and can be difficult to remove. Rupert Holmes explains how to…
Want to read more practical articles like Boat shaft seal replacement?

A subscription to Practical Boat Owner magazine costs around 40% less than the cover price.
Print and digital editions are available through Magazines Direct – where you can also find the latest deals.
PBO is packed with information to help you get the most from boat ownership – whether sail or power.
-
-
-
- Take your DIY skills to the next level with trusted advice on boat maintenance and repairs
- Impartial in-depth gear reviews
- Practical cruising tips for making the most of your time afloat
-
-
Follow us on Facebook, Instagram, TikTok and Twitter


