
Ben Meakins used KiwiGrip deck paint to refresh the non-slip on his boat’s decks last winter – but how well did it cope with a season’s abuse?

We spent a busy winter repainting Polly’s topsides: making the surface as smooth, shiny and reflective as possible.
However, the next job on the list required us to forget everything we learned about making a surface smooth and shiny: this time we wanted to make it as rough as possible.
That’s right – this time we were painting the decks.
There are a few options available once your deck paint begins to lose its non-slip properties and you end up looking like Bambi on ice when you head to the foredeck to change a sail.
First up, there’s the stick-on options – Treadmaster and similar.
This gives a highly non-slip surface but needs careful preparation to ensure it sticks down.

KiwiGroup needs to be applied with a special ‘Loopey-Goopy’ roller
Next, come the deck paints with a non-skid aggregate mixed in.
These, such as International’s Interdeck, rely on the non-skid granules suspended in the paint: these are adhered to the deck, leaving a grippy surface behind.
KiwiGrip is ‘a durable, homogeneous, elastic anti-skid surface’.
It’s a water-based acrylic paint which can be textured with a special roller to suit your boat and your type of sailing.
It’s a little like Artex, with the peaks in the paint forming the non-slip.
A number of popular colours are available from chandleries, or you can get it tinted to any shade at a DIY store, so it will match any colour.

Polly‘s decks sanded the old decks with 80-grit discs on a random-orbital sander
Polly’s decks had been painted with Interdeck about five years ago when the original deck pattern had given up the ghost.
We’d been pleased with the paint, but after five years of hard cruising and racing it had begun to lose its grip and had become a grey, stained colour.
We chose to redo the decks in KiwiGrip for a few reasons.
First, it would allow us to vary the texture to suit the area: extra grippy on the foredeck, but slightly less so in the cockpit, where we spend our time seated rather than standing.
Second, our test showed that it could provide an attractive surface that looked like an original moulding and resist dirt: and, thirdly, its non-slip properties were the best we could find.
Decision made, we ordered a large 4lt tin and set to work.
As the paint is water-based, it mustn’t get wet while drying, so doing the job first thing in the morning – or in a tent or shed – is very important.
You also need to ensure the temperature is over 10°, or the non-slip texture is likely to slump before it dries.
We did ours while undercover for painting the hull, finishing off under a temporary winter cover.
Preparing the deck for KiwiGrip
There’s no doubt at all that for the best deck paint job, you should remove all the deck fittings.
This gives you the biggest area to work in, protects the fittings and will give you the best possible results.
However, removing jib tracks, winches, chainplates, stanchion bases, hatches, filler caps and cleats from a 35-year-old boat is a long job.

The boat’s decks, sanded and masked up, ready for painting
With spring approaching rapidly, we decided to cut that particular corner, mask up and paint around the deck fittings.
If carried out with care this would look OK and would shorten the process considerably.
One of the major advantages of KiwiGrip is that it self-levels and will sit quite happily on top of a rough surface.
That does mean you don’t need to sand back the deck coating completely smooth as the paint will fill any voids – although it will use more paint.
Sanding
We sanded the decks with 80-grit sanding discs in a random orbital sander to remove as much of the old Interdeck as possible.
A ‘mouse’ sander was useful for sanding around mooring cleats and other areas.

The decks in their sanded state
We removed the anchor well locker lids as well as the lazarette lids to practise our technique back in the garage.
Masking up for KiwiGrip
With everything sanded, washed and dried, we were ready for the next stage – masking up.
The main lesson we learned here was not to underestimate the amount of time this would take!
One tip that we wished we’d learned was to apply the tape in short sections, for reasons that would become very clear once we started painting.

A mouse sander was effective in sanding the foredeck and around cleats
You need to remove the tape while the paint is still wet – and on a narrow foredeck with limited access, that meant doing so as you go along.
Short, 1ft sections of tape would allow you to peel off each section as you paint it with minimal fuss – whereas we had to tear it off, which made things considerably harder and messier!
You can leave the tape on until it dries, but you’ll need a sharp blade or chisel to remove the edge of the tape and leave a good line – it’s much better to peel off short sections as you go along.

The ‘Loopy-Goopy’ roller
We used FrogTape – a similar good-quality tape is essential – to mask along the toerail, the inner edge of the non-slip and around all the fittings on deck.
The paint can become quite messy as you move your way back on the narrow side decks, so covering everything (stanchions, winches, etc) with plastic bags is a good plan to avoid painted handprints.
With the boat masked up, we could begin the painting.

A 4mm notched spreader ensured an even coverage of the KiwiGrip
To get the ‘peaked’ texture which gives the paint its non-slip qualities, you need to apply a large, thick coating of paint to the surface.
To get an even coating, KiwiGrip recommends using a notched spreader, as used for tiling, to spread and even out the paint, such as a 1∕8in spreader.
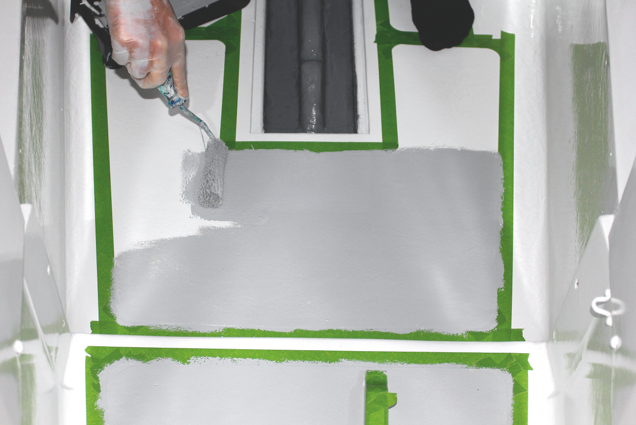
Apply KiwiGrip: step-by-step

1. Apply a good dollop of KiwiGrip to the deck – we used a large, cheap brush.

2. Use a large, notched spreader to even out the coating on the deck.

3. Using the ‘Loopy- Goopy’ roller, roll over the notched paint. We found it best to roll over in directions, firstly across the run of the notched spreader to even out the score marks, and then in a fore-and-aft direction, pressing quite hard, to get the deep texture required.

4. You can experiment with more or less paint and different rolling techniques to vary the grip. We used a medium grip on the side decks and in the cockpit.

5. Some areas, like the top of the coachroof, needed to be slightly smoother to allow the crew to scramble over in a race without skinning their knuckles and wearing through their oilskins. On these areas, we used a standard mohair roller.

6. The finished job: As you go along, remove the tape from the section you’ve just painted. Some bits, like the jib tracks, proved too fiddly, so we left these and removed it afterwards. We needed to run a Stanley knife along the lower edges of the fittings to leave a clean line.

7. Where the roller was too big, to get in, we found you can use a brush in a ‘stippling’ motion to recreate the peaked effect – especially useful in constricted areas. For really small areas, a cotton bud worked well. In larger areas, one of us painted it on and the other moved in with the roller, but this was impractical in other areas.

8. We were pleased with the finished job. Of course, our technique improved somewhat as we went on, but the end result looks like moulded non-slip. Best of all, it’s easy to clean and has excellent non-skid qualities.
One season later
I was a little concerned about the longevity of the finish – after all, it’s a water-based, one-pack paint.
We’ve had a busy year of cruising and racing, with a crew of six scrambling over the deck on a weekly basis and a spinnaker pole bouncing off the foredeck.
When cruising, the foredeck gets extra abuse from the dirty anchor and chain.
And the result? I’m very impressed.

The KiwiGrip still looking good after one season
There are a few areas which will need touching up in the winter – the edges of the cockpit seats, for instance, but these can be easily patched with a cotton bud.
The foredeck, where I was worried about the pole damaging the paint, has stood up extremely well, with little visible damage.
Some friends own another Impala and stripped their deck completely, belt-sanded off the old non-slip and then applied KiwiGrip – and theirs looks even better.
The wider areas mean you can get a much more even coating and texture than when you have to negotiate deck fittings – so if you have the chance, it’s worth removing as many as possible.
Nonetheless, ours looks good and we’re really impressed.
No more sliding around the foredeck – and the boat looks much better for it!
Continues below…

How to fit Flexiteek decking: Swan 43 owner explains how he did it
When we bought Elisabeth, our Nautor’s Swan 43ft ketch, in 2006 she was already nearly 30 years old. At the…

How to re-caulk teak decks: Vagabond 47 owners explain how they did it
First, they removed the old caulking between the planks using a Bosch Palm Router and pinned a guide into the…

Non-skid deck cleaners tested
Which cleaning products are the most efficient at removing ingrained dirt from boat decks? PBO’s Ben Meakins tries out a…
Deck paints on test
With more than 7,000 visitors to the boatjumble, many of whom climbed our ramp, PBO readers’ feet must have caused…
For more boating news, features and expert advice, take out a PBO subscription
A subscription to Practical Boat Owner magazine costs around 40% less than the cover price.
Print and digital editions are available through Magazines Direct – where you can also find the latest deals.
PBO is packed with information to help you get the most from boat ownership – whether sail or power.
-
-
-
- Take your DIY skills to the next level with trusted advice on boat maintenance and repairs
- Impartial in-depth gear reviews
- Practical cruising tips for making the most of your time afloat
-
-
Follow us on Facebook, Instagram, TikTok and Twitter