
Stu Davies explains how he fitted a new cam belt to the diesel engine in his 1999 Beneteau 381

Venerable is a word to describe the Volvo Penta MD22 engine fitted to my 1999 Beneteau 381.
The 50hp MD22 is a marinised version of the Perkins Prima 50, which was also used by British Leyland as the diesel engine for their Montego and Maestro 2.0 saloons.
It was developed jointly by British Leyland and Perkins back in the 1980s. Volvo Penta also offered a turbocharged version of this engine, the TMD22, producing 78hp.
This engine is basically the same as the MD22 with the addition of a turbocharger and extra heat exchangers and coolers.
Some of the earlier ones have a different fresh water intercooler system, but essentially, the basic engine is the same.

It’s important to check your cam belt every year to ensure the tension is correct. Credit: Stu Davies
The engine is a single overhead cam engine with the cam being driven by a cam belt, a simple method of valve operation BUT having the possibility of dire consequences if the cam belt breaks!
I’m sure most motorists are aware of the costs that can be incurred if the belt breaks and the pistons contact the valves.
The purpose of this article? I wrote the job up quite a few years ago for PBO when I first had the boat and have since changed the cam belt several times.
Some of the information I sourced all those years ago has now changed, so I wanted to update readers and reveal how the engine and belt have fared over the years.
Cam belt research
After conducting some more research, I found that the MD22 and its variants have a relatively low compression ratio but are not ‘free wheeling’ engines (ie there is not enough room for the pistons to miss the valves if the belt breaks).
Normally, when the belt breaks on these engines, the valve hits a vertically opened valve, which is driven directly by the cam shaft and snaps the cam.
Cams for this engine are now nearly impossible to source so checking and changing the cam belt, if necessary, is important.
As I was a maintenance engineer, I’ve always done my own engine work so changing the cam belt is just a routine job for me!
On the subject of the cam belt, Volvo recommends that owners ‘check for cracks and oil contamination’ and ‘change if necessary’.
Personally, I find this is not very helpful if you don’t have the expertise to make a considered judgment on what is good or bad or necessary.
If, like me, you were brought up to ‘change cam belts religiously’, this information seems a bit haphazard, although after further research I discovered that because the belt is 30mm wide it would last longer than a normal, thinner one found on modern vehicles.
More data has since become available, and Volvo Penta now recommends changing the belt every three years.
I did some checking in my logbook and found out that I last changed the belt in 2014, and have only put 400 hours on the engine.
Anecdotal evidence shows the average boater puts around 100 hours a year on the boat’s engine.
I will say in my defence that I religiously check the belt’s condition every year.
Running smoothly
The engine on Sacha, my Beneteau 381, is now 25 years old but is still going strong; I change oil and filters regularly, and I changed the injector nozzles a few years ago, which made a massive difference to the sound and smoothness of the engine.
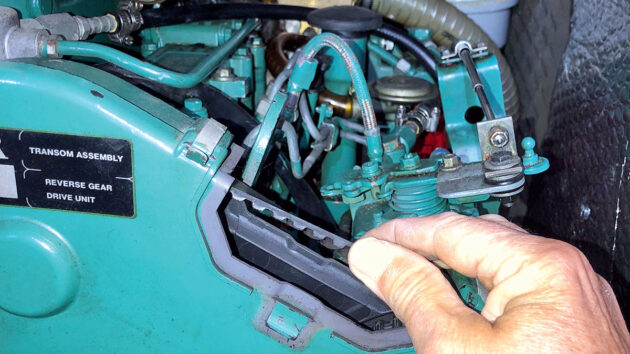
Accessing the engine is a relatively simple task on a Beneteau: lift the companionway steps, and the front of the engine is easily accessible.
The top of the cam belt cover has an inspection piece which is easily removed to expose part of the cam belt for checks.

Locate the hole in the cam cover for the locking pin. Credit: Stu Davies
Volvo Penta recommends making a chalk mark on the belt and then manually turning the engine over, inspecting the belt for cracks and oil contamination until the chalk mark appears again.
A word of warning here: I tie off the manual stop lever on the injector pump to make sure the engine doesn’t start while barring it over!
Before starting the job I collect the tools and parts needed.
Basic hand tools, spanners and sockets, an 8mm Allen key plus the ‘pins’ to hold the crankshaft, camshaft and injector pump in their relative positions whilst changing the belt.
I used 6mm threaded bolts and some 6mm bar to make these pins up.

Finding a new cam belt is becoming more difficult. The one for Stu’s engine also fits the old Maestro and Montego cars
New cam belts are getting harder to find nowadays – unlike a few years ago when I could source a new belt for a 2-litre diesel Montego from my local car parts supplier.
Today, one of the best sources is www.parts4engines.com – and this is where I bought my cam belt, which arrived marked for a Montego engine by the manufacturer, Gates.
Changing the cam belt
Changing a cam belt involves placing the engine in a position and locking it there so the timing of the injector pump and cam shaft isn’t lost.
I started the job by locating the locking flywheel pinhole on the starboard side of the engine under the inlet manifold.
This is a 6mm hole in the flywheel housing that corresponds with a similar hole in the flywheel.

Make sure you insert the flywheel locking pin to lock the engine into position. Credit: Stu Davies
I then located the cam shaft locking pin hole; this 6mm hole is accessed by removing a 6mm screw at the top front of the cam cover.
I turned the engine over with a 24mm spanner until my wife, Laura, was able to push a 6mm bolt through the flywheel hole, and I could drop a 6mm pin into the cam locking hole and, similarly, with the cam shaft.
The engine was now locked in position so the cam belt could be removed and replaced.
The next job is to remove the fresh water pump pulley so the cam belt cover can be removed.
Four 8mm-headed bolts hold it on. The bolts were first slackened (it is best to do this first so the pulley is held by the alternator belt to stop it from turning), and then the alternator holding bolts were slackened so the cam belt could come off.

The fresh water pump pulley needs to be removed to access the cam belt cover. Credit: Stu Davies
The water pump pulley is then removed. The clips around the edge of the cam belt housing are easy to flip off, and the cover can then be removed.
A little bit of wriggling is required, but this will expose the cam belt drive train. The injector pump drive gear can be seen.

Remove the cam belt drive train cover by undoing the clips. Credit: Stu Davies
You need to fit two 6mm bolts through the non-threaded holes in the pump drive wheel – this locks the injector pump in position.
Now that the engine is locked into position, the belt can be safely removed.
The four 10mm bolts which hold the cam wheel are then slackened slightly; the holes are elongated to allow a little bit of wriggle room when fitting and tensioning the new belt.

Use two 6mm bolts to lock the injector pump into position. Credit: Stu Davies
The next job is to slacken the belt tensioner using an 8mm Allen key before the jockey wheel can be removed using a 13mm socket on the holding bolt.
This will give enough room to manoeuvre the belt around the bottom pulley.
Then the tensioner pulley can be removed to give some more room.
Fitting the new cam belt
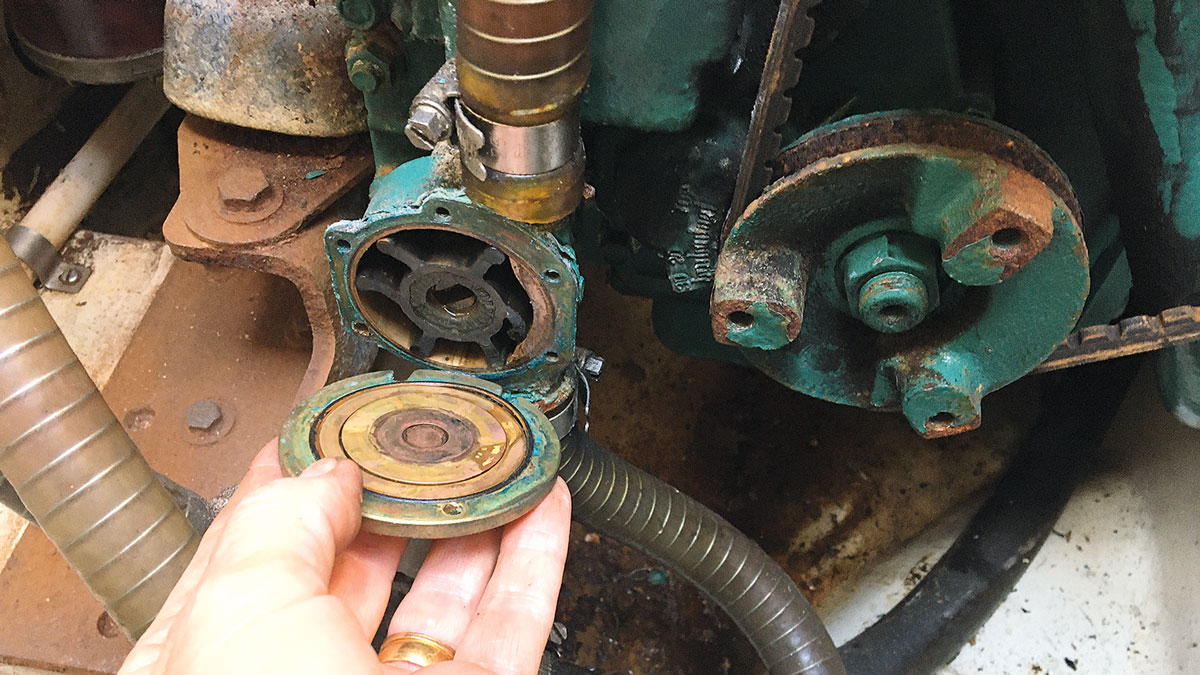
Now, the old belt can be removed and compared with the new one.
It’s important to note the direction of the rotation arrows (the engine rotates clockwise looking from the front).
After examining my 10-year-old cam belt, I found it was in perfect condition with no sign of cracking or excessive wear.
Thoroughly check the cam belt for signs of cracking or wear. Credit: Stu Davies
The jockey wheel and belt tensioner pulley wheel bearings were also checked for wear.
They were in perfect condition with no noise, and the seals were in excellent condition. Some people would change these too as a matter of course.
The case covers can be cleaned up, getting rid of alternator and cam belt dust, and the new belt offered up to the bottom pulley, cam wheel and injector pump pulley.
There are arrows on the new belt indicating which way to fit it.
Move the jockey wheel into position and make sure the bolt is loosely fitted. It is worth noting that the stiffness of the new belt makes it slightly difficult to hold the pulley in position while fitting the bolt.

Removing the jockey wheel will give you more room to manoeuvre the belt around the bottom pulley. Credit: Stu Davies
The belt tensioner pulley is then fitted loosely.
The slacking of the cam shaft pulley securing bolts is handy here, allowing a bit of wiggle room to get the belt teeth properly lined up.
There is an Allen keyhole in the pulley base which can be used to tighten the belt with an 8mm Allen key.
The elongated holes in the cam wheel fixing will ensure that as the belt is tightened, the cam wheel moves slightly, but the cam remains still.

The belt tensioner pulley. Credit: Stu Davies
Many manuals suggest using a special tool to check the belt tension.
As a veteran of many cam belt changes, I’m confident of my ability to check the tension of the belt by feel.
This is the third time I’ve changed the belt and, touch wood, all has been well.

Use an 8mm Allen key to tighten the cam belt tensioner pulley. Credit: Stu Davies
I aim for a 1cm deflection and no ‘twanging’ when the belt is flicked.
The belt is driven via the teeth, unlike a V belt, which relies on tightness to make it grip.
The rest of the job is a straightforward replacement of the case, water pump pulley and alternator belt.

How to change a water pump impeller
Stu Davies shows you how to check and replace an engine’s raw water pump impeller, and explains why it’s an…
How to winterise a boat engine
Engineer Stu Davies explains the steps you should take to make sure your boat’s engine is protected over the winter…

How to service an outboard engine: step by step
Stu Davies shares useful maintenance tips on how to keep your 2-stroke and 4-stroke outboard motors running sweetly

Alternator belt tensioning: step-by-step
Every boat owner should know some basic engine maintenance. Stu Davies shares how to tension the alternator drive belt
Want to read more practical articles?

A subscription to Practical Boat Owner magazine costs around 40% less than the cover price.
Print and digital editions are available through Magazines Direct – where you can also find the latest deals.
PBO is packed with information to help you get the most from boat ownership – whether sail or power.
-
-
-
- Take your DIY skills to the next level with trusted advice on boat maintenance and repairs
- Impartial, in-depth gear reviews
- Practical cruising tips for making the most of your time afloat
-
-
Follow us on Facebook, Instagram, TikTok and Twitter