Phil Taylor reduces the size of the windows on his Sabre 27 by fitting portholes for offshore sailing
Designed as a coastal and cross-Channel family cruiser, the Sabre 27 is renowned for its solid construction, high ballast ratio and good sailing ability.
Consequently, with a little modification, it can become a seaworthy and economical offshore or even bluewater yacht.
Compared to modern designs the freeboard is low which means the cabin windows could be vulnerable to a breaking wave.
When I first started sailing my Sabre Tabitha offshore I fixed 6mm perspex over the insides of the windows to give a second line of defence while preserving the attractive external appearance.

Phil Taylor wanted to change the long windows on his Sabre 27 ahead of cruising offshore. Credit: Phil Taylor
However, before embarking on a trip to the Azores, I decided the best solution would be to reduce the size of the windows by fitting boat portholes instead.
This might seem a little niche but older boats often have leaky windows and the method I used could be adapted to replace them without much change in appearance.
Also, if you want extra windows, this method works just as well for anyone with a GRP boat and basic fibreglass laminating skills.
Preparation before installing boat portholes
The work can be completed either with the boat afloat or on the hard.
The first task is to prepare for what will be a messy job with a good deal of dust being made.
It is worth spending time on this to reduce the effort needed to clean up afterwards.
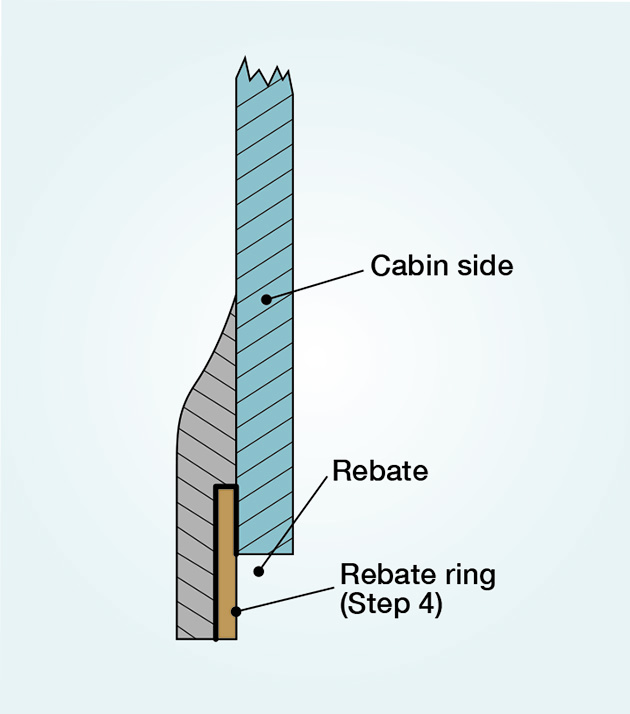
Forming the rebate (steps 4 and 5 below)
Carefully remove and label any internal trim around the windows.
Also take out curtains, cushions and any easily removable furniture and equipment.
Anything that cannot be removed should be covered with polythene sheeting secured with duct tape.
Safety
Wear protective clothing, goggles and a good quality dust mask, particularly when using an angle grinder.
Remember that epoxy and polyester resins are inflammable, as is acetone.
The method
Whether you want to reduce the size of your windows, fit new ones with the original size and shape, or create windows where none currently exist, the method is similar.
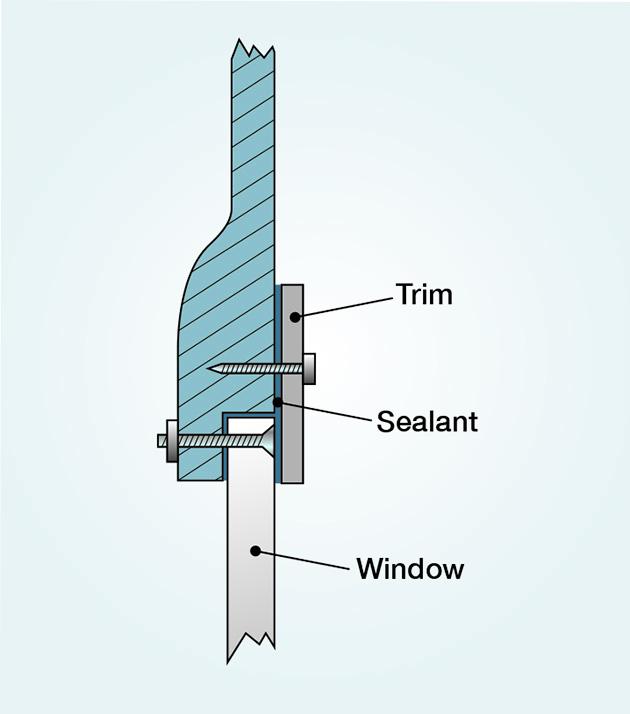
Cross section of the finished window (step 9 below)
The windows are inset to be flush with the cabin side, this requires a rebate to be formed around their edges.
The resulting joint is covered by suitable trim.
Interior
Although smaller windows naturally decreased the light in the cabin it was still sufficient for most purposes.
I needed new trim panels but if you keep the windows the same size then you may be able to re-use the originals.
Materials and costs
The total cost for my six portholes was around £320 – reduced thanks to my retired boatbuilder friend Paul’s bulk buying policy.
- Fibreglass materials (epoxy and polyester resin, polyester filler, chopped strand mat, woven glass tape, acetone) cost about £150.
- A sheet (60cm x 40cm) of 6mm polycarbonate (bought online) was £38.
- A tube of marine sealant (Sabatack 750) is £14.
- Paint for the cabin side was International Toplac, a 750ml can cost £29.
- The trim rings are an area you can save money. I could have made them out of marine ply and painted them. If I’d used a contrasting colour to the cabin it would have looked quite smart and done the job for next to nothing. Having decided to spend a little for a professional finish, a local stainless steel fabricator was able to make them for under £100. If you do not have a local source, several companies online will cut any metal shapes to your specification. A quick quote on the internet suggested a price for my rings could have been about £180 so it’s worth shopping around.
Option one: step by step Fitting new boat portholes to the forward cabin

- The new portholes are inset to be flush with the cabin side, which requires a rebate to be formed around their edges – a dusty job that includes using an angle grinder. The diagram (above) shows a cross-section of the finished porthole. Having decided where you want the window, use the grinder with coarse sanding disc to clean and roughen the surface on the inside at least 15cm around where it will go. This enables the fresh fibreglass resin to form a good bond with the cabin side.

2. Now draw the shape of the window, both inside and out on the cabin side. For boat portholes, three concentric circles are needed. For other shapes the principle is the same – the lines just need to follow the shape of the window. The outer line (diameter A) marks the outside of the stainless steel trim, the middle line (B) is the outside of the rebate and the inner line (C) is the actual size of the window and coincides with the inner edges of both the trim and the rebate.

3. The next bit is scary, you’re going to use a jigsaw to cut a hole in the cabin side. Check and double check the position and then drill a 10mm hole to allow access for the jigsaw blade so you can cut out the middle circle (diameter B). I used a fine blade recommended for plastic laminate. It’s worth using a new blade and cutting as carefully as possible, but the good news is that the circle doesn’t have to be perfect because any small gaps will be filled with sealant and covered by the trim.

4. Make a ring to form the rebate. I used an old fibreglass locker lid about 6mm thick which I had lying around. Failing that I could have made up a fibreglass sheet or used a piece of marine ply. The main thing is the inner diameter of the ring must be the same as the window (C). The outer diameter is less critical but should be as big as the trim you intend to use.

5. Fix the ring around the inside of the window opening.
I glued it in place with fibreglass paste, using duct tape to temporarily hold the ring in position. Once the paste has cured, laminate the ring in position inside the cabin using two layers of chopped strand mat and/or woven glass tape. Leave overnight to harden, then clean up the edge of the hole.

6. Fit the window which will be either the cheaper and harder polyacrylate (Perspex) or polycarbonate – stronger but softer and more prone to scratches. The area was small so I chose 6mm polycarbonate. Ensure the window material is not thicker than the cabin side. Keep its protective film on for as long as possible and cut out a circle with diameter B. Check it fits nicely in the rebate, then drill and countersink four 4mm holes. Using the window as a template, drill through the rebate.

7. Bigger windows will need more holes but, before you drill, think about where the holes for the trim are going to go, as these must be offset from the holes for the window. Remove the plastic film on the inside, apply a generous bead of sealant to the rebate, line up the holes and fix the window with countersunk marine grade (A4) bolts (or screws). Do not overtighten. Clean up any excess sealant before it sets and leave to harden before peeling off the outer plastic film.

8. Now fix the trim, which you’ll have prepared before you started. I used polished, laser cut, 3mm marine grade stainless steel – the Rolls Royce of trim – but a cheaper option is aluminium, hardwood or even painted marine ply so it might be possible to do it using offcuts. My trim was a single piece but you could fit more than one together for a larger window.

9. The trim finish is important because it is visible and covers the unsightly window joint. Screw or bolt the pre-drilled trim around the window onto a generous bead of sealant to create a good seal. Don’t forget to clean up any excess sealant before it sets. Now there’s only one more job to do – stand back and admire!
Continues below…
Bonding marine windows back in: the best gasket sealant
PBO reader Nicholas Phillips wants advice on the best gasket sealant for bonding his marine windows. Our expert Sven Petersen…
Resealing boat windows – DIY project on a Sadler 32
Stephen Wallace demonstrates how he went about removing, resealing and reinstalling the windows on his Sadler 32
How to replace your sprayhood windows
Do you have a foggy view? Don’t throw away your expensive sprayhood or awning – you can replace the windows…
Option two: Replacing the existing window with similar
First, take out the old windows, one side at a time. After removing all the fixings, the windows will probably be held firmly by old mastic.
To fully release them, slice through the sealant with a sharp blade – easier said than done!
With patience you’ll be rewarded with a clean hole in the cabin side. If you’re lucky there may already be a rebate.
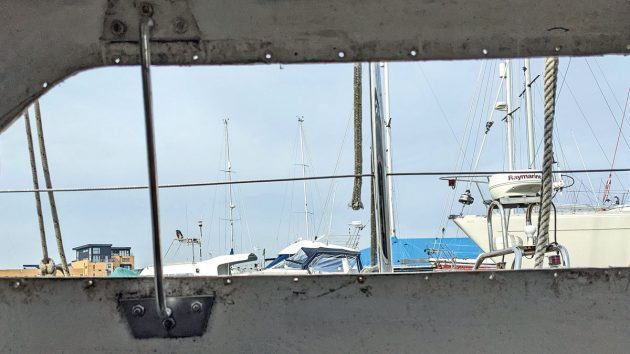
The old windows are taken out ahead of installing boat portholes. Credit: Phil Taylor
If not, then you need to make one using the method described in Option 1 but obviously following the shape of your window and not necessarily in one piece.
Beware – if you use the original opening, the new window will be smaller all around by an amount equal to the width of the rebate (1cm-2cm).
If you want to preserve the size as well as the shape of the original, you’ll need to increase the opening by the width of the rebate, which will mean sawing through the cabin side!
Depending on condition, you may be able to convert the old window frames into trim.
Alternatively you have the same choice of materials as before. It is worth spending time and even some money on this as it’s what everyone will see
Option Three: Reducing the size of existing windows
Finally we get to why I embarked on the exercise in the first place.
This is the most difficult of the options but well within the reach of a reasonably competent practical boat owner.
I was lucky to have the help and advice of my friend Paul, a retired boatbuilder.
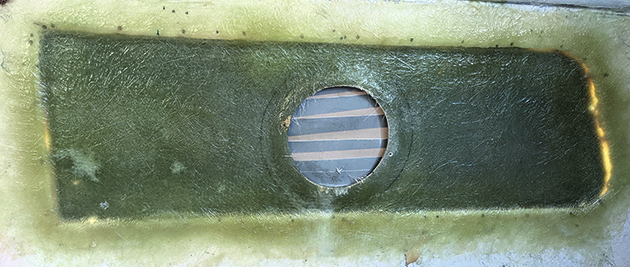
Glassing the joint makes it stronger. Credit: Phil Taylor
If any readers are fortunate enough to have a Macwester from the 1970s or 80s, there’s a good chance that he had a hand in building it which is probably why it’s still around!
First he made four fibreglass panels of a similar shape to the existing windows but a little larger.
Each panel is gelcoated on the outside with a circular depression moulded into the centre to make the rebate for the portholes.
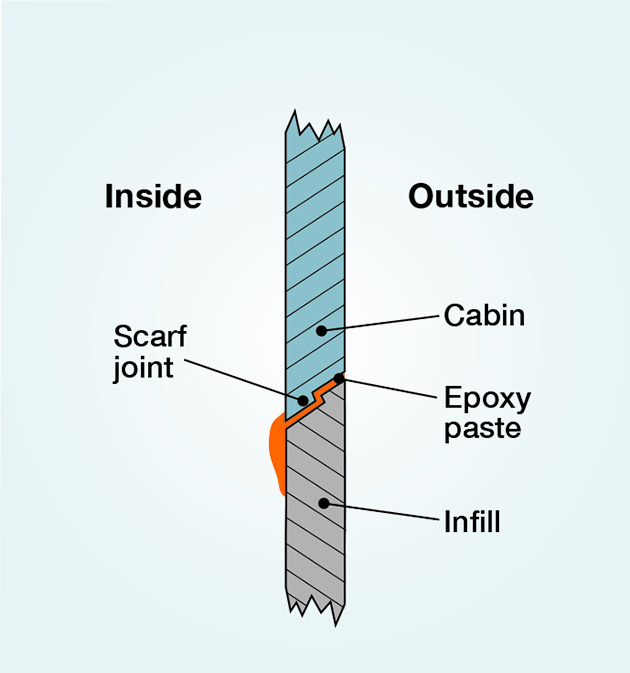
The scarf joint
If, like me, you are not confident at moulding fibreglass, you could make flat sheets and form the rebate afterwards (described in Option 1).
Cut out the holes for the windows before fitting the infill panels.
The panels were a little larger than the opening so that, for maximum strength, a scarf joint could be made by grinding the edges of the panel and the opening.

Boat portholes are installed
Having formed the scarf, Paul used epoxy paste to fix the panel into position.
After curing, the already-strong joint was made even stronger by glassing over on the inside.
The result looked pretty grim but don’t despair, it all works in the end!
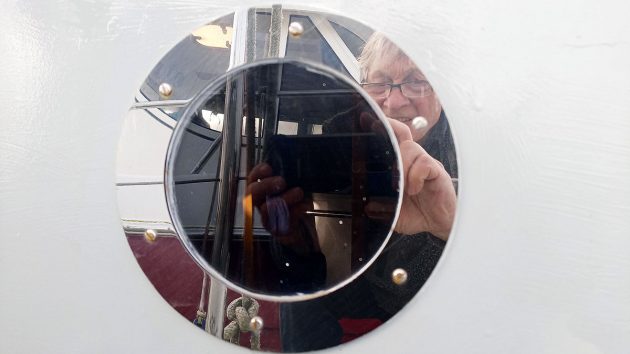
The final result! Phil is pleased with his new boat portholes. Credit: Phil Taylor
It was then a straightforward job to fit the windows, fill and fair the exterior joint using polyester paste followed by coats of paint so that it blended in with the existing cabin.
Finally, the trim was fitted although as these portholes were larger than those at the front, six screws were used rather than four.
The end result is a Sabre 27 like no other!
Enjoyed reading How to install boat portholes?
A subscription to Practical Boat Owner magazine costs around 40% less than the cover price.
Print and digital editions are available through Magazines Direct – where you can also find the latest deals.
PBO is packed with information to help you get the most from boat ownership – whether sail or power.
-
-
-
- Take your DIY skills to the next level with trusted advice on boat maintenance and repairs
- Impartial in-depth gear reviews
- Practical cruising tips for making the most of your time afloat
-
-


