
With the eye-watering cost of teak, Andy Pag decides to lay bargain EVA foam decking in the cockpit of his catamaran

Since we bought our boat three years ago the cockpit floor has looked pretty shabby.
The caulking is peeling, and some of the planks are chipped and ripped. It’s cork, which for my money is the best material for outdoor flooring.
It’s a pleasure to walk on barefoot because it’s spongy and doesn’t get roasting hot in the Caribbean sun, it’s hard-wearing and grippy even when wet. It won’t last as long as teak but it’s obviously much cheaper.
The big downside with cork is that it holds the dirt. No matter how often I scrub and hose it down, grimy water still flows off it.
It’s so grubby that there’s no three-second rule if you drop a biscuit in our cockpit.
While in Guatemala I got quotes for a teak replacement. I thought the labour and wood there would make it an affordable option for the three square metres of flooring I needed, but the quote came back at over £3,000!

The old cork decking, which was impossible to keep clean
And the ‘teak’ they use is actually a similar-looking wood which is never dried for long enough and it’s full of knots and prone to warping.
I’d have happily gone for cork again but I struggled to find any in strip planking – maybe I should have looked into it while we were in Portugal where there’s a big industry of cork production.
With limited options, I just put up with the fraying grimy floor, until I was on board a friend’s boat and noticed his closed cell foam flooring.
I questioned how rugged it was and he said he’d been impressed with how well it stood up. After a year it still looked like new.
A few online YouTube bloggers confirmed it was longer lasting than it looked.
Finding an EVA foam decking supplier
My first search got me to SeaDek, a company that specialises in making tailor-cut marine flooring from foam.
Their ordering process is a little long-winded. First, patterning material is sent to you; you draw out the shape you need and send it back and finally, the foam flooring is sent. It’s backed with an adhesive so installation looks pretty easy.
If the firm has your boat model on file then you’ll be able to skip the patterning step.
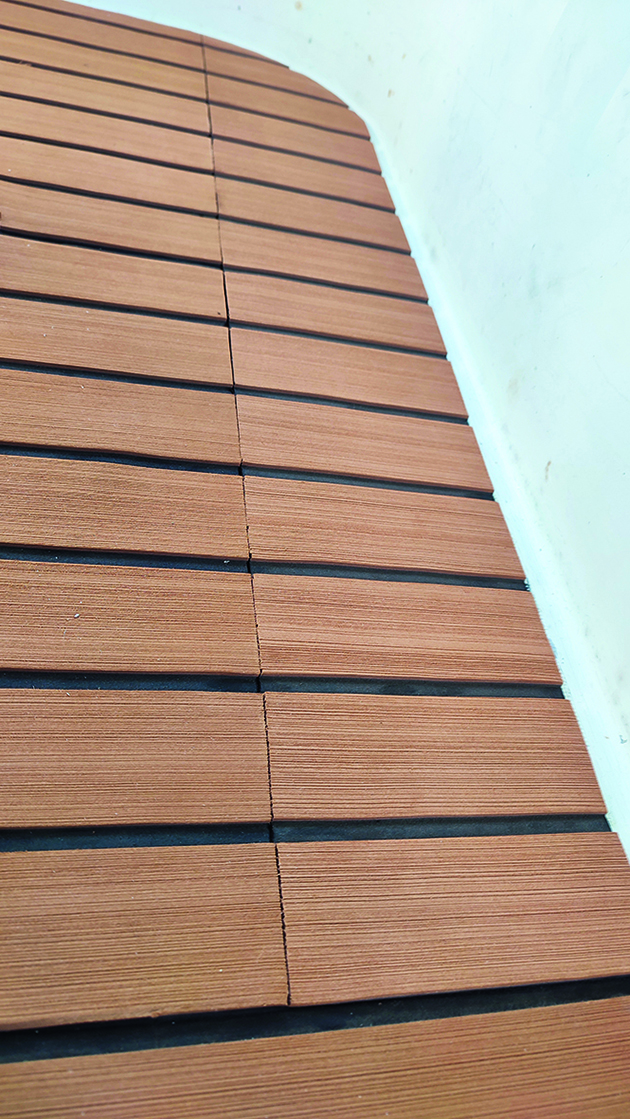
Fitting EVA foam decking: Andy tried to make sure the butt joins were mostly hidden from view
SeaDek also has a range of colours and designs, from neon disco boat to 1930s classic teak, and if you wanted you could even have your boat name written into the flooring.
But the back and forth of deliveries put me off, and it still wasn’t cheap, coming in at over £1,000.
I couldn’t get the whole cockpit area done in one sheet and ordering two smaller sheets seemed problematic.
By then I’d stumbled across the generic sheets available on Amazon.
These are flat sheets available in different sizes which you cut yourself. They’re much cheaper and I preferred the idea of being able to tailor the sheets myself rather than hoping the back and forth of patterns would work out.
The downside is that they don’t have an elegant border to them, although I guess you could cut out sections to make your own border if you wished.
Removing the cork
I ordered two sheets for just over £100 and set to work pulling up the old cork.
It was glued, not screwed, so the best way to separate it from the textured non-slip gel coat underneath was with a reciprocating tool.
I experimented with a serrated blade but settled on a smooth blade to protect the gel coat. Using a file, I occasionally sharpened the blade as I worked. It’s hard work on the tool and I took frequent breaks to make sure it wasn’t overheating.

The reciprocating tool worked best with the tail up and digging down slightly into the cork
Most reciprocating tools are designed so their tail is in line with the blade.
Resting it flat on the floor presents the cutting edge at a straight angle. But I found that vibrations coming through the tail while in contact with the floor fatigued the internal battery contacts and I had to stop midway to re-solder them.
Holding the tail up and digging down slightly also removed the cork more cleanly.
I used ear defenders and padded gloves to counter the hand numbness the tool’s vibration can cause.
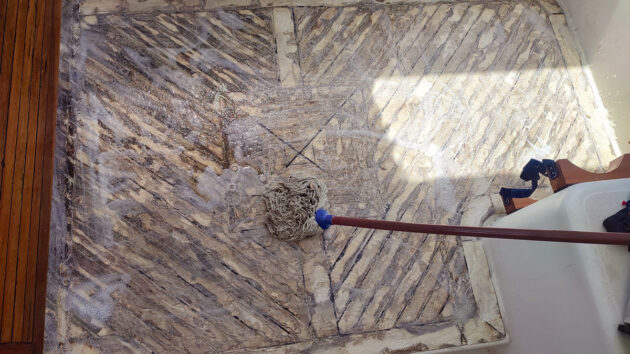
To ensure the new foam flooring would stick, Andy moped the cockpit area twice, using plenty of detergent before hosing down the soap residue
It took me a whole day, and I was still left with lots of adhesive residue, but this was stuck firm to the gel coat and its smooth, flat, rubbery finish would make for a better substrate for the foam’s adhesive backing than the dimpled flooring.
Next, I swept and mopped the floor to remove all the dust I had just created.
It’s recommended to use an acetone wipe down on the gel coat to remove greasy residue but I was worried this would leave the remaining adhesive a gooey mess; instead, I did a second mop down with an extra dose of detergent, followed by a hose down to remove the soap residue.
How to cut EVA foam decking
To cut out the right shapes I used several techniques, from measuring the existing radii of the cork corners to removing the corner pieces intact and using them as a pattern to cut around.
Measure twice and cut once was the mantra.
The backing is hard to mark even with a Sharpie pen so I switched to making the cuts with the sheet in place.
Sandbags would have helped to keep it in place while I was working. I didn’t have any so I sat or knelt on it to stop it from moving around.
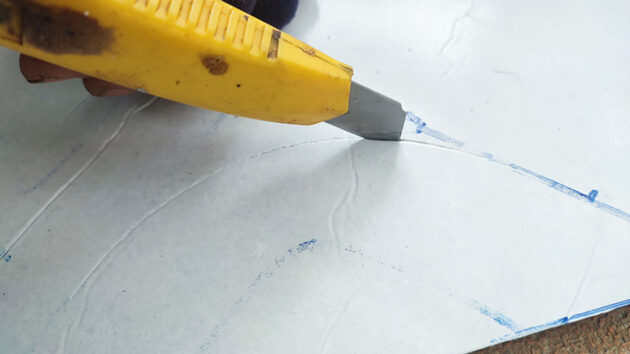
Marking the back of the EVA foam decking didn’t really work, so Andy cut with the sheets in place
The hardest parts to cut around were the table legs and the water drains, but I took it cautiously and cut in slow increments, sometimes resulting in a rough edge that needed smoothing out with a final trim.
The material cuts very easily with a fresh blade.
I planned the layout so the joins were in less visible places.
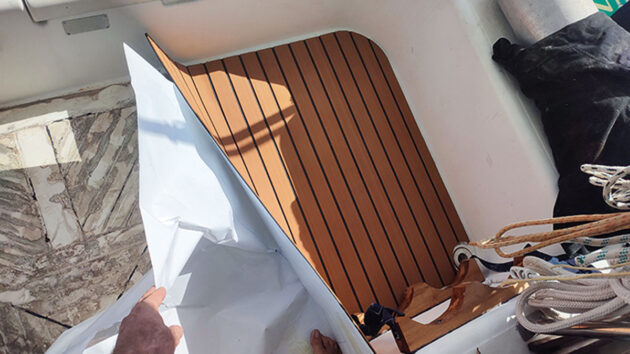
Andy dry-fitted the pieces of EVA foam decking before pulling off the backing and sticking it in place
Side by side the join is imperceptible, but joined ends show a noticeable line. Perhaps if I’d cut the foam with the blade at an angle it might have butted together better.
With hindsight, I should have bought a third sheet instead of joining the offcuts from my two primary sheets to cover the final third of the floor.
Instead, I positioned the join to be out of sight under the cockpit table.
I also noticed that the sides of the sheet were not perfectly square from the factory, and I had to trim one edge on each sheet to make the join to the adjacent sheet look right.
Will it last?
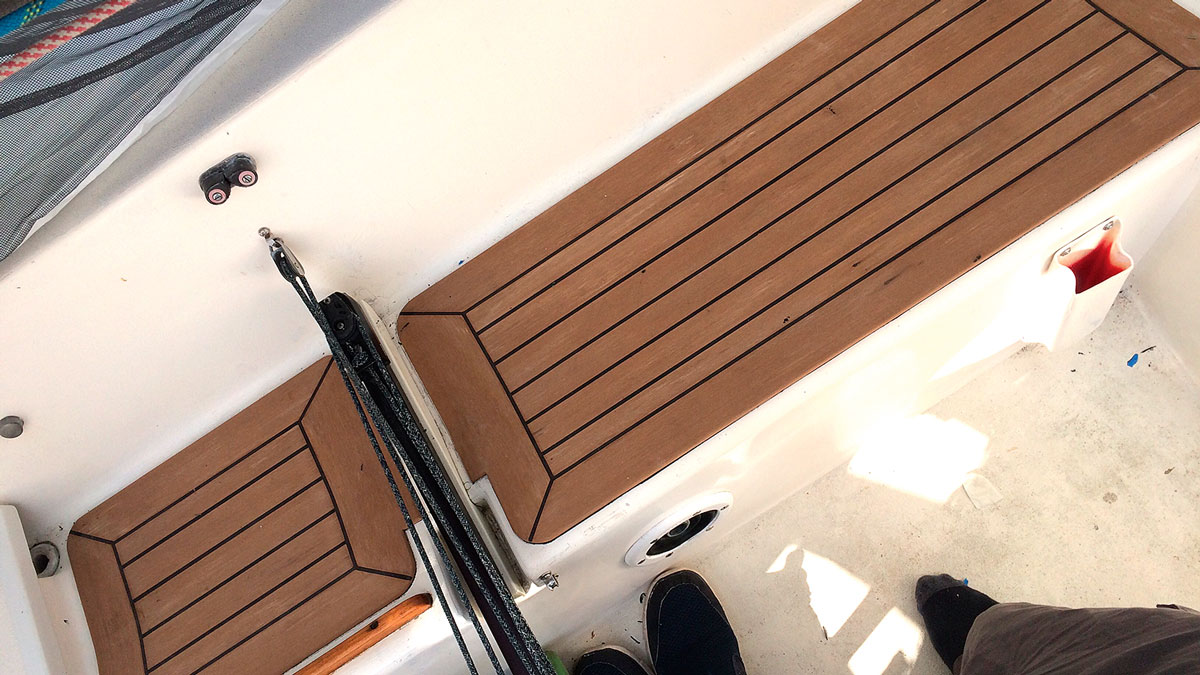
The end result looks amazing. It’s transformed the external appearance of the boat. It almost feels too glitzy compared to what we had before.
Like freshly whitened teeth, it will take a while to get used to it. I’m very happy with it but I’m still curious to know how it will hold up and how best to maintain it.
I have three main worries, which time will either confirm as a problem or alleviate.
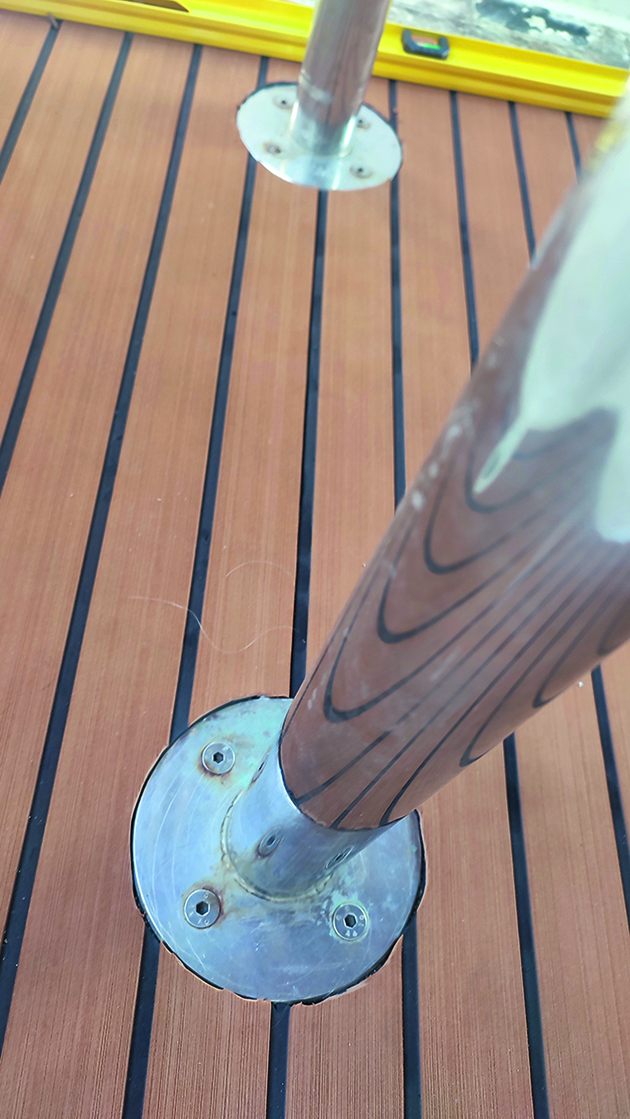
Fitting EVA foam decking: Be slow and steady when cutting around things like table legs and the water drains
If water gets in underneath it risks weakening the glue.
Around the edges, that’s easy to deal with using a contact adhesive, but I’ve heard it can create boils that are hard to get behind.
I hope that the flush residue of adhesive will act as a clean barrier to water penetration.
I occasionally catch a fish (not often, admittedly) but I hear that this flooring stains if you get fish blood on it.
We also eat in the cockpit most days so it’s just a matter of time before it gets oily food stains on it, and I’m not sure what the best product for cleaning it will be.
I worry that anything with bleach will degrade the foam over time.
And finally, the legs of the fold-out table and the scuba tanks provide points where there’s regular pressure on the foam and I worry that this will lead to permanent indentations over time.
Multitool tips for laying EVA foam decking
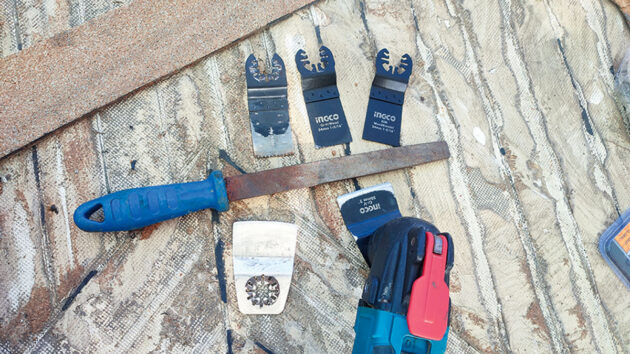
Andy found that rather than a serrated blade, a smooth blade on the reciprocating tool was best for cutting away the old cork
- Use the reciprocating tool’s tail to set the angle of the blade.
- It is the movement of the blade that does the cutting and applying too much pressure will trap the blade and slow your progress. Less is more.
- Rest it if it’s getting hot and don’t knock it about while it’s at temperature. Motor wires are more fragile when they’re hot.
How to remove and replace the cockpit sole: step-by-step

1. Measure up based on where the existing flooring lies.

2. Confirm your radius measurements are correct by checking with a pair of compasses.

3. Plan your layout to avoid having to butt the ends of sheets together – if that can’t be avoided, plan to have them hidden away from view.

4. Rip up the old flooring to leave a smooth, flat substrate.

5. Brush, mop and hose it down. Acetone wipe if appropriate.

6. Check the edges of your sheeting are square, and trim if necessary.

7. Cut out and dry fit your first sheet.

8. Holding the sheet in place with sandbags or body weight, cut out positive shapes like table legs and drainage holes.
9. Remove a corner of the backing and stick the flooring down, removing the rest of the backing from underneath a little at a time as you press the foam into position. Make sure you keep it aligned and flush to avoid kinks.

10. Line up and fit the adjacent sheets. Trim the shared edges to disguise any mismatch in length.
11. The cork cockpit sole before the replacement work was started.

12. The finished EVA foam floor.

How to fit Flexiteek decking: Swan 43 owner explains how he did it
When we bought Elisabeth, our Nautor’s Swan 43ft ketch, in 2006 she was already nearly 30 years old. At the…

How to apply KiwiGrip to your deck
Ben Meakins used KiwiGrip deck paint to refresh the non-slip on his boat’s decks last winter – but how well…
Fitting synthetic teak to a cockpit
Ben Meakins shows how he installed synthetic teak Dek-King seating

Boat wood: a complete guide for yacht owners
Boatbuilder and finisher Lyndon March explains which types of wood work best for different repairs and modifications on board
Want to read more practical articles?

A subscription to Practical Boat Owner magazine costs around 40% less than the cover price.
Print and digital editions are available through Magazines Direct – where you can also find the latest deals.
PBO is packed with information to help you get the most from boat ownership – whether sail or power.
-
-
-
- Take your DIY skills to the next level with trusted advice on boat maintenance and repairs
- Impartial in-depth gear reviews
- Practical cruising tips for making the most of your time afloat
-
-
Follow us on Facebook, Instagram, TikTok and Twitter