
Tony Moss and his wife, Marike, enhance the manoeuvrability of their Dufour 44 to make cruising life easier in their retirement years
Sailing into our 70th decade, my wife, Marike, and I were beginning to feel that our much-loved Union 36 Absconder, a 36ft heavy displacement cutter, was getting a bit too much for us.
Old bones needed more space and comfort, and the continuous maintenance was changing from a pleasure to a chore.
In addition, sailing in the increasingly crowded waters of the Netherlands and long-keeled without a bow thruster, she was sometimes frustratingly difficult to manoeuvre.
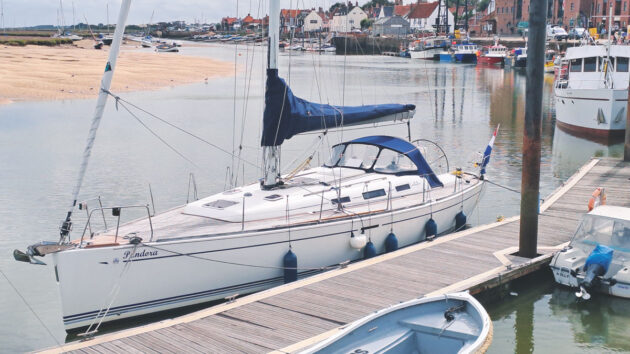
We did some homework but instead of opting for a nice little cabin cruiser, we upsized to a 2006 Dufour 44 Performance cruiser/racer.
She had lots of space and came with all mod-cons both above deck and below but the one thing she didn’t have was a bow thruster.
Tony and Marike’s beloved Absconder had become too much to handle. Credit: Tony Moss
However, the vendor assured us that with her fin keel and 50hp saildrive he’d never felt the need for one, although some scrapes in the gelcoat along the side hinted at a slightly different story.
Various sites on the internet generally confirmed his opinion and, because when we were viewing the boat, the temperature was -7°C, we took him at his word and signed the contract.
Some weeks later when the temperature had risen to a balmy +3°C we motor-sailed her to her new home in Monnickendam, northern Holland.
We were very pleased with her and despite some annoying undisclosed problems which I won’t bore you with, we felt sure that she was the boat for us.
But it soon became apparent that with any wind at all blowing from the side, she was awful to manoeuvre at slow speed.
Showing shallow forefoot. Credit: Tony Moss
And so, we sailed the whole 2022 summer season on our new boat, now called Pandora (because of all the surprises), going sideways into locks and backwards through bridges.
Turning short round in a confined space, even without wind, we found was almost impossible.
The reason for this is not difficult to understand: Pandora is very light with a tall mast, has a shallow hull, a maximum rudder angle of only 35° and the saildrive is a long way from the rudder.
‘Yes but they’re all like that, get a grip, Moss,’ I can hear readers cry, but Pandora is extreme and if you could get her through a lock with 10 knots of wind from the side and without whanging the wall I’d give you a coconut!
What we needed was a bow thruster… and I even ended up installing it myself!
This is how it went:
Primary considerations when installing a bow thruster
I discovered on the internet that there are loads of people who want to sell you a bow-thruster but there are far fewer people who are willing to install it for you.
Another difficulty is trying to decide, from the avalanche of well-meant advice from professionals, friends and family, which type of thruster to buy.
There are three basic choices: jet, tunnel and retractable.
Opinion is divided on which is the best and I think it all depends on your priorities.
Jets are great but they require large battery banks and are heavy and noisy. However, they are easy to install, reliable and safe.
Tunnels are the industry standard, but they are often noisy and must be mounted deep enough to be effective, and as far forward as possible. They may also cost some valuable speed.
Sleipner test rig at home. Credit: Tony Moss
Retractables are more complex and difficult to install, but they are quiet and efficient and there is no loss of streamlining under water. They are also a magnet for stray ropes!
Price is of course not a minor consideration, and I do not want to even try a comprehensive comparison between all the various types and manufacturers, but here are some ball-park basic retail prices as they applied to Pandora (13.5m, 10.5 tonnes):
- Jet €10,500 (£8,896)
- Tunnel €3,000 (£2,541)
- Retractable €7,500 (£6,354)
All are 12V, 90 to 100kgf models and inclusive of VAT, but do not include installation, batteries and all additional modification materials.
The Dufour 44 has a very shallow and flat-bottomed cross section at the bow which makes installing a tunnel bow-thruster a non-starter.
We rejected the idea of a jet because of the cost and weight of the necessary 300Ah battery capacity although, to be fair, for a few years Dufour fitted jets as their standard thruster option.
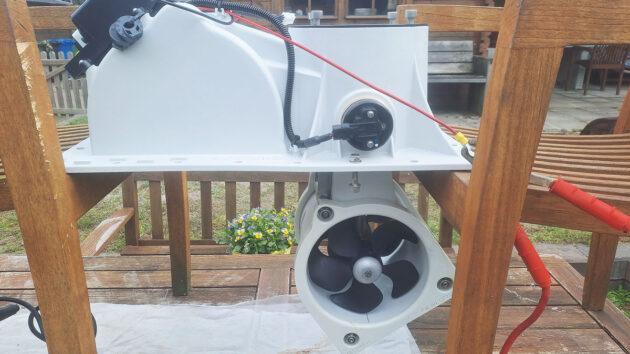
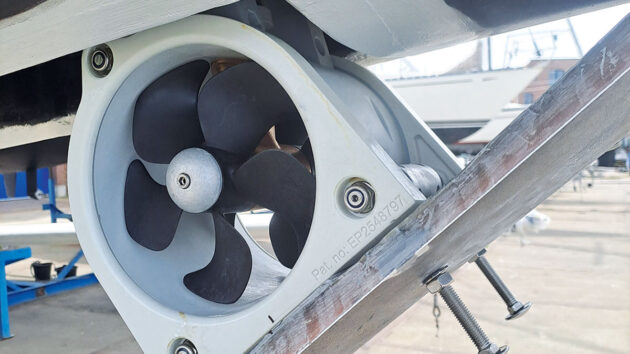
This left the retractable option and we eventually settled on the Sleipner/Side Power SRV 100kgf 12V and set about finding someone to install it.
The consensus was that this was an operation that required a professional to install, and so in the autumn of 2022, we set about finding one.
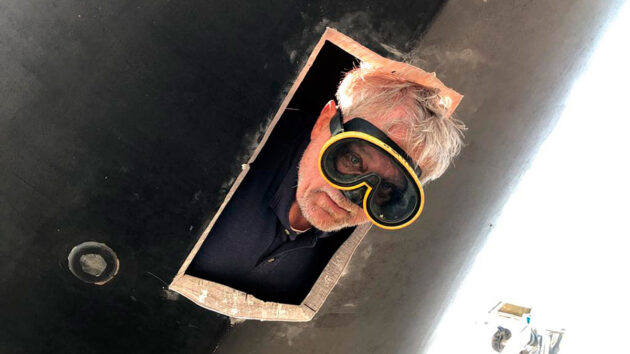
Observation hatch. Tony Moss
We asked a specialist thruster company for a quotation, but they told us in very colourful language that they no longer installed retractables.
This was apparently because installations resulted in too many technical problems, cost overruns and guarantee work which made it not worth their while.
One company in Germany was prepared to do it for an agreed price but we would have to get the boat to Hamburg.
Two other Dutch companies gave us a quotation but only on the basis of an open-ended calculation of time and material and they had no idea of when they could do the work.
The final quotation, also open-ended, was made by a company that would only do the electrical work; the physical installation would be subcontracted to a specialist.
It transpired that it contacted the first company we had spoken to, and he was too busy.
All of the above quotations were for sums in excess of €19,000 (£16,098) in total, including the thruster and VAT.
So, during the winter I studied all the available literature, watched countless YouTube videos, spoke to several Dufour owners and decided I could do it myself and in April 2023 I got stuck in.
On the brink
The worst part of the whole experience was at the very start. It felt very similar to when I was a teenager, standing on the edge of a 10m diving board for the very first time and trying to pluck up the courage to dive.
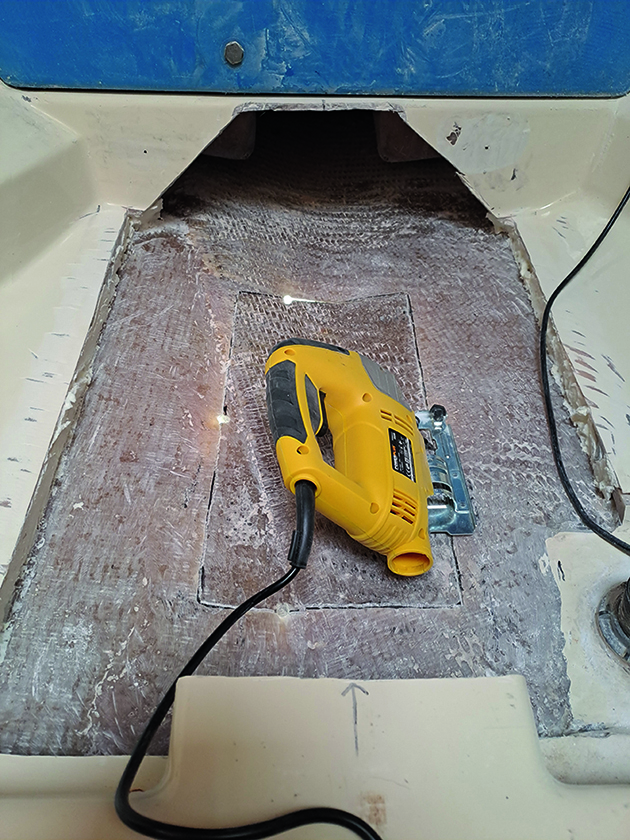
However, after 10 minutes of paralysis, I plunged the jigsaw into the pilot hole and began cutting the hole in the hull.
The cut must be made at 45° to the horizontal so that the cut-out piece can function as the hatch for the unit when it is retracted.
‘Tricky’ sums it up. The hatch, with its chamfered edges, must absorb all the considerable slamming forces of a heavy sea and not transmit any force at all to the thruster unit itself.
I was amazed at how thick and hard the laminate of the Dufour was and the jigsaw blade kept bending and blunting, requiring several changes of blade.
This made making a straight cut very difficult and, while from the inside, the cut looked reasonably straight, from the outside there were straight bits but several obvious wobbles.
If I was ever to do this again I’d make a series of pilot holes and cut from the outside using a reciprocating saw.
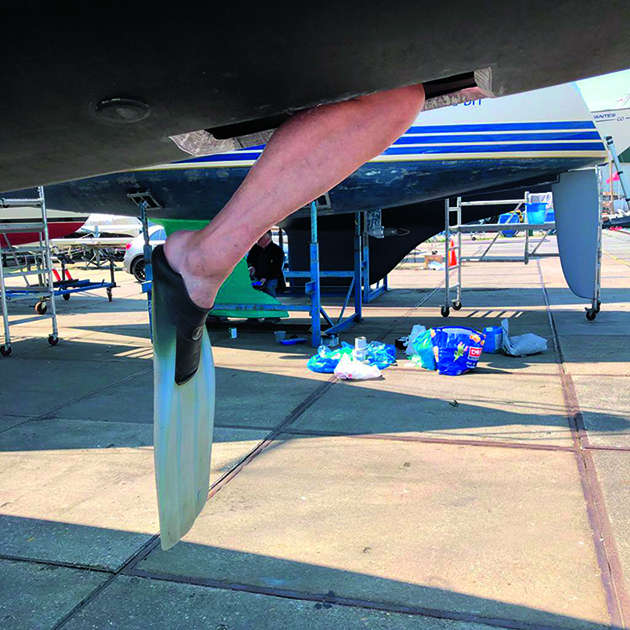
Manual bow thruster! Credit: Tony Moss
I would certainly think twice about fitting a retractable in a vessel with a sandwich or very light hull laminate.
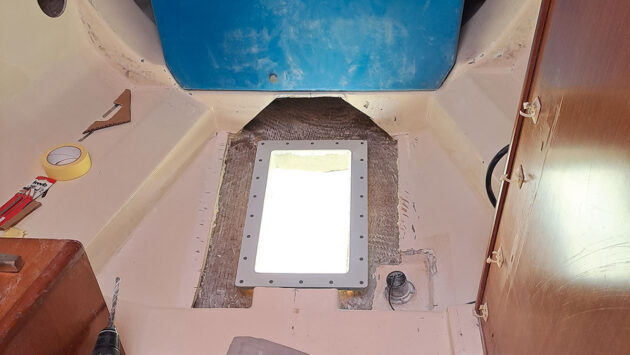
After thoroughly sanding and degreasing I mounted the frame in position with J-B Weld epoxy which I cannot praise highly enough. No boat should be without it!
Laminating the frame with glass and epoxy was not so much difficult as messy.
I had to work almost blind underneath the flange of the frame and my cunning plan to use a shaving mirror and torch was a failure from the start.
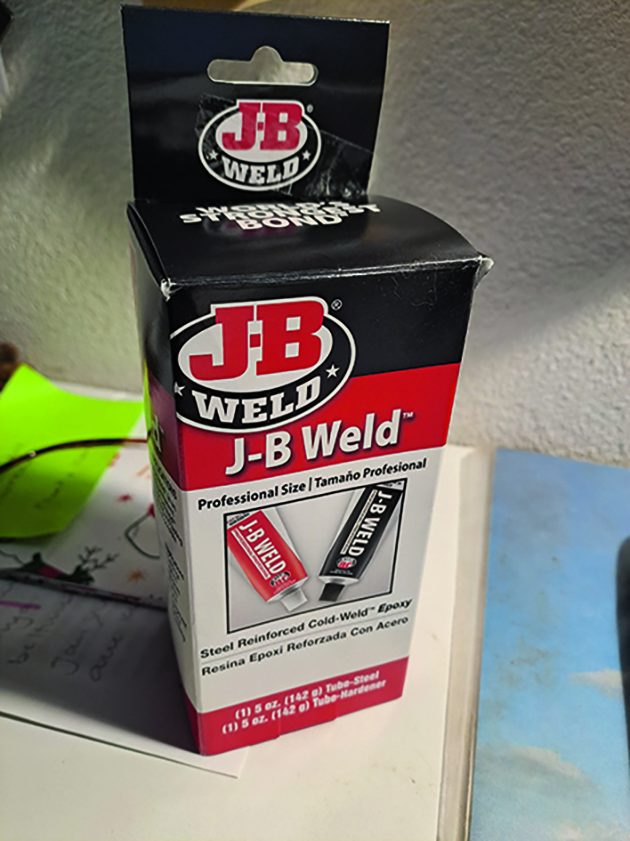
J-B Weld steel reinforced epoxy glue
Within a minute everything was covered in epoxy, and I gave up.
Wearing long surgical gloves and doing everything by feel, I bonded the frame wet on wet with a friend feeding me with impregnated glass strips one at a time.
I built up five layers of glass on the inside and two on the waterside of the frame and left it to harden for a day.
Then two more layers of glass on the inside. I have no doubt that there are air bubbles in the laminate and, if you could see it, it would not look very professional.
But you can’t see it, and it is a massive layer, so what the eye doesn’t see etc.
Sleipner provides a test mode for use during installation with which you can extend and retract the drive unit and test to see that the hatch opens and closes smoothly into the hull.
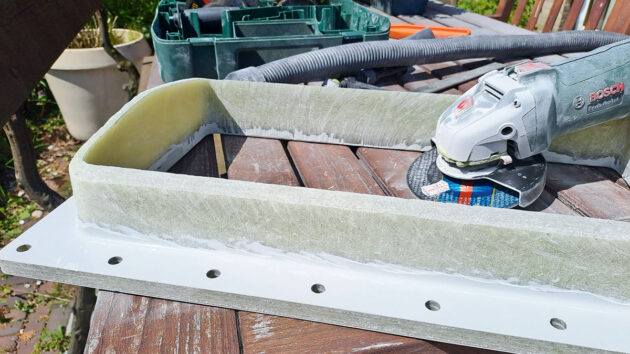
Grinding the mounting frame to fit the hull profile. Credit: Tony Moss
Getting this right is essential and I found that even after following the installation instructions to the letter, I still had to grind away part of the forward end of the hatch to avoid binding.
I also modified the mounting bolts to give me more precise control of positioning the hatch.
Then, satisfied that all was working properly, with lots of Sikaflex and more J-B Weld I bolted everything in place.
Discussion groups on the internet offer a dozen different ways of powering thrusters with Sleipner only advising a minimum of 50Ah supply at 12V.
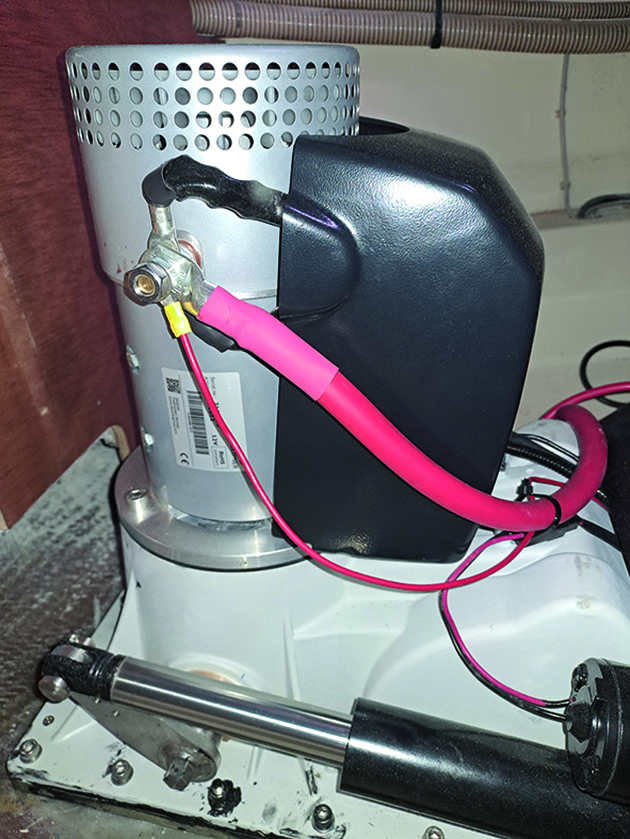
The bow thruster motor takes around 400A of current and big fat power cables with an isolator switch and a hefty fuse are needed to supply this.
I installed two Red Top 50Ah batteries and also tapped into the anchor winch supply to give an extra boost when the engine is running.
A power diode ensures no reverse current drain and allows charging the Red Tops automatically from either the engine or shore supply.
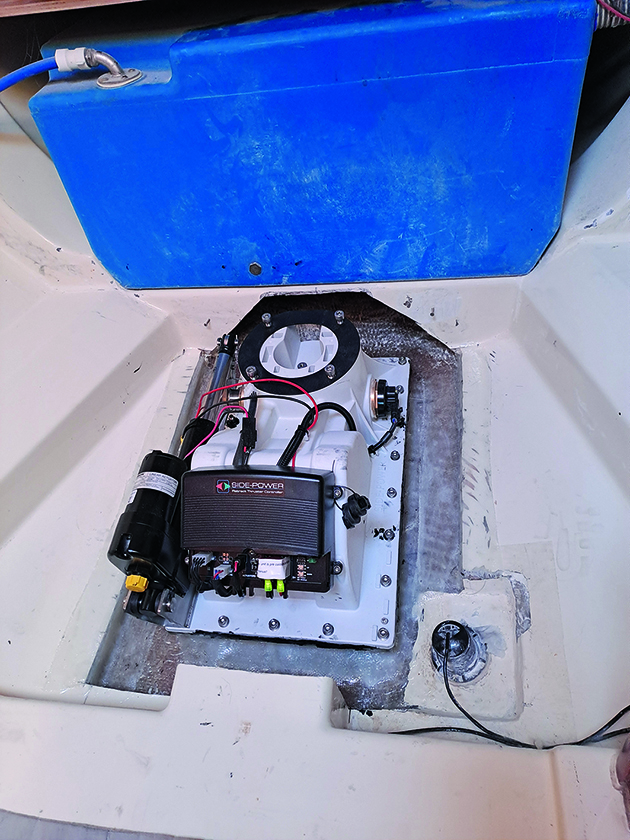
I wired up the control panel close to the engine control lever and ran the cable all the way to the bow through the air heating conduit.
Simple. And that was it!
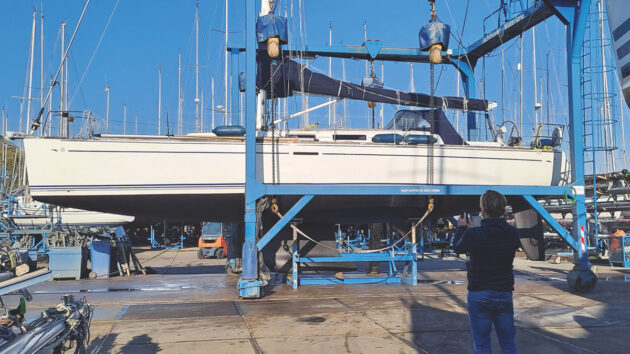
A bit of hull paint and antifouling and we were done.
Before we put Pandora back in the water, I took a few days off to recover.
Bending, kneeling and climbing the ladder on and off the boat had taken its toll. I calculated I’d climbed the equivalent of Ben Nevis in the 18 working days it took me to finish the job.
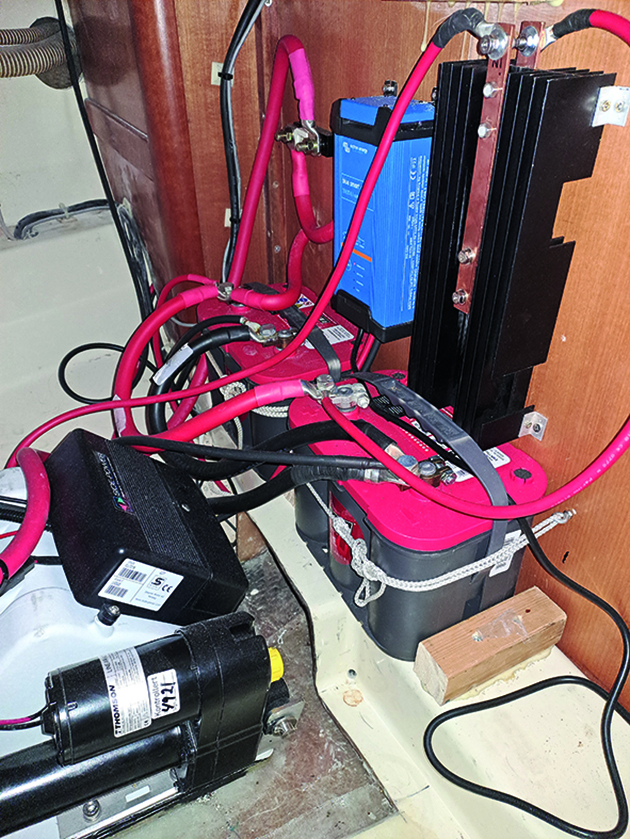
Batteries, 220V charger and diode heat sink
Cost effective? Was it worth it? Oh yes!
The thruster is terrific: powerful, quiet and simple to use. That summer we sailed in the crowded Dutch waterways, and then over to the East Coast and visited Lowestoft, Wells, Grimsby and Scarborough.
Mooring with a stiff breeze from the side is no longer something to dread. Next year – Scotland!
To sum up: I spent €8,500 (£7,200) on the bow thruster and hardware; harbour and crane costs were €450 (£381); and my time calculated at a professional rate of €75/h for I8 days at 6h/day was €9,750 (£8,259).
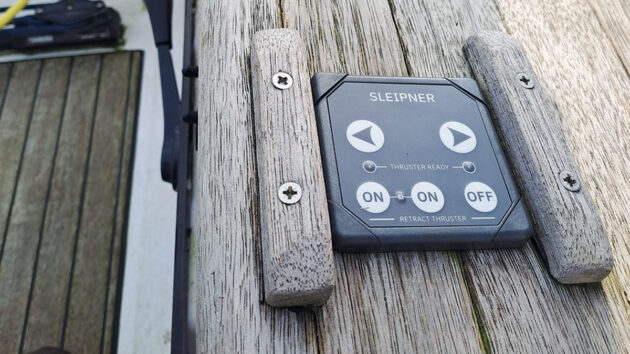
Control unit close to throttle handle
I could have done it more quickly but I was learning on the job and I’m not as young as I was. I can also now see how companies arrive at their hefty quotations.
Would I do it again? Not willingly, but a handy amateur can do this if they plan well and take the necessary time.
The job required no special tools, and it saved me nearly €10,000 (£8,471). I still get a big kick thinking to myself, “You did it!”
DIY bow thruster installation in a nutshell
The thruster unit was to be installed about 3m from the bow and under the bed in the sail storage space.
I spent a week of preparation dismantling the bed, putting up dust sheets and cutting away the inner fibreglass shell to expose the hull moulding.
I drew up a basic plan and marked out the position of the thruster leaving as much room as possible for working space around the unit.
I never forgot the adage ‘Measure twice, cut once’ and my plan was quite simple, as follows:
Taking the plunge – no way back
1. Deep breath… start by cutting a big oblong hole in the bottom of the boat.
The hole with the foundation frame in place
2. Laminate the foundation frame into position with glass and epoxy.

Aligning the hatch with my granddaughter’s Plasticine
3. Temporarily mount the thruster onto the frame from above and connect to a 12V supply.
Hatch extended and in position with temporary bolts
4. Temporarily attach the hatch to the thruster drive unit and test, test, test.
Bow thruster in position without motor
5. Permanently mount the thruster unit and permanently attach the hatch.
Thruster unit with motor and heavy-duty cables
6. Worry about sorting out the electrics later.
Expert opinion
Sleipner Group responds: “We always recommend having GRP and electrical work performed by professionals to ensure safety and structural integrity. However, depending on local regulations and insurance requirements, skilled individuals can manage these projects, as demonstrated in this article.
“Regarding the electrical part, it’s crucial to also focus on cold cranking amps (CCA), which measures the battery’s ability to deliver high current consistently. High and steady voltage is essential for optimal performance. Often inferior performance is due to incorrect batteries and/or too thin battery cables.
“Make sure to meet the minimum requirements to get the full thruster performance. Battery size (Ah) depends on desired run-time and other equipment using the same battery bank. A separate battery for the thruster often requires a smaller pack since thrusters run briefly between charges. Maintaining steady voltage with the right battery is key
“Different battery technologies may suit different motor designs, so ask an expert. We have exterior thruster models perfect for retrofit that require no GRP work, for bow or stern installation in sailboats and non-planing motorboats of up to 50ft.”
How to replace ageing through-hull fittings
In preparation for an extended voyage, Kerry and Fraser Buchanan replace all below waterline through-hulls with composite fittings

Gelcoat repair: How to make an invisible repair
Everything you need to know to make an invisible gelcoat repair, from preparation and filling to topcoat and polishing

Milky oil in my saildrive. What do I do?
While changing his engine oil, Chris Mardon noticed milky oil in his saildrive. Will it have caused damage to the…

15 boat fixes at sea: sailors share how to deal with torn sails, rudder damage, chafe & more
Transatlantic sailors tell Ali Wood how they used their ingenuity – and sometimes bravery – to cope with emergencies on…
Want to read more practical articles like Retrofit a bow thruster?
A subscription to Practical Boat Owner magazine costs around 40% less than the cover price.
Print and digital editions are available through Magazines Direct – where you can also find the latest deals.
PBO is packed with information to help you get the most from boat ownership – whether sail or power.
-
-
-
- Take your DIY skills to the next level with trusted advice on boat maintenance and repairs
- Impartial in-depth gear reviews
- Practical cruising tips for making the most of your time afloat
-
-
Follow us on Facebook, Instagram, TikTok and Twitter