Dena Hankins and James Lane show their Monitor wind vane self-steering gear some love and learn that patience is a virtue
Wind vane self-steering gear is famously rugged, famously fiddly, and really intimidating when you first look at one, writes Dena Hankins and James Lane.
It requires little maintenance—mostly a rinse and a sharp eye for chafing lines – and no electricity.
It works best when the boat is balanced and well-trimmed, steers most closely on track when the wind is steady in both velocity and direction and cannot (yet) be adjusted by an electronic chartplotter…all of which are true about sails too.
Events like the Jester Challenge demonstrate year after year how useful wind vane self-steering gear is on short-handed boats going the distance.
So why would any sailor give up on theirs?
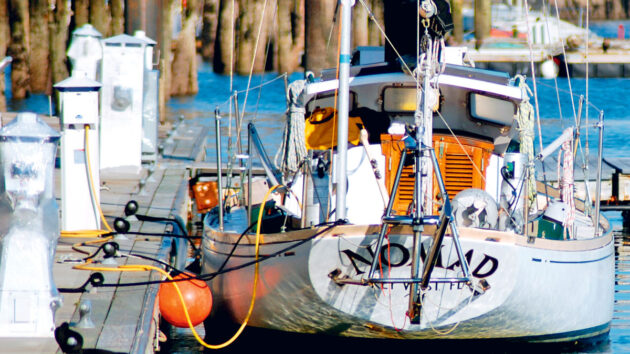
The Monitor wind vane self-steering system, called Flo newly installed on Nomad in Boston 2014: Nomad’s transom is small but Flo fits quite well. Credit: James Lane
Many sailors obtain their wind vane self-steering gear when buying a used boat with it already installed.
Learning to operate self-steering gear is more frustrating if it has been weathered, on the water, and perhaps even used.
The proud new owner of used gear should, at a minimum, thoroughly clean the apparatus.
With older self-steering systems, they’re more likely to end up with an affectionate nickname if you undertake a complete rebuild right out of the gate.
Why put in the work?
We set off on our first offshore adventure down the West Coast of the US, from Puget Sound to San Fransisco Bay, with a traditional hank-and-hoist rig and no autohelm on our 15m/49ft wooden ketch, S/V Sovereign Nation.
The two of us stood our four-on/four-off watches with the grim determination of the greenhorns we were.
Lesson one: get an autohelm and lose the resting cry-face! We shopped around for a couple of years while we repaired all the gear we broke sailing down the coast.
Because of her tonnage, an electric autohelm was too expensive, and Sovereign Nation’s beautiful wine-glass transom of teak and mahogany had us chewing our nails over whether to install a wind vane self-steering system.
In 2004, we sold that boat, bought a 1989 Gulf 32, and fell in love with sailing.
The yacht came equipped with an Auto-Helm belt-driven electric system that was loud, ate power, and wandered terribly in a sloppy sea.
There were no brand-new wind vane gears with the performance we needed at the price we could pay comfortably, but we landed on the Monitor wind vane and did our due diligence.
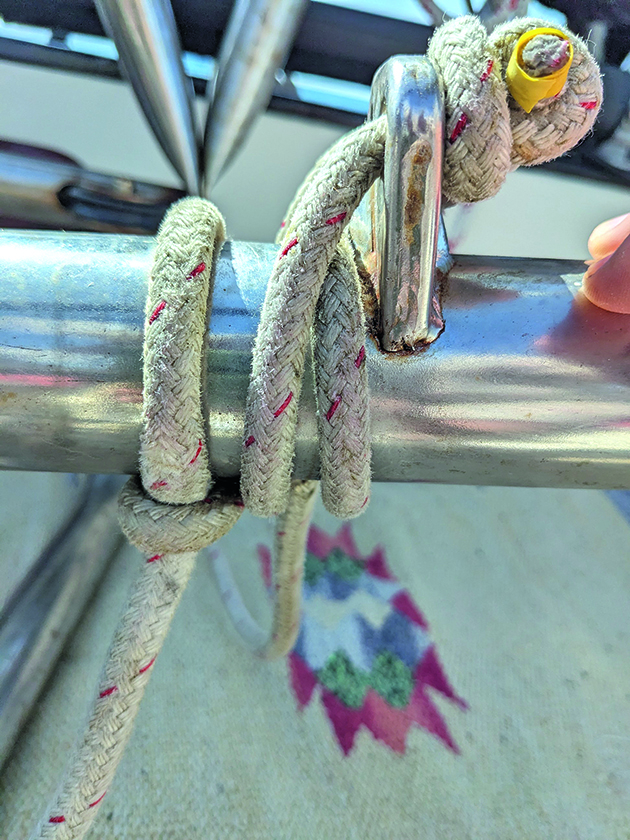
Half-hitches to line up the control lines: This is not the recommended way to run the lines unless, like ours, your frame has a significant bend in it. Credit: James Lane
At their factory in Richmond, California, we talked to the inventor. He showed us the Gulf 32 page in their giant book of installations and we walked out with a brand-new Monitor-sized hole in our budget.
At first, we were incredibly intimidated by the whole thing.
With all those gears and rods it is one of the craziest whiz-bang gizmos you could imagine.
It sat in the pilot’s berth for a few months while we practised sail trim in the San Francisco Bay.
Ultimately, we bit the bullet, drilled holes, and did the installation.
We put Monty (yes, we name them) through its paces up the California Delta and down to Monterey before it drove us to Hawaii in 2005.
We’ve been fans of that brilliant piece of kit ever since, and have gone on to own two more Monitor wind vanes.
We found the second one, Flo, in a pile of stainless-steel tubing at a chandlery in Rhode Island and we wasted no time installing it on our 1961 Rhodes Chesapeake 32.
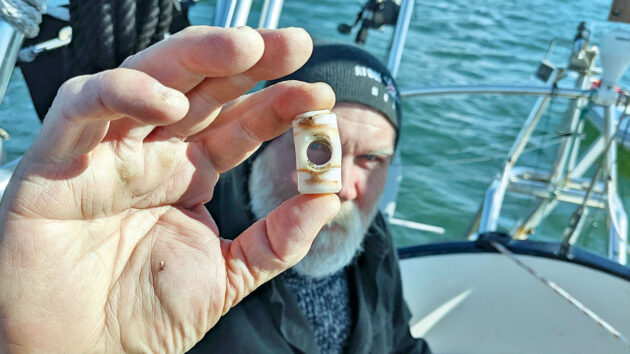
We replaced this warped bearing while moored at Stonington, Connecticut, and yes, we did lose a retainer ring over the side! Credit: Dena Hankins
Flo steered us up and down the US East Coast for nine years and thousands of miles.
On our 1984 Baba 30, the Monitor wind vane had long since been replaced by davits but, because the seller had mentioned it in the ad, he was forced to ransack his garage to find it for us.
LoveBot, that third Monitor wind vane, sat in a sail bag on our foredeck for a year.
Installation wasn’t very high on the list of projects as we sailed in the protected waters of Maine’s Casco Bay, but when we took her offshore and stood watches hand-steering again, it became job one.
We sold the folding davits and the broken auto-helm, installed our LoveBot, and returned to travelling in comfort and style.
If only it had been that simple.
Teething troubles with our monitor wind vane
The original Monty, the one purchased new, got us to Hawaii and between the islands with no more work than replacing chafed control lines.
Flo, the second, cost us one-sixth the money and, after installation, gave us several years of travel, on top of whatever the original owner had put it through before a slowly growing stiffness in the system signalled the need for a rebuild.
Flo is still going strong with the new owner of that beautiful good ‘ol boat. LoveBot is a different mech-animal altogether.
Though the price was right because it came with the boat, it was badly abused by a previous owner of our (now electric) Baba 30.
The water paddle was creased and bent where it had been backed into a dock at least once.
The frame had taken a beating too, between the dock-hitting and the garage-dumping.
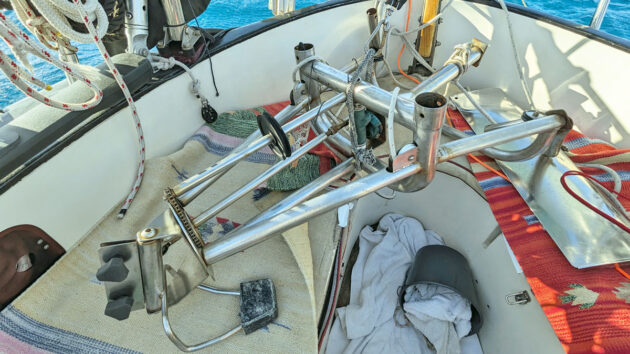
LoveBot is in the cockpit of Cetacea and ready for the rebuild. Credit: James Lane
Without a load, though, the bearings and bushings seemed to be doing their jobs.
At first, the bend in the lower part of the frame didn’t seem to matter because it was even on both sides, but it turned out we were being a bit naïve.
The bend fouled the control lines’ fair lead from the pendulum strut to the lower sheaves and that misalignment chewed up the lines in short order.
After a few months of replacing lines and staring at it, we came up with the fix: two stacked half-hitches on the pendulum strut that recreate the fairlead.
We haven’t replaced the control lines since!
During our electric motor conversion, we got rid of the wheel steering and went back to a more practical and traditional way of steering the boat– a tiller; this made it easier to loosen, tighten, and make fine adjustments to the control lines.
We tested the whole rig when we sailed from Florida to the Azores, Maderia, and then the Canary Islands.
Now, after over 8,000 miles travelled since we reinstalled it, it’s time for a complete LoveBot rebuild.
When to commit to a rebuild I love watching the Monitor wind vane do its job and by far the most important preventative maintenance tool is observation.

For an easier service, make sure you study and read everything. Credit: James Lane
The Monitor wind vane is a rugged system with simple needs: a good fresh-water rinsing daily while under way and shifting the control lines every few thousand miles to change the possible chafe points.
With a benchmark of good performance, the experienced user will notice degradation in several ways.
The actuator shaft bearings (visible in their forked clevises) are consumable parts. They take a heavy stress load, are exposed to the sun, and eventually get sloppy as the constant motion wears them down.
The roller bearings and ball bearings are in somewhat loose spaces so that salt and dirt will rinse away for quite some time… but not forever.
The air vane may need heavier and heavier winds to tip it sideways, the reaction through the actuator shaft might slow down, or the water vane pivot shaft may begin to resist turning in the pendulum strut.
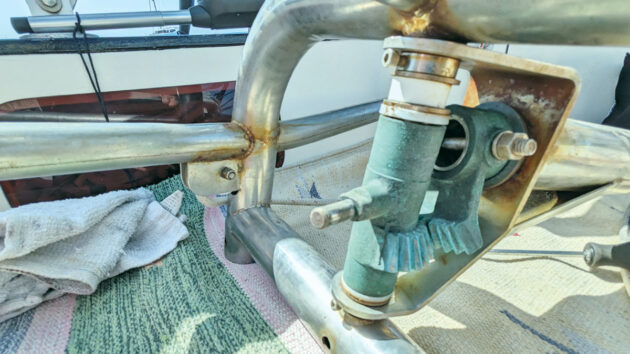
The gears come off with the pendulum strut. Credit: James Lane
These are all signs of wear, but worry not: visual inspection and touching the moving parts can provide quite a bit of information.
The actuator shaft bearings should be a strong black colour. Too much fading means they are brittle; white ones are very old.
Some scoring from the clevis forks is fine but deep scoring or any malformation means a replacement is in order.
If the roller bearings between the pivot shaft and pendulum strut bind due to wear, rust, or dirt, a subtle rumble can be felt through the stainless steel strut.
The ball bearings in the wind vane are harder to assess by feel because the forces they respond to are so slight but, if a light touch to the top of the air vane doesn’t overcome the pendulum weight, the state of those bearings might surprise you.
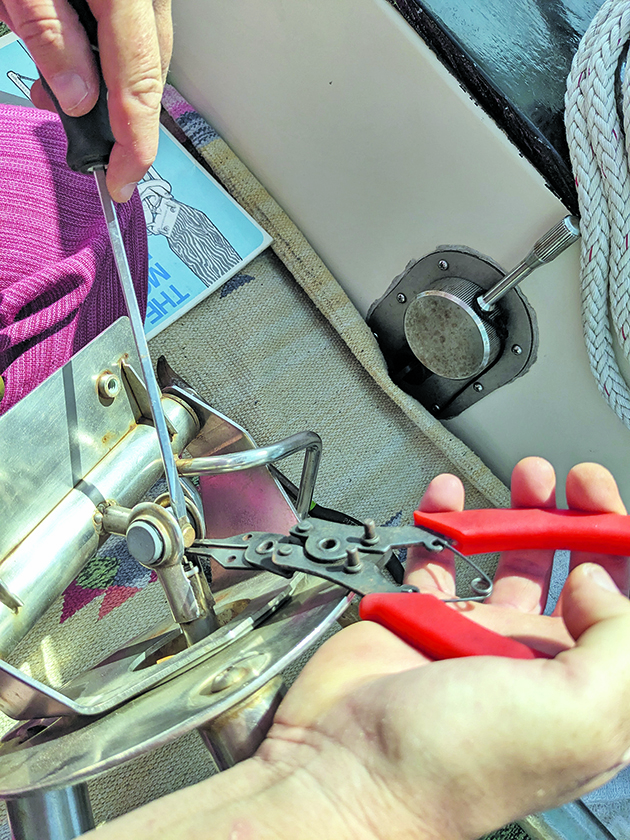
Actuator shaft removal: Mark the threads if you will put the actuator shaft back in the same position, then break the locknut loose. Credit: James Lane
If the gear shows two or more of these signs, commit to a full rebuild. It will save labour in the long run; keeping old parts which have life left in them for emergency use means there’s no real waste.
While sailing from Madeira to the Canary Islands, LoveBot developed a squeak, which turned into a groan and ultimately became a painful lament that was utterly impossible to share the cockpit with.
To relieve the tension, we sprayed it down with fresh water about four times a day but even that stopped working.
Finally, we diluted dish soap in a spray bottle and coated all the sheaves.
With a heavy fresh water rinse after, the wailing abated for a few days but it was the final sign that LoveBot was long overdue for a complete rebuild.
Preparation is key
If, like us, you work on your vessel at anchor in your favourite exotic places around the world, rather than a marina or workshop, preparing for a rebuild takes a level of situational awareness you might not be used to in a controlled environment.
Stuff cockpit drains, scuppers, and hawsepipes with rags, put a towel over the teak cockpit grating, and have an overabundance of towels at hand for those unforeseeable eeks and oozes.
Next, remember that if it was built by a person it can be fixed by one. Nothing about this project is undoable but it takes patience, diligence, and attention to detail that most people outside the sailing community can’t even comprehend.
This project is the very definition of a practical boat owner’s dream come true so… get your tools together, and get to it.
Hard-earned lessons for a successful Monitor wind vane rebuild
It’s important to note that assembling your Monitor wind vane self-steering gear is not a demolition; as much care should be taken in the disassembly of the unit as with the rebuilding.
Note that all the numbers mentioned below are taken from the Monitor wind vane parts list and diagram.
While Scanmar recommends taking the unit off at the hull brackets, the frame alone is a lot lighter and more compact, making it easier to manoeuvre into the cockpit while at anchor.
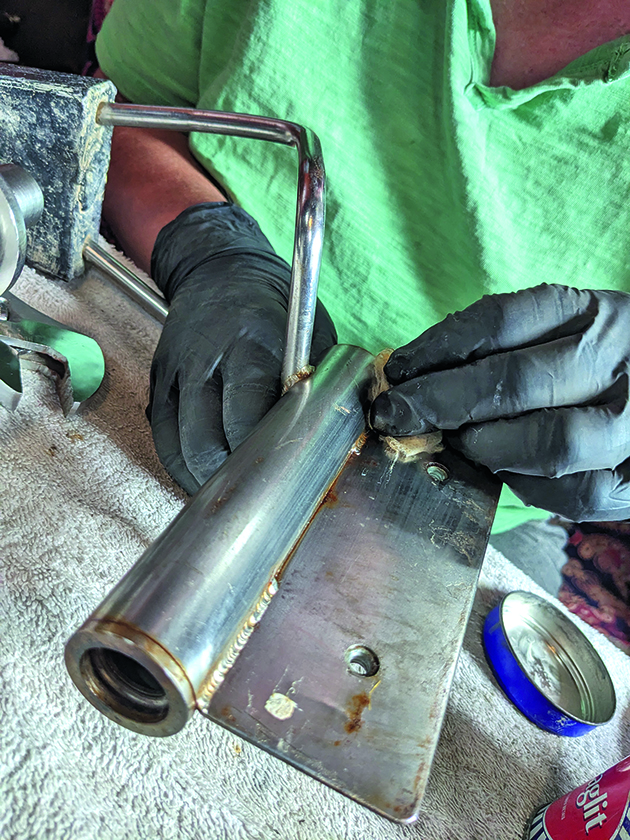
The cleaner it gets, the better it works. Credit: James Lane
Before we removed any of the bolts, we took all the weight off the joints with a 4:1 block and tackle on a soft shackle around the body.
The actuator shaft (57) has cylinder-shaped bearings at each end (54) that contribute to sloppiness in the system as they wear.
They are held in place by retainer rings (also called C-clips, 55) that are so much fun to remove that the rebuild kit supplies extras and the manual refers to them as potential UFOs.
Actuator shaft bearings are the parts most likely to need replacing ahead of a full rebuild, so this process might eventually be performed with the gear on the transom, meaning that having some practice in a controlled environment could help keep everyone calm.
When you get those off, the top, plain clevis (81) and its bushings (74) are loose on the actuator shaft, so slip them off and keep them in a safe place.
The threaded clevis (80), on the other hand, is unscrewed from the shaft after loosening the locknut.
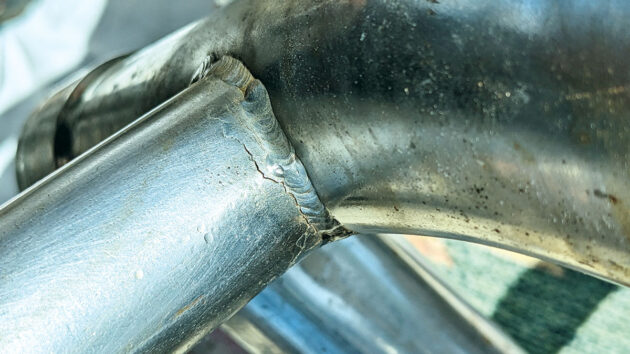
Cleaning can reveal unexpected problems like cracks. Credit: James Lane
If you’re not replacing the gears, mark the threaded clevis’s original position for accurate reassembly.
The two Delrin rings that act as bearings between the air vane yoke (8) and the disc base (11) are not part of any rebuild kit and, if lost, will become more important than is reasonable. Keep them safe.
When removing the pendulum strut assembly (260), be aware that the water vane support shaft (33) holds the pendulum strut in place but also goes through the pinion gear (36), its roller bearings (31), and the important, specifically-placed spacing washers (29) that bring the gears together correctly.
Catch the whole mess in a basin or on a towel as it comes free of the frame.
If not replacing the gears and you are satisfied with the forward-and-aft placement of the pinion gear, make careful note of the thickness and placement of the spacing washers.
Elbow grease for a mirror shine
Now that the Monitor wind vane is down to its component assemblies, it’s elbow grease time.
Cleaning can take as much or as little time as you like but we recommend that you polish everything until your hands are aching.
With heavily-abused gear like poor LoveBot, polish long enough and you might find an unexpected crack.
Without access to a welder, we applied West Systems G-Flex epoxy. When we get access to craftspeople, we’ll get back to that one.
Rebuilding the air vane welded assembly (501) is an infamously frustrating process but not complicated.
It is best done in a controlled environment like a saloon table, with a towel or basin ready to catch runaway bearings.
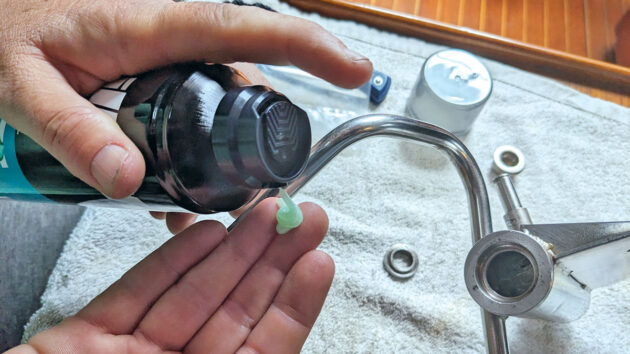
Shaving cream holds the ball bearings in the bearing cups. Credit: James Lane
As the shaft (6) clears the yoke (8), the bearing cones (2) at each end will fall out, along with the tiny Delrin balls (3) on each end.
The bearing cups (4) may fall out of the assembly but that is not a problem unless they fit very loosely when pressed back in.
Do not skimp on cleaning these parts. Reintroducing the ball bearings can inspire creative profanity.
Take it slow, keep the cat out of the mix, and try to smile. Apply a small amount of shaving cream or other water-soluble paste to one bearing cup.
The Delrin balls must stay in the cup until all 18 are in place and the cone covers and traps them.
Bearing cups that have fallen out are easier to work with because a finger in the gap keeps dropped balls from falling through, and the completed bearing sandwich can be pushed, intact, into the end of the assembly.
If the bearing cups are too well-seated for easy removal, there is an excellent chance that one or more of the balls will fall through during application, regardless of the shaving cream.
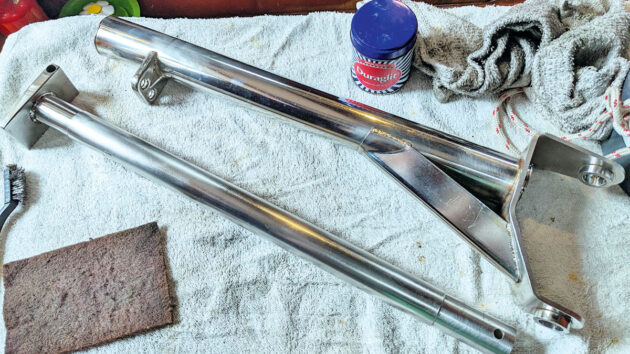
A perfect shine on the pendulum strut. Credit: James Lane
This is common and not dangerous, just a test of your patience.
Then, once one side is done, the cone must be put over the bearings and held in place with painter’s tape or by hand while the other end gets the same treatment, an even more frustrating time to drop a ball bearing since its egress from the assembly is blocked by that tape or finger.
The whole assembly, with the new Delrin balls trapped in each end by the bearing cups and cones, should slip within the yoke easily but not loosely.
The shaft should slide smoothly through the entire assembly.
One Nylock nut later, the assembly is ready for later reinstallation.
Rebuilding the pendulum strut
The pendulum strut assembly (260) is easier to rebuild but requires more cleaning.
Once the oval machine bolt (38.1) is removed and the ring gear is knocked or pried loose (gently, and with great patience), the pilot shaft will slip right out of the strut.
The black Delrin washers (41) and roller bearings (31) at the top and the bottom will be replaced in the rebuild so it is safe to let them fall.
On the other hand, keeping them out of the bilge is good because they’re perfectly sized to seize almost any bilge pump.
If not replacing the gears or changing their alignment, the number and thickness of the stainless steel washers should be noted for replacement later.
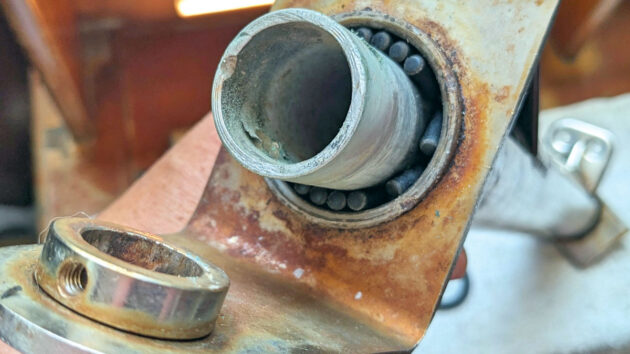
Removing the ring gear exposed rust and corrosion. Credit: James Lane
They determine how high the ring gear sits in relation to the pinion gear, so mistakes here add quite a bit of work.
We bought stainless steel gears to replace the well-worn bronze ones, and the spacing washers turned into a merry-go-round of trial and error. Avoid this fun if possible.
Only the paddle is more often submerged in seawater than the bottom of this assembly, so it needs serious cleaning.
Spend the time so that the new washers and bearings have a smooth life…for a while.
Any binding here will ensure that the paddle does not achieve enough of an angle to steer in low winds.
Getting the pendulum strut assembly (260) back on the frame again requires patience; follow the manual to a tee.
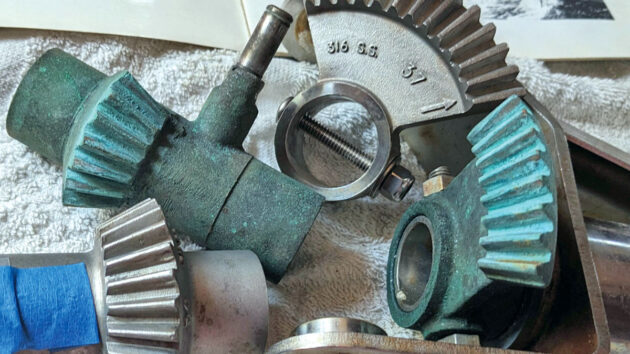
New gears will improve the performance, but they changed the number and size of spacing washers in the system. Credit: James Lane
If you know how many spacing washers are needed on each end, excellent.
If not, a dry fitting will get you close and might save you from having to do this process multiple times.
This isn’t like the cup and cone for the bearings on the air vane assembly.
Only the spacing washers hold the roller bearings in place between the pinion gear and the wooden dowel, and, during installation, that dowel must be pushed very carefully out by the shaft or the entire group of washers and bearings can fall apart.
Four hands are best, so draft in a partner or a friend and buy the drinks afterwards.
One person, lining up the set screw holes, slides the shaft in from the aft side.
The other pushes the pinion gear and washers into place, holding these pieces in a straight line.
The shaft slides through the spacing washers and then begins to displace the wooden dowel.
Keep your cool
This process demands a cool head. Too much force on the shaft can crush or misalign the bearings.
Pulling the dowel out ahead of the shaft allows all the fiddly parts to fall out of position.
If you’ve cleaned everything well and aligned the parts as closely as possible, the shaft should glide through smoothly.
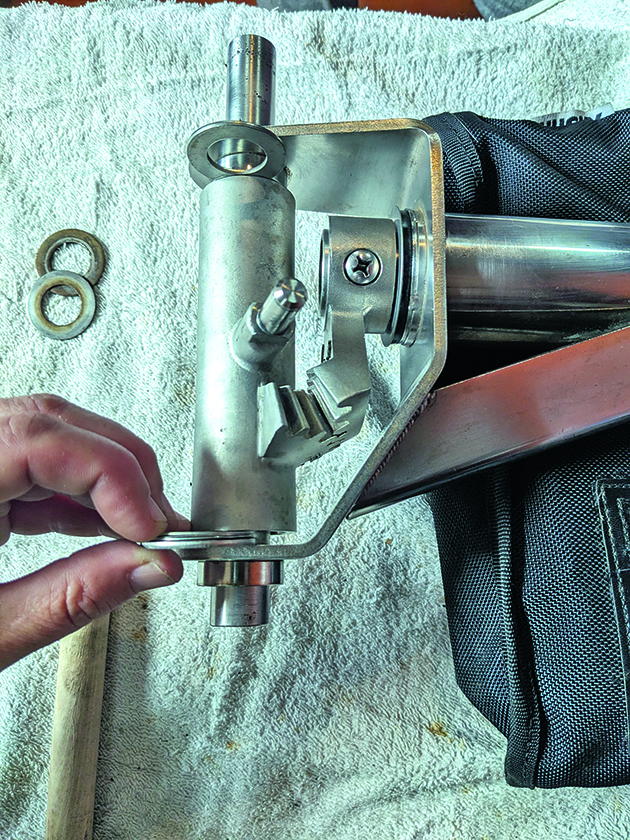
Mock up the washer arrangement before you try to assemble it to make sure there is not too much of a gap or too little. Credit: James Lane
The whole shaft slides through the forward section of the frame last, and the two set-screw holes should align.
If they don’t, do it again.
If you must reload the bearings three times (like we did) due to needing different spacing washers or allowing the parts to spontaneously disassemble, then that is just what it takes.
This is an achievable project and believe us, the calmer you are, the more likely you are to nail it in one.
Everything else is easy… Relatively.
Servicing a monitor wind vane: disassembly and cleaning
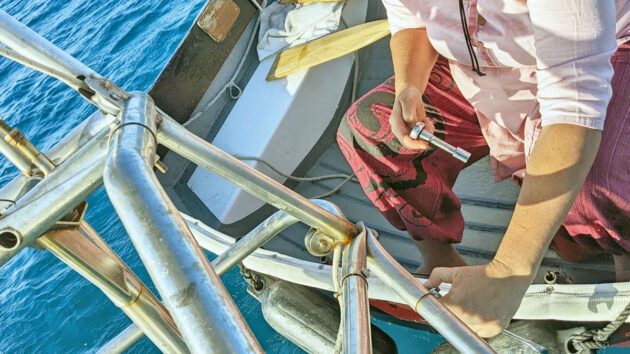
Credit: James Lane
1. Remove the water paddle/hinge assembly (601) at the hinge pin (76), unreeve the control lines from all inboard sheaves, and remove the Monitor from the transom.
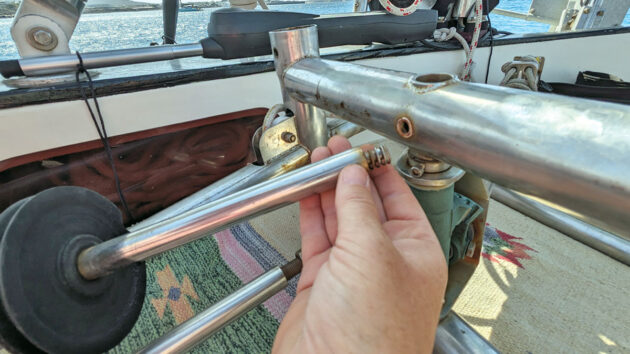
Credit: James Lane
2. Remove the upper components: the pilot shaft (20) (pictured), actuator shaft (57), and air vane yoke (9).
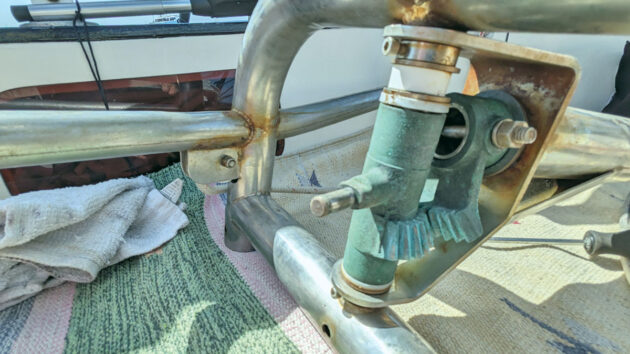
Credit: James Lane
3. Remove the pendulum strut assembly (260). Ensure you keep everything together.
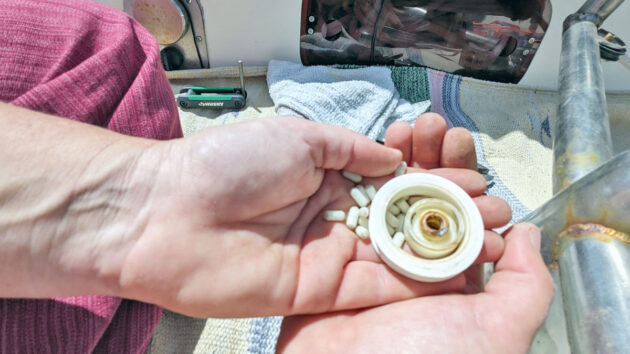
Credit: James Lane
4. Remove the control lines (reeve a mousing line for easy reinstallation) and the in-frame roller sheaves (49) at the top and bottom. Our sheaves were ancient and painfully squeaky. Don’t lose the stainless steel bearing block that slips out of the composite bushing.
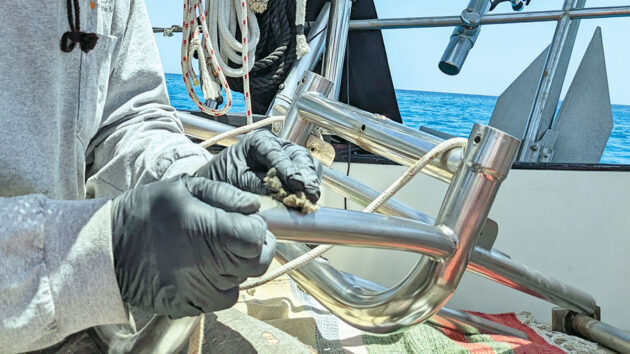
Credit: Dena Hankins
5. Clean everything – this is also an unspecified part of each assembly rebuild that follows.
Servicing a monitor wind vane: reassembly
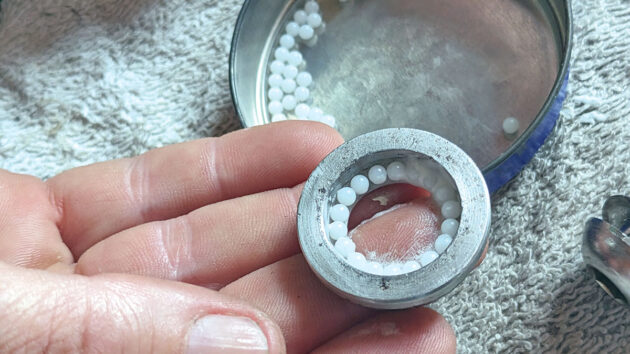
Credit: James Lane
1. Rebuild the air vane welded assembly (501). This is the shaving cream step to hold ball bearings in place while the bearing carriers are installed.
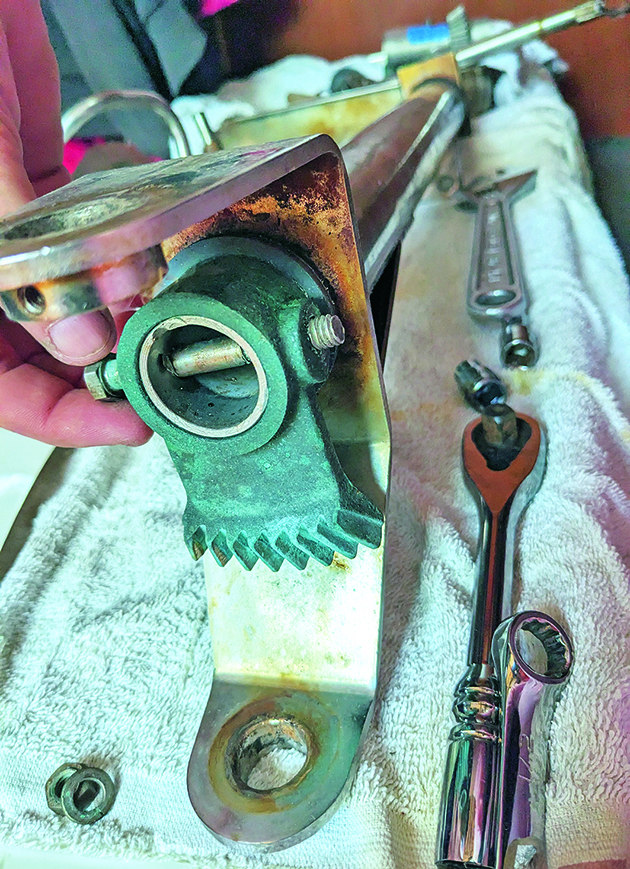
Credit: James Lane
2. Rebuild and reassemble the pendulum strut assembly (260) from the water vane pilot shaft (43) to the ring gear (37). The shaft should hold the bearings in place, but a pair of needle-nosed plyers may help if bearings fall sideways.
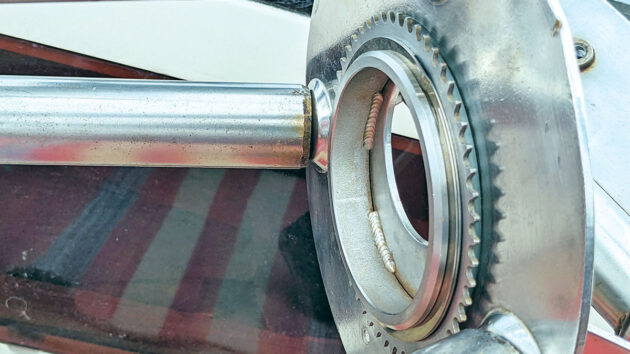
Credit: James Lane
3. Reassemble the upper air vane assembly: the air vane welded assembly (501), the yoke (8), the disc base (11), the pilot shaft (20), the chain (18), and all associated bushings.
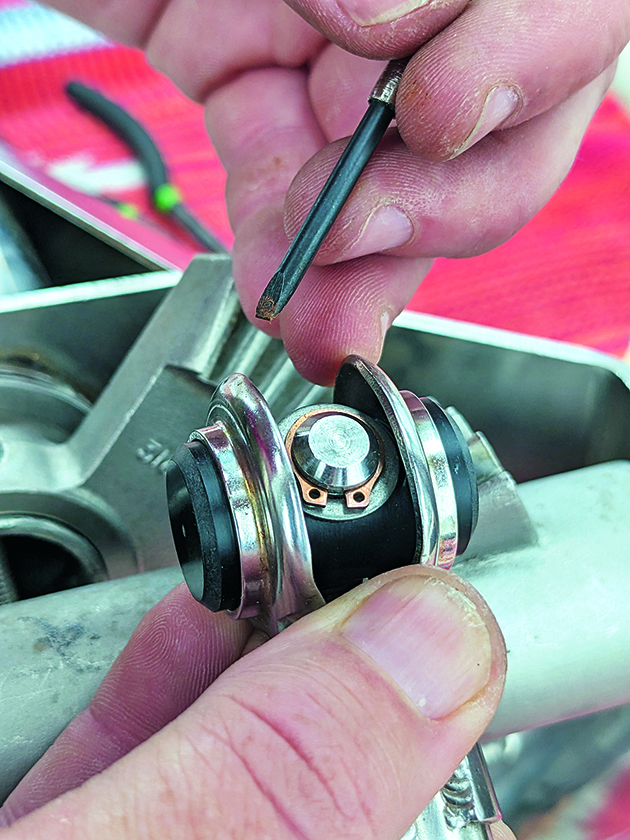
Credit: James Lane
4. Reinstall the actuator shaft assembly (501) and pre-adjust it.
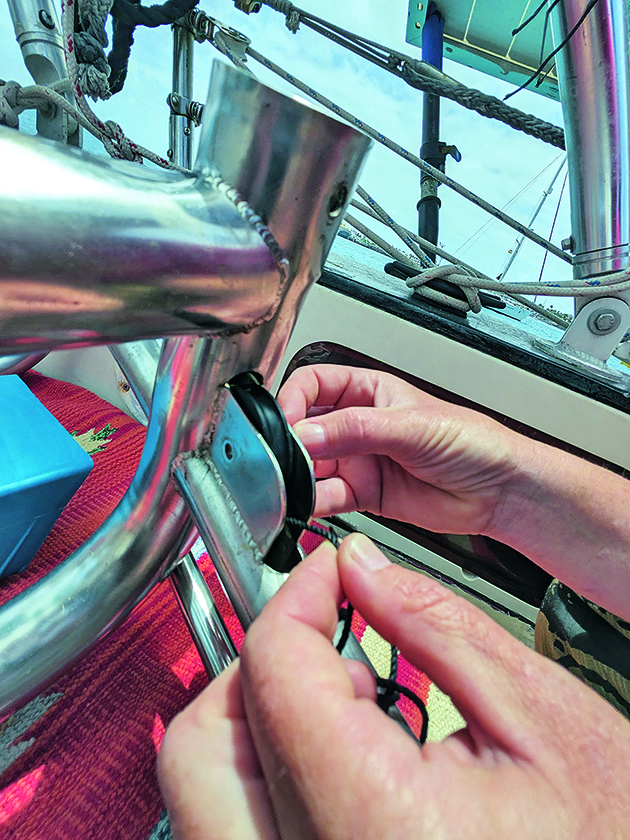
Credit: James Lane
5. Replace the sheaves and control lines. The mousing line can be useful for aligning the sheaves’ bearings with the mounting holes.

Credit: James Lane
6. Reinstall the Monitor on the transom and check the actuator shaft’s adjustment as per the manual.
Wind vanes: some common factors
Over a dozen companies make wind vane self-steering gear and maintenance varies, especially around where to apply grease, but common factors abound.
No manufacturer will discourage rinsing their gear with fresh water.
Our experience is that a garden sprayer gets the water where it needs to go without much waste. Rain is a big help, depending on your climate.
If you can access shore water, rinse your wind vane gear and all the other moving systems (blocks, furlers, etc) generously.
Remember to watch for chafe in your lines, especially lines that are the largest diameter that fit the system’s sheaves.
Loose fasteners can introduce motion into parts of the system that should be still or, even worse, put entire portions of the gear at risk of loss or breakage, so check them regularly.
The lubrication issue is far more complicated.
The manufacturers generally agree that grease introduced into a system exposed to salt water and atmospheric dirt will gum up the works. See your manual for actual instructions.
At one end of the spectrum, Aries calls for lanolin or petroleum jelly on all moving parts and the ratchet spring, while the Wind Pilot says to use WD-40 for the bevel gear axle, push rod universal joints, and worm gear, to use lanolin for screwed and bolted joints, but to get neither of those on bearings made of Teflon, thermoplastic or Delrin.
Other manufacturers are more worried about the various greases and sprays ageing badly.
Mister Vee, Monitor, and Navik advise against using any kind of petroleum lubricant.
Hydrovane recommends something like WD-40 for the body but insists that the axles and bearings never be lubricated.
Most manufacturers offer spares or rebuild kits, even for older models.
Hebridean wind vane: testing the DIY self-steering gear
David Pugh assesses the build-it-yourself Hebridean wind vane in a moderate breeze off Lowestoft
Offshore sailing gear: How to prepare a boat for extended cruising
Sea Bear is a Vancouver 28 built in 1987. She was generally in very good condition when I bought her,…
‘Why I want to sail around the world in my 9m electric sailing boat”
Dena Hankins is on a global voyage aboard her 1984 9m Baba 30 converted to run with an electric propulsion…
Want to read more practical articles like How to service a Monitor wind vane self-steering gear?

A subscription to Practical Boat Owner magazine costs around 40% less than the cover price.
Print and digital editions are available through Magazines Direct – where you can also find the latest deals.
PBO is packed with information to help you get the most from boat ownership – whether sail or power.
-
-
-
- Take your DIY skills to the next level with trusted advice on boat maintenance and repairs
- Impartial in-depth gear reviews
- Practical cruising tips for making the most of your time afloat
-
-
Follow us on Facebook, Instagram, TikTok and Twitter


