
Faced with his 30-year-old Konsort's knackered vinyl dforecabin, Richard Hare renovated it with 12mm insulation and maple strips
Restoring the inside of a tired forecabin, resplendent with the ubiquitous ‘vinyl droop’ commonly associated with Westerlies and other yachts of that genre, presented us with problems.
Predominant was the complex curvatures of the hull itself.
One thing I knew was that any attempt to restore most of the existing vinyl would be a waste of time.
So, I adopted a solution that I’d used previously when fitting out my former boat, a Golden Hind 31.
The criteria then, as here, were that the end result would have to be aesthetically pleasing, technically sound (insulation and strength) and, importantly, within my amateur capabilities.
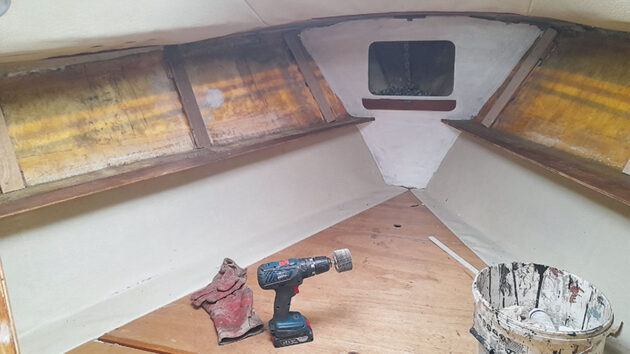
Vinyl is shown removed from the forward bulkhead and about to be removed below the foredeck. The foam above the shelves had to be junked to make way for ribs. Credit: All images Richard Hare
Not all vinyl had to be junked. Aboard Cockle, the forecabin vinyl above the side shelves and the thin foam behind it had to go.
The same applied to the bedraggled vinyl on the main cabin bulkhead and also the foredeck underside.
What could remain was the vinyl under the side shelves and the deckhead (forecabin ceiling).
The vinyl below the shelves was OK as it had been protected by the berth cushions. It was also intact. All of this could be re-tightened and thoroughly cleaned.
A considerable advantage to me was that Westerlies of this type benefit from a useful wood core to cabin deckheads and side decks.
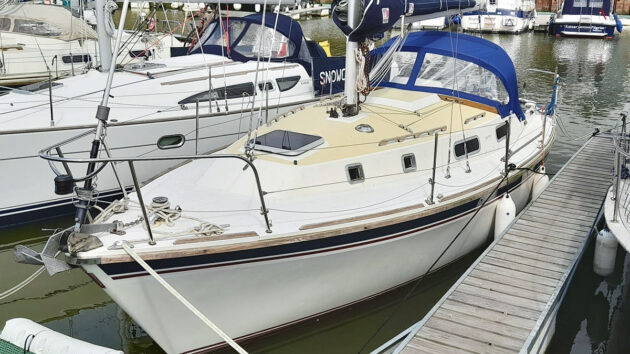
The Westerly Konsort Cockle before the side decks were painted. The forecabin extends aft to include the first square windows on each side
The reusable vinyl cleaned up well enough after I first used white spirit, followed by a gentle scrub using warm water with washing-up soap and a dash of white spirit.
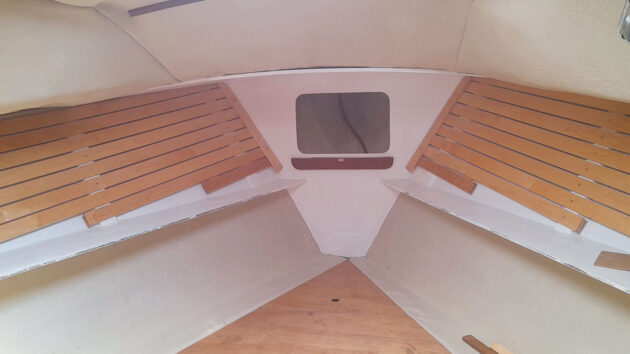
I considered that the best solution for the problematic lining above the shelf was to repeat a technique I’d used on my previous yacht; thick closed cell foam, obscured by 9mm thick x 45mm wide maple slats, 9mm being sufficiently meaty to attach other items later on, such as cabin lights and small storage bins.
I sourced the wood from Robbins Timber, a timber company specialising in wood and wood-based products for marine use.
Since this forecabin was to be our main sleeping area, it made sense to fit it out with an attractive material, and maple scored well on aesthetics.
It goes well with teak, Cockle’s predominant interior wood species.
Rib-forming in the forecabin
Given the curvature of the hull, the problem was this: how do we attach near-horizontal maple strips to a curved GRP hull?
Attaching the strips directly to the GRP hull surface is a non-starter.
My solution was to laminate ribs to the hull using 12mm plywood offcuts, subsequently ripped into 75mm (3in) wide strips.
The plywood was bonded to the hull using a polyurethane mastic which is similar to Sikaflex.
With shelf upstands removed, the upper hull was cleaned and scrupulously degreased
The difficulty with this is obvious; you can’t bond a flat length of plywood to a curved GRP surface. Further, it’s doubtful that 12mm plywood is thick enough to take the screws from the maple strips.
The answer was to bond shorter pads, about 75 x 100mm (3 x 4in) top and bottom, and then attach the full-length pieces to them. This forms a sort of bridge that has the benefit of bridging the curvature as well.
It’s worth noting that, in this case, I did not attempt to introduce a vertical curvature to the full-length pieces. The comparative short rib length didn’t warrant it.
But before any plywood/GRP bonding took place, the glassfibre had to be thoroughly cleaned of all old glue and grime.
It’s a tedious task – no point in pretending otherwise – but I found I could wipe away most of the old impact adhesive with white spirit, scraping and sanding manually.
Leaving overnight helps as the surface becomes crispy and consequently, more amenable to sanding the next day. I then repeated the process, this time with cellulose spirit, sometimes known as ‘paint thinners’ in car parts shops.
A first coast of white Superdec is applied to the fore bulkheads. The rib pads are shown as well as the bridging plywood strips. Old vinyl was stripped from the shelves and they’d be finished later with Superdec. Note flap wheel abrasive in battery drill
This was also scraped and hand-sanded. I then finished off with a flap-wheel abrasive in my hand drill.
The final touch was to wipe it over with a mix of soapy warm water and white spirit.
With the GRP thoroughly cleansed, I could bond the top and bottom plywood rib pads.
I did this using a PU mastic adhesive like Sikaflex or CT1. This way, I could construct four ribs down each side of the hull.
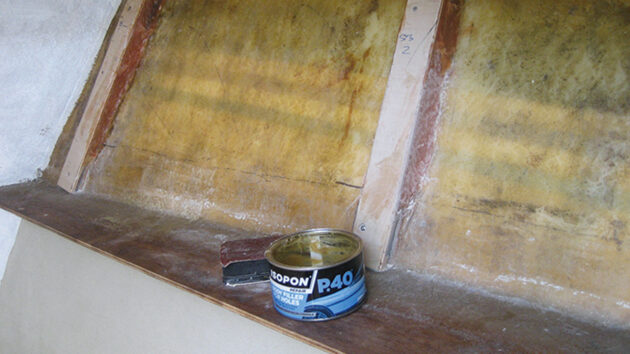
Ribs solidified and stiffened by filling with Isopon P40 car body filler
By the following day, the short plywood pads were cured and securely bonded to the inside of the hull, sufficiently for the second full-length strips of 12mm plywood to be attached.
Screws and waterproof PVA adhesive were used to draw this into contact with the pads, thereby forming the ‘bridge’.
What followed next was a visit to the local car parts shop.
Here I bought a tin of pre-mixed P40 glassfibre car body filler which makes a very cheap and effective stuffing for the bridge/voids that now existed between the plywood and the glassfibre hull.
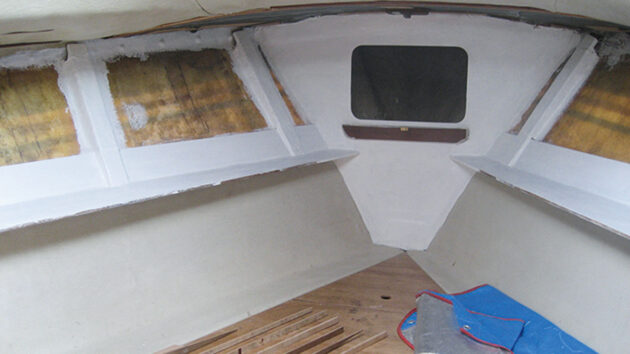
The ribs were then bandaged in using resin-soaked glassfibre mat and finished with two coats of white Superdec paint. Ply shelf backs are bonded to the hull and painted along with the shelves
Not only does this completely stiffen the batten but it provides additional reassuring strength to a hull at a point where it can be particularly useful…
The final touch was a bandage of polyester resin-soaked random strand glassfibre mat wrapped over each composite rib.
This is not only good practice but also relieves the PU mastic from being the sole bond between the hull and the composite ribs.
I bought a 1lt can of Isopon Fastglas polyester resin for the purpose, also from the car parts shop. I already had glassfibre mat in stock.
Insulating the forecabin
Next came the insulation. Not only is this highly desirable if condensation is to be avoided, but it makes a forecabin so much more comfortable in hot and cold temperatures.
If we ever return to free movement across Europe and can once again base our boats on the Continent for periods longer than 18 months, we’ll very likely return to the South of France.
Irrespective of the political obstacles, this is the best time to add insulation as it would entail significantly more upheaval later.
Unlike wood, GRP has horrendous thermal insulation properties, especially if you have a blue-coloured gel coat.
The 12mm insulation bonded into position
Here, thick closed-cell insulation is a huge benefit. Don’t use open-cell insulation – it absorbs condensation and can end up loaded with water.
I bought the 12mm thick closed-cell flexible foam from a local supplier although thicker insulation semi-rigid bats are readily available from builders’ merchants.
Either way, this insulation was bonded to the hull using PU mastic/adhesive.
But before the insulation was bonded into place, the ribs and their surrounds were given two coats of white (satin) Sadolin Superdec, a water-based acrylic paint that sticks to absolutely everything that I‘ve used it on.
It doesn’t like epoxy though, as the epoxy makes it yellow.
Once it was fitted, I also gave the foam two coats of white Superdec.
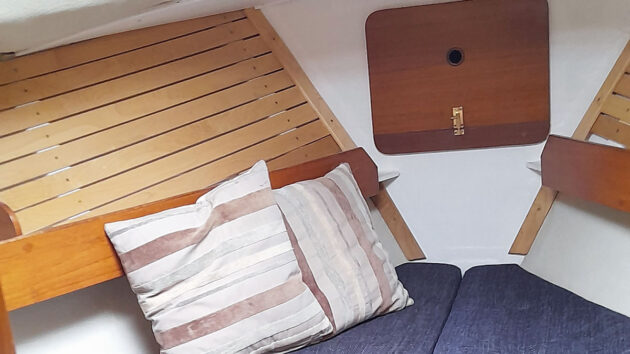
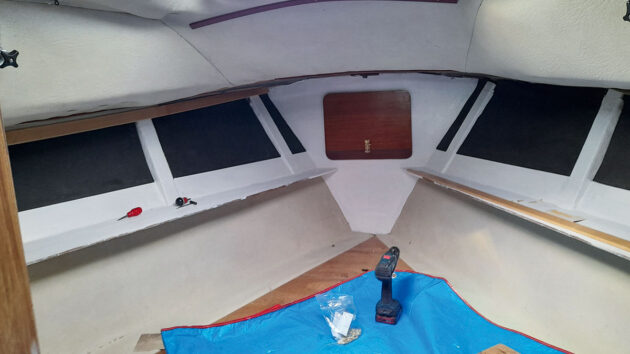
Maple strips attached to ribs and painted plywood attached below foredeck
Satisfied with the solidity and strength of the ribs, I turned my attention to the horizontal maple strips.
These were attached using brass screws. Using a piece of 4mm plywood as a spacer, a gap was left between each batten.
The gap is important as it can be very difficult to get each strip to lay perfectly against its neighbour.
Even if they fit perfectly when initially fabricated, the impact of seasonal relative humidity fluctuations will cause stresses later on.
Further, I think that the appearance of the white paint behind the slats makes a cabin less claustrophobic.
Each batten was given a liberal coat of Ronseal Yacht Varnish (satin) to its reverse side to ensure that each was encapsulated when fully finished.
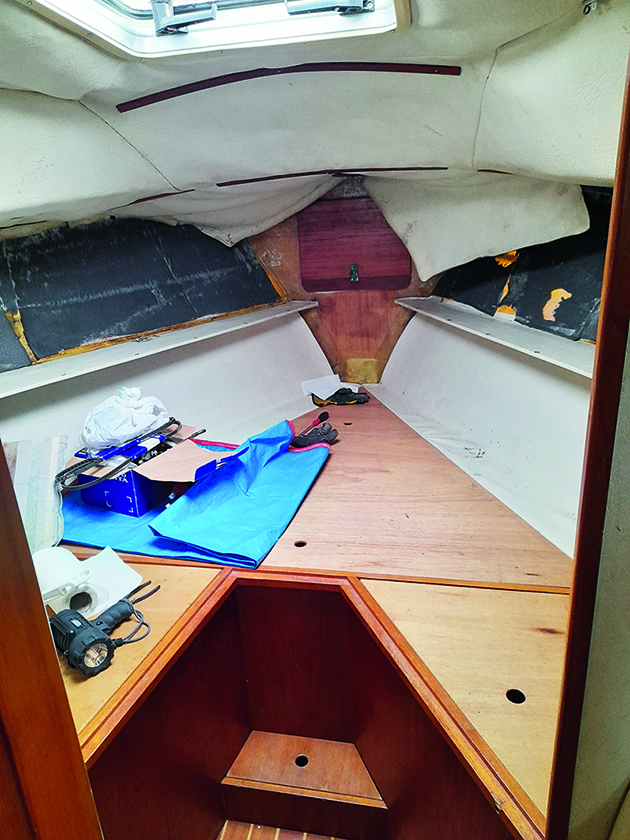
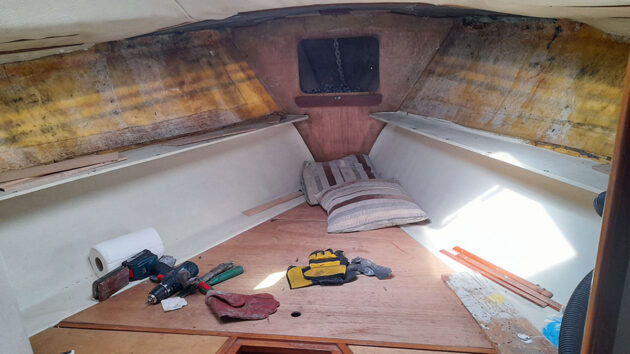
Foredeck underside and chain bulkhead
Now to the ‘pointy’ end. Using the discarded vinyl beneath the foredeck as a template, I made a cardboard version and then cut a 6mm plywood replacement.
A plywood deckhead like this is warmer than vinyl and consequently, less prone to condensation.
But, how to attach it to the foredeck underside? I first bonded on and screwed 9mm and 12mm plywood attachment points/pads to the underside to provide something for the plywood sheet to be screwed onto.
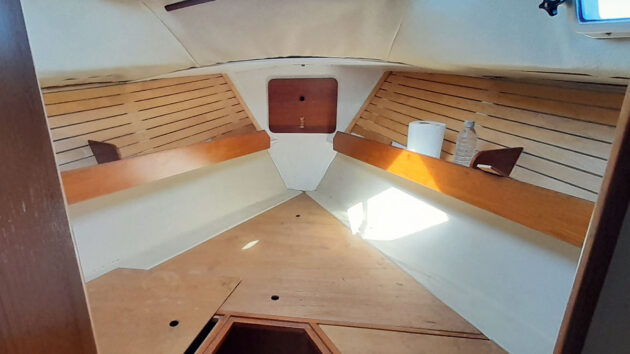
The re-varnished shelf upstands are re-fitted
The foam insulation here had been redone recently, so I was able to retain it, albeit with bits cut out to make space for the plywood pads.
The plywood sheet was given two coats of Superdec. A feature I like about Superdec is that being water-based as opposed to oil-based, it doesn’t yellow over time. Nor does it flake.
The anchor box/forward bulkhead was stripped of all its vinyl, old foam backing and adhesive, and refinished with two coats of Superdec.
The teak-faced anchor hatch varnish was cut back and two coats of Ronseal Yacht Varnish were applied.
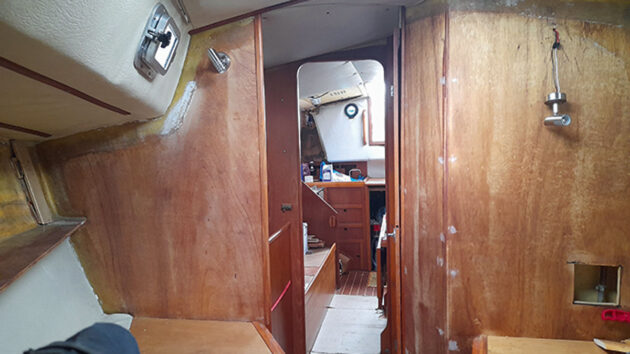
Main bulkhead
Removing the largely wrecked old vinyl and wasted foam backing from the existing plywood structural bulkhead was a piece of cake, but the removal of the adhesive was anything but.
Inspired by the quality of the tropical hardwood plywood that was unveiled, however, I set to the task of removing it all including the old contact adhesive.
If I’d not done this, the varnish would not have stuck, and it would have looked a mess.
Several days were taken up using rags and white spirit followed by judicial use of a broad paint scraper.
The main bulkhead stripped of vinyl and adhesive to reveal a pleasing wood figure
I found it helped to leave this to dry overnight and harden. This made it sand better.
It was galling to know that no trace of glue could remain. Not only would the varnish not take properly to it but my indiscretions would be there to haunt me until the day that Cockle and I finally part company.
On more than one occasion, I toyed with the idea of throwing in the towel, resorting to Plan B; to paint the entire bulkhead white. Life’s too short! But I persevered.
The finished main bulkhead complete with all edges, profiles, and trims cut and fitted
Another time-consuming task was making the 4in (or so) wide trim profiles that disguise the unsightly edge where the ply bulkhead is joined to the hull and deckhead.
The lack of vinyl originals meant I had to make cardboard templates before graduating upwards to off-cuts of chipboard, MDF, hardboard, or whatever I could find before using plywood for the finished article.
Not having the original was a pain as the plywood cores might have cleaned up well enough for re-use.
Costs and materials
9mm maple strips (12 x 3.6m*): £293 (ex delivery)
Ronseal varnish: £22
Closed cell foam: £50
Fibreglass resin: £20
Sundries (adhesives and screws etc): £50
Total: £435
* Strips available in 3.6m lengths only at the time (sometimes available in 3m lengths). Offcuts were sufficient for the 2nd and 3rd from bottom slats, these being shorter. The bottom slat was left over from a job from over 20 years ago. There were quite a lot of useful other offcuts, all of which have since proved useful on board. All plywood for the ribs was from existing offcut stock. For this use Class 2 plywood to EN 314-2 1993: ‘Plywood. Bonding Quality Requirements’. It’ll be fine in this situation. No need for Class 3 (Marine).
What if your boat has longer hull-shaped curved ribs?

Originally a triple chine plywood hull, modern GRP Golden Hind 31s have vertical curvature to overcome, the tricky angle at the sheerstrake and the rest of the hull
Of course, there are also situations where boat owners will want to line the entire height of the cabin side, from berth height up to side decks.
If so, you’ll probably want to introduce a vertical curvature, one that mimics, to a degree, the curvature of the hull.
This was the situation with my former boat, the Golden Hind 31, Keppel. In this case, the hull was new so the process involved less GRP cleansing.
A good wipe with cellulose spirit to remove wax emulsion and an abrasion did the trick.
On Keppel, the ribs were deeper and I attached 25mm semi-rigid closed-cell insulation bats.
Once semi-rigid, I used a Stanley knife to score the back in places to enable the bats to take up the curvature of the hull, particularly the corner where the sheerstrake meets the rest of the hull.

How to replace boat headlining with PVC planking
Roger Hughes replaces old vinyl boat headlining with easy-to-clean white PVC planking

Boat modifications: how to design changes for your yacht
Yacht designer Ian Nicolson explains how to make changes to living space on board

Painting and varnishing a boat: how to get the perfect finish
Kit boat builder Polly Robinson shares her tips for painting and varnishing a plywood-epoxy boat
Best boat varnish: 7 top options for gleaming woodwork
Few things are as quintessential to the archetypal sailboat as gleaming, iridescent woodwork that is indicative of a recent coat…

Westerly Konsort: space, security & good performance
One of the roomiest cruisers of her size, the Konsort is also known for her solidity, interior finish and easy…
Want to read more practical articles?

A subscription to Practical Boat Owner magazine costs around 40% less than the cover price.
Print and digital editions are available through Magazines Direct – where you can also find the latest deals.
PBO is packed with information to help you get the most from boat ownership – whether sail or power.
-
-
-
- Take your DIY skills to the next level with trusted advice on boat maintenance and repairs
- Impartial in-depth gear reviews
- Practical cruising tips for making the most of your time afloat
-
-
Follow us on Facebook, Instagram, TikTok and Twitter