
Face up to the task of applying veneer with the help of boatbuilder Tony Davies
Veneering ply is not exactly an arduous job – it’s pretty simple when you know how.
Many people, however, worry about which glues to use.
I’ve been veneering boat interiors for over 20 years and all I’ve ever used is thixotropic contact adhesive.
The first veneering job I did was with Thixofix, and this was something of an experiment as I was worried about the longevity of the adhesive.
Decades later and it hasn’t fallen off!
Nowadays, I use the trade equivalent of Thixofix, Evo-Stik TX528, which is available from builders’ merchants in large sizes.
I’ve also used Evo-Stik Timebond when I ran out of TX528: this works just as well, but is more expensive in retail sizes.
The technique I use relies upon the final finish to protect the veneer and the underlying adhesive, so it is important to properly coat the finished veneer with a high quality varnish rather than just waxing or oiling the surface.
Where a waxed finished appearance is required, I use a satin varnish, then wax over that.
Whether a gloss or satin finish is required, I always use Hempel Dura-Gloss or Dura-Satin as I find it gives among the best finishes and long-term protection of all the varnishes I have used.
You will most likely have your own favourite, though, so use whatever suits you best.
I would emphasise that I only recommend veneering for boat interiors – it wouldn’t have much of a lifespan in the open, exposed to the weather.
Learning the basics of veneering
The first step is to build whatever it is you are planning to veneer: in this case, it is the roof of a heads compartment in the wheelhouse of a 26ft (7.9m) sport fisher.
A simple design motif is being incorporated into the veneered panels, which makes this job a little more complicated.
It could almost be called marquetry – but it’s still not rocket science!

Credit: Tony Davies
1. The first stage in this particular project is to mark out the position of the rectangular motif on the ply panel which will become the heads roof.

Credit: Tony Davies
2. The length of each piece of veneer is then marked.
Credit: Tony Davies
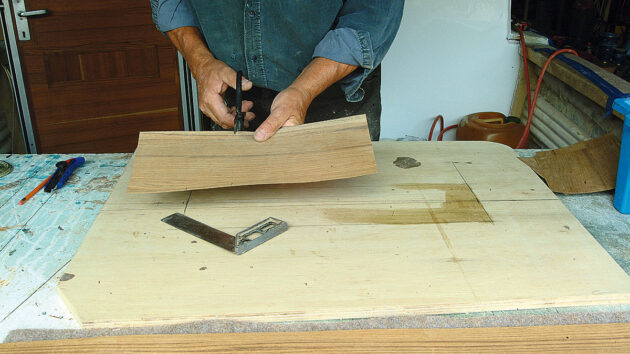
3. The end is squared and marked ready for cutting. The leaf can now be carefully cut using either scissors or a craft knife and straight edge – whichever you feel more comfortable with. Number each one as it is cut to ensure they all end up in the correct positions!

Credit: Tony Davies
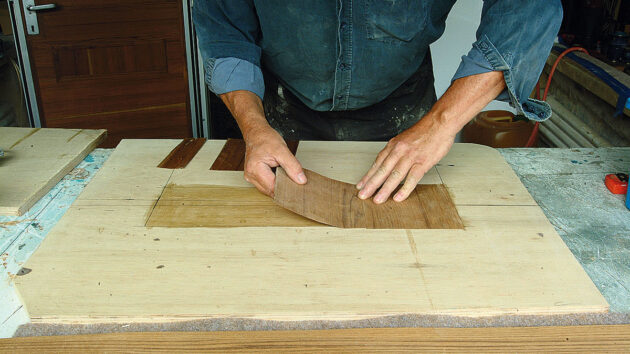
4. The rest of the set is cut to size and laid in position to ensure they are a neat fit together.

Credit: Tony Davies
5. Adhesive is now applied to the ply within the marked area.

Credit: Tony Davies
6. This is followed by an application onto each of the cut veneers. They are left for a few minutes for the adhesive to become touch-dry.
Credit: Tony Davies
7. The first veneer is then carefully placed into position, followed by each subsequent piece in turn.

Credit: Tony Davies
8. Use a roller to apply pressure and ensure the veneer is properly bedded down onto the adhesive. I am using a glassfibre roller here, but on larger areas, I use a vinyl flooring roller which covers a large area more quickly.

Credit: Tony Davies
9. Next, I use a palm sander to smooth the veneer surface: at the same time, the vibrations help force it more firmly into the adhesive. Sanding dust will fill any tiny gaps between the veneer pieces and be held by the glue. Excess dust can then be brushed from the surface. Ensure you wear appropriate PPE.

Credit: Tony Davies
10. Now the veneer is given a final trim using a straight edge and craft knife.

Credit: Tony Davies
11. After trimming, the excess veneer can be lifted with a sharp chisel – the adhesive will not be fully cured for 24 hours.

Credit: Tony Davies
12. For the next stage, I am using teak iron-on edging, bought in 50m rolls from eBay. The first step is to cut a 45° angle for the first corner. I have some vinyl trimming snips with built-in guides, but a protractor and craft knife are just as accurate.

Credit: Tony Davies
13. The corner is carefully positioned and the iron (set on medium heat) is applied to the end of the edging and pressed down to melt the edging’s heat-set adhesive and hold it in place.

Credit: Tony Davies
14. Before glueing down the entire length you need to cut the other end of the strip after carefully marking its length. The remaining section can then be heated with the iron and fixed.

Credit: Tony Davies
15. The central panel is now finished and I’m ready for the next stage. First I double-check the length of the panel….

Credit: Tony Davies
16….so I can mark the veneer and then cut it to length.

Credit: Tony Davies
17. Adhesive is applied to the back of the veneer and to the face of the ply.

Credit: Tony Davies
18. Each piece is placed into position and rolled down.

Credit: Tony Davies
19. Carefully trim excess veneer using the craft knife with a new blade to ensure it does not pull the veneer. Once all pieces are glued down, the entire surface is sanded to smooth and embed the veneer.

Credit: Tony Davies
20. The edges of the panel are now carefully sanded, taking care to keep square with the front face.

Credit: Tony Davies
21. An iron-on edging strip can now be applied all around the perimeter.

Credit: Tony Davies
22. As each corner is reached the position is marked and the edging cut off square.

Credit: Tony Davies
23. Overlap from the edging is now trimmed from both the underside and the top of the panel. Take extreme care when trimming the excess from the face side.

Credit: Tony Davies
24. The whole panel can now be given a final sanding. Be careful not to over-sand the edges of the panel – it is very easy to sand right through the veneer.

Credit: Tony Davies
25. Finish off the sanding by hand, especially along the delicate edges.

Credit: Tony Davies
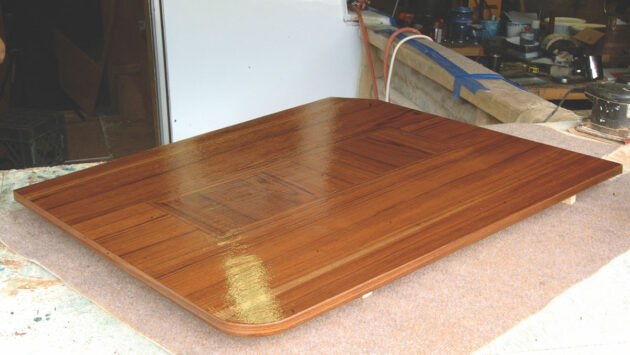
26. A first coat of varnish can now be applied to keep the finished surface clean. This is a satin varnish, which will lose its gloss as it cures.

Credit: Tony Davies
27. With the varnish cured the completed panel can be placed in position to see how it looks – and it looks pretty good!
Veneered design features
Curved edges to built-in furniture
There is no doubt that rounded corners in boat interiors look very professional and, of course, fewer sharp corners means there’s no likelihood of injury when falling against something in rough weather.
To obtain the look, you either have to perform some very fancy carpentry with solid wood or, if you are using veneer, you can easily achieve the same effect with a slice of plastic drainpipe.

Credit: Tony Davies
1. Once the basic structure is complete, a piece of 100mm (4in) plastic drainpipe is cut down lengthways into quarters, and a single section is placed into position in the recess in the corner of the structure and temporarily held with masking tape.

Credit: Tony Davies
2. A layer of lightweight mat and resin is applied over the pipe section to secure it in place. This is rolled out to exclude air in the normal manner, then left to cure before starting to apply the veneer.

Credit: Tony Davies
3. As with our previous panel, an adhesive is applied to the ply structure: I find a brush easier to use than a spreader.

Credit: Tony Davies
4. Adhesive is applied to the veneer leaf and, again, both are left for a few minutes to become touch-dry.

Credit: Tony Davies
5. When ready, the veneered leaf is offered up to the ply, taking care to align it perfectly with the previous leaf before pressing into place. Carefully take it around the curve and align it before pressing firmly.

Credit: Tony Davies
6. The roller is used to ensure the leaf is perfectly flat and properly stuck.

Credit: Tony Davies
7. Here, the heads compartment, its door and an adjacent locker door are ready for varnishing. All carrying the rectangular motif – but in this case, they are applied to the face of the veneer rather than being cut in flush.
Frames around windows
If you have different thicknesses of superstructure side panels, it is impossible to keep all the interior frames looking the same.
Boxing them in using veneered ply will give a smart, uniform finish.

Credit: Tony Davies
1. The side windows look neat enough, but to help them match the forward windscreen panels, a veneered frame will be required.

Credit: Tony Davies
2. A simple frame made up of narrow ply strips was bonded around the window interior frames using polyurethane adhesive.

Credit: Tony Davies
3. Iron-on edging was applied to the inside and outside edges of the strips. I used a hot air gun to melt the glue, while an ordinary bristle (not plastic) paintbrush smooths the edging into position.

Credit: Tony Davies
4. I used the handle of the brush to press the edging down to ensure good adhesion.

Credit: Tony Davies
5. Shaped pieces of veneer were cut to form the corner faces while iron-on edging was used for the straight runs. Once in place, they were then trimmed and sanded in the normal manner.

Credit: Tony Davies
6. The finished frames provide a simple but smart, uniform appearance.
A quality look for an instrument panel
The ultimate car dashboard is still traditional burr walnut, and it is often applied to boats – so I thought ‘why not?’

Credit: Tony Davies
1. Four specimen leaves of burr walnut were bought from a specialist supplier on eBay.

Credit: Tony Davies
2. The instrument panel was prepared from a piece of 12mm ply. Carefully cut holes in the veneer after it has been glued to the panel.

Credit: Tony Davies
3 After many coats of varnish, the finished panel looks pretty impressive. The rest of the surround will later be covered with black vinyl.

Boat wood: a complete guide for yacht owners
Boatbuilder and finisher Lyndon March explains which types of wood work best for different repairs and modifications on board
Best boat varnish: 7 top options for gleaming woodwork
Few things are as quintessential to the archetypal sailboat as gleaming, iridescent woodwork that is indicative of a recent coat…

Woodworking tools – a DIY boat owner’s guide to getting a professional finish
It’s not difficult to achieve a professional finish using woodworking machines and there are bargains to be had every day…

How to remove mouldy stains from interior woodwork – Ask the experts
Kevin Woods from Dublin writes: “I have a 1991 Feeling 286 Special. Some of its timber interior is stained by…
Want to read more practical articles?

A subscription to Practical Boat Owner magazine costs around 40% less than the cover price.
Print and digital editions are available through Magazines Direct – where you can also find the latest deals.
PBO is packed with information to help you get the most from boat ownership – whether sail or power.
-
-
-
- Take your DIY skills to the next level with trusted advice on boat maintenance and repairs
- Impartial in-depth gear reviews
- Practical cruising tips for making the most of your time afloat
-
-
Follow us on Facebook, Instagram, TikTok and Twitter