PBO reader Charles Beddingfield undertook a step-by-step investigation to diagnose a noise in his boat’s 40-year-old PRM 100 gearbox
As a boat owner practical enough to cope with most maintenance I still had to think twice before delving into the guts of my gearbox. One imagines the need of special tools and workshop facilities, maybe a hydraulic press, and the prospect of shrapnel pinging off the walls as some unsuspected spring escapes captivity.
 However, on relaunching Tudor Rose in 2018 after a 15-year refit (what can I say? I work slowly!) I found myself cocking a critical ear to her old gearbox, built by PRM in Coventry.
It came second-hand long ago together with her BMC 1.8 diesel engine and now has at least 40 years’ service under its cogs. It was working perfectly except for a slight grumbly whir. Nobody else seemed to notice but as the gearbox ran more quietly astern, when more gearwheels are under load than ahead, this curious behaviour nagged at the back of my mind. Suspecting a failing thrust bearing I resolved to inspect its innards.
Tudor Rose’s gearbox is either a PRM 100 or 140 – the ID plate has long since disappeared so it’s hard to tell the difference. Either way it is an old model no longer made. Spares are not available from PRM-Newage but some parts are obtainable commercially and you could always look for a decommissioned donor box if desperate. They were popular in the Broads hire fleet and on the canals and I’ll bet there are plenty gathering grime, long forgotten beneath some boat mechanic’s workbench but too good to send for scrap quite yet.
The procedures apply to the 100, 140, 175, 250 and 265 models that appear from drawings to be essentially similar in construction. Later models use different bearings that require tricky adjustment with shims. You can get the workshop manual PDF for free from the PRM-Newage website.
Top tips before dismantling a marine engine gearbox
Before starting, drain the oil and thoroughly clean the outside of the box to avoid specks of old paint and dirt getting into bearings and hydraulics.
When prising apart the main casing take care not to damage the mating faces which have no gasket, and when removing ancillary parts take care not to damage their O-ring seals if you hope to re-use them. The only ordinary gaskets are under the top access cover and hydraulic control block.
No special tools are needed, although I found a pair of angled circlip pliers useful, but not essential.
Stripping down the gearbox
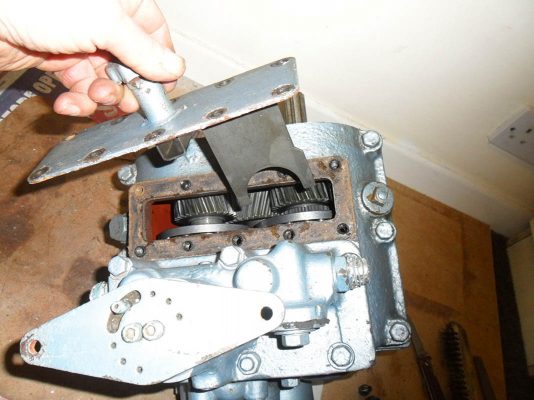
1. Unbolt and remove the top access plate which has attached to it the emergency get-you-home device selector plate.
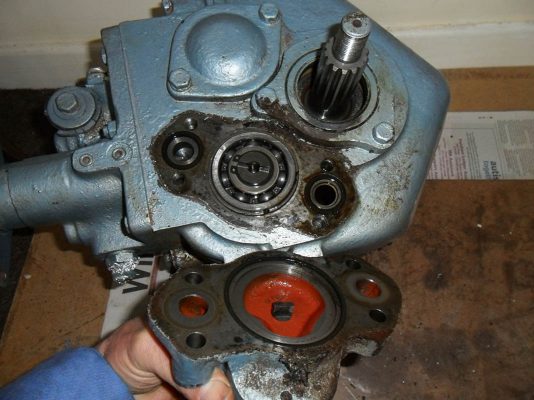
2. Unbolt and remove the oil pump. Mark the oil pump and casing so you know to put it back on the same way it came off.
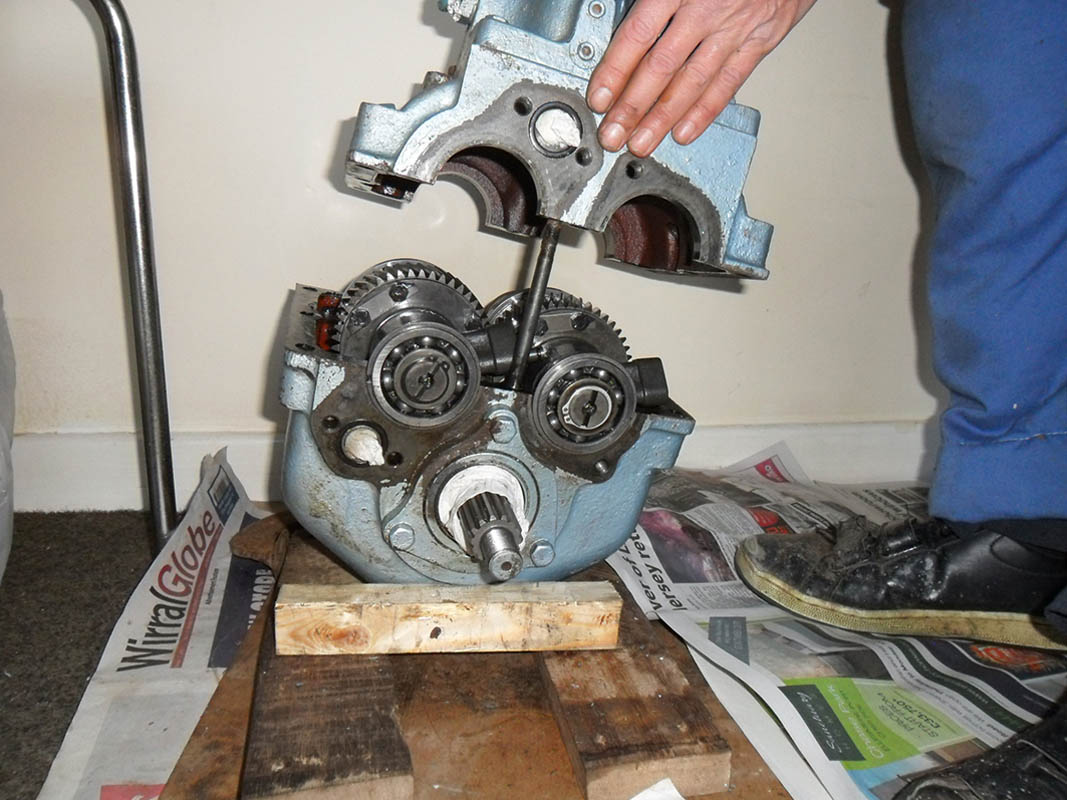
4. The top half of the casing can now be unbolted. Lift off the top complete with the hydraulic control block in one piece.
Inside a hydraulically operated gearbox
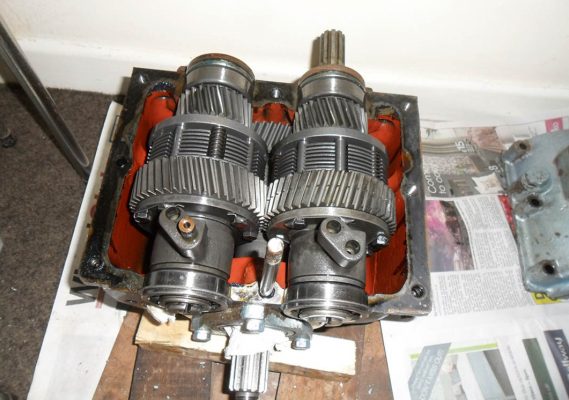
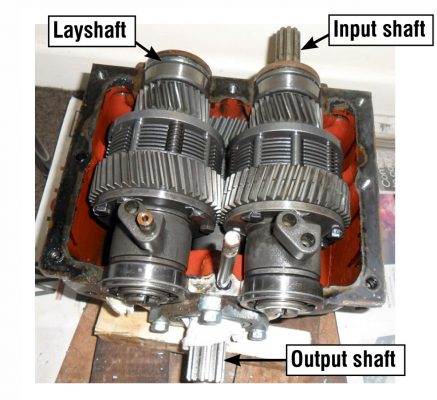
Splitting the casing exposes the whole works. After 40 years’ service the innards of this gearbox look like new, doubtless owing to the excellent lubrication inherent in the way the gearbox is built and works.
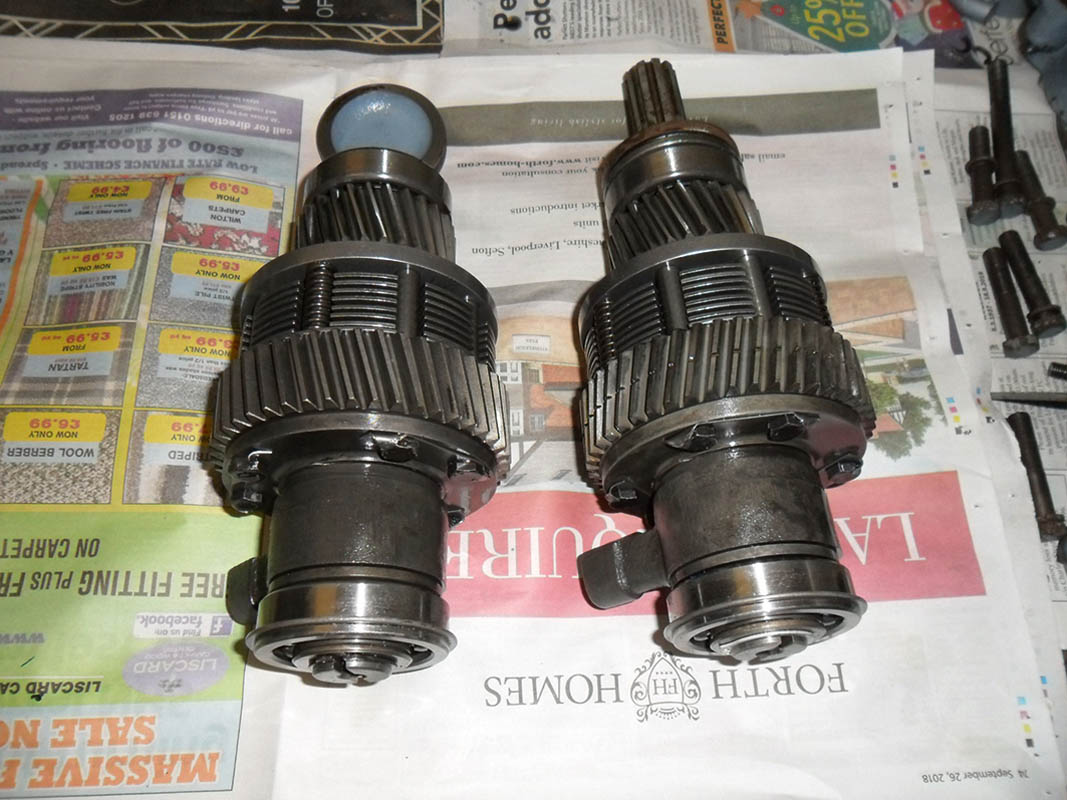
In this type of hydraulically operated gearbox the input shaft is turned by the engine and drives the layshaft through a pair of large gear wheels.
Riding freely on the input shaft is a smaller pinion gearwheel attached to a multi plate clutch – the layshaft has the same.
Thus whenever the engine is running the input shaft and layshaft revolve in opposite directions, while the smaller pinion gearwheels both mesh with one larger gear on the output shaft beneath, but remain stationary so long as the gear lever is in neutral.
The clutches have the effect of locking the pinion wheels to their respective shafts, so you get ahead or astern drive depending on which clutch is activated by the control lever.
On this gearbox the control lever directs oil under pressure (from an oil pump driven by the layshaft) to one or other of feeders on the shafts.
The feeders activate pistons which force the clutches to engage. So when forward is selected the input shaft clutch engages, and for reverse the layshaft clutch is engaged.
All the gear wheels are thus permanently in mesh and there is no grinding, crashing or jerks when drive is selected ahead or astern.
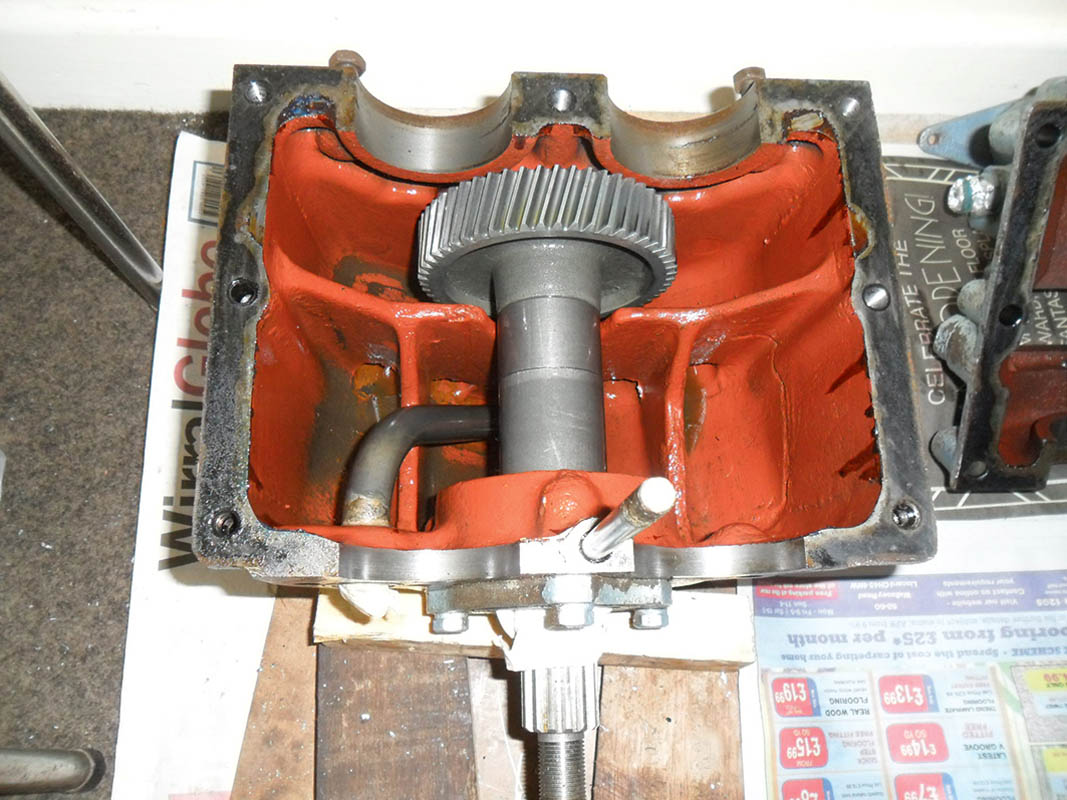
Removing the output shaft
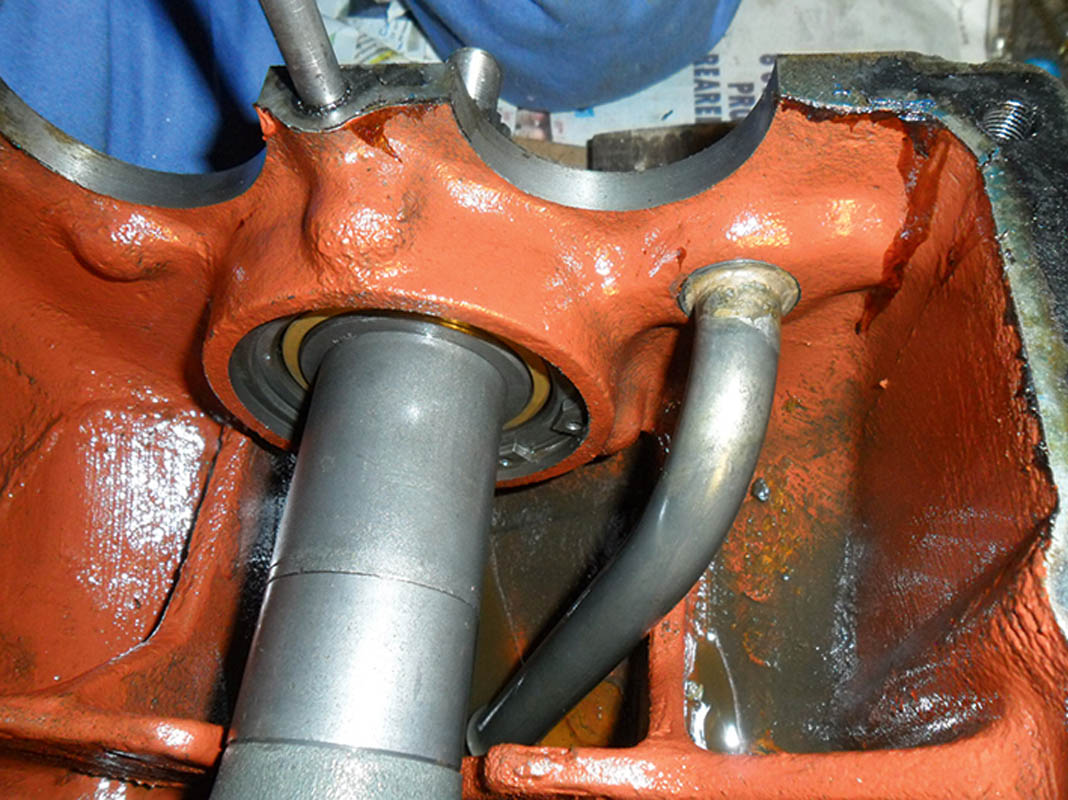
1. The workshop manual instructs that a large circlip adjacent to the big rear bearing should be removed and the whole shaft including the bearing should be driven forward to the extent possible (maybe an eighth of an inch or so) to displace the sealing cap from in front of the shaft. All well and good if you have a big enough and suitably angled pair of circlip pliers for this man sized circlip. Mine were not up to the job so I devised an alternative procedure.
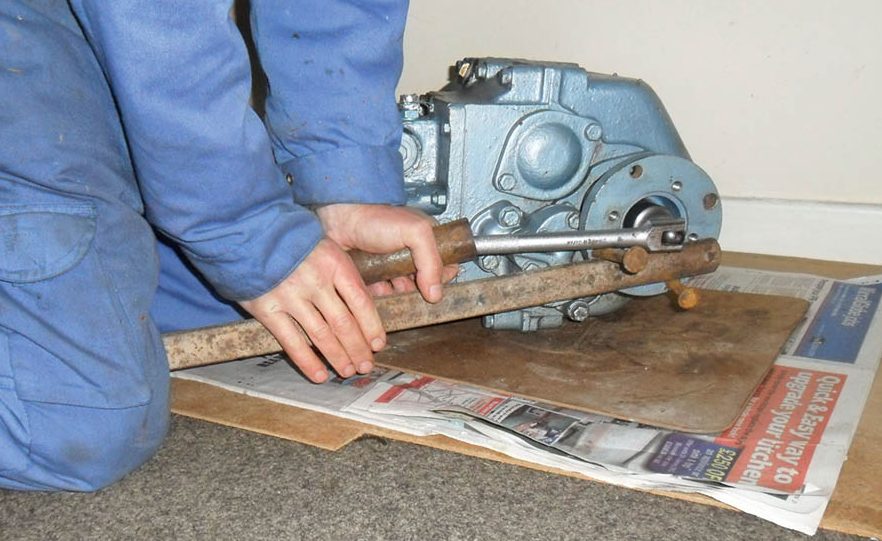
2. First, I slackened the output half coupling nut. This is mighty tight so you will need to contrive a stout bar across a couple of bolts in the flange while you unscrew the nut so that…
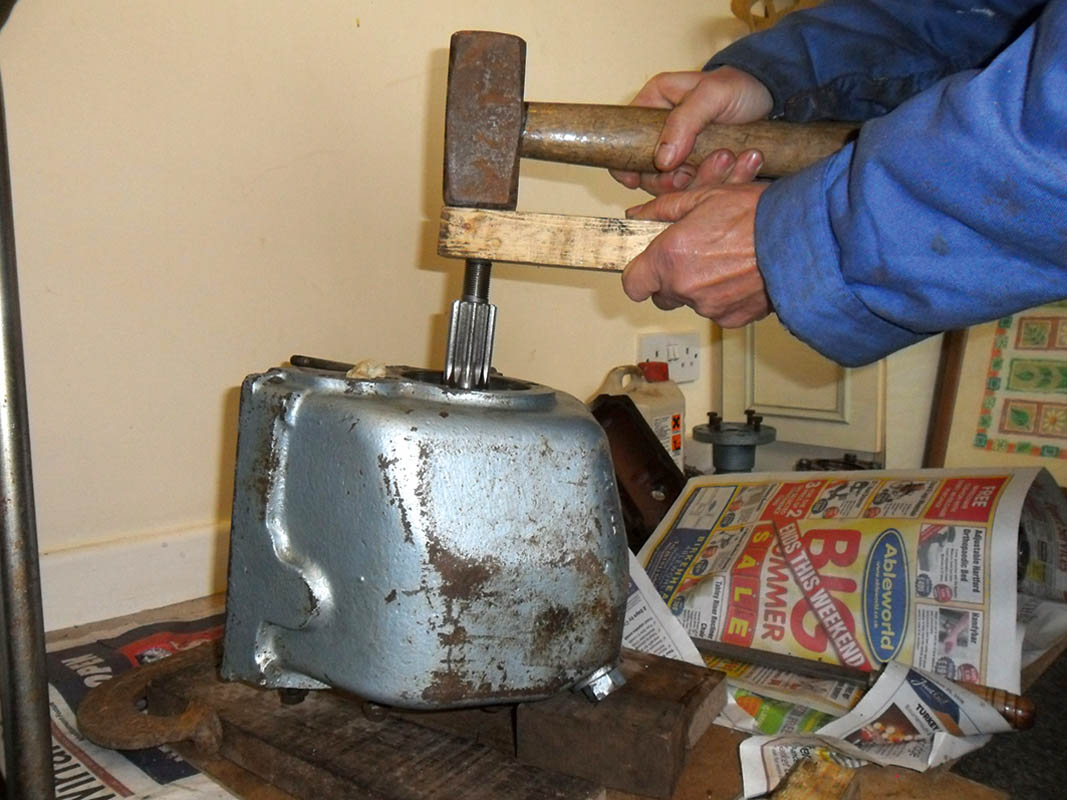
5. This allows the shaft to be driven forward with a hammer as prescribed leaving the big bearing and circlip undisturbed. Use a piece of wood to protect the shaft from hammer blows.
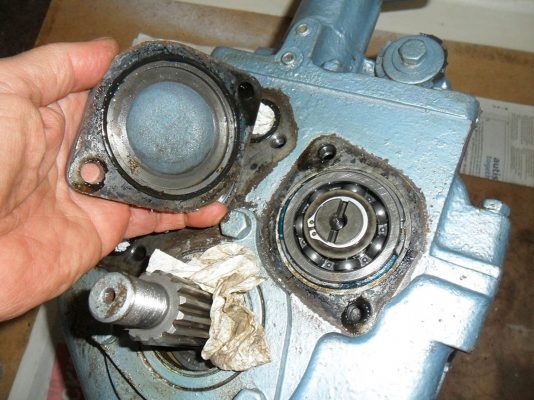
6. This pops out the aforementioned sealing cap from in front of the shaft. Again, the cap is sealed by an O-ring so take care not to damage this as you prise off the cap.
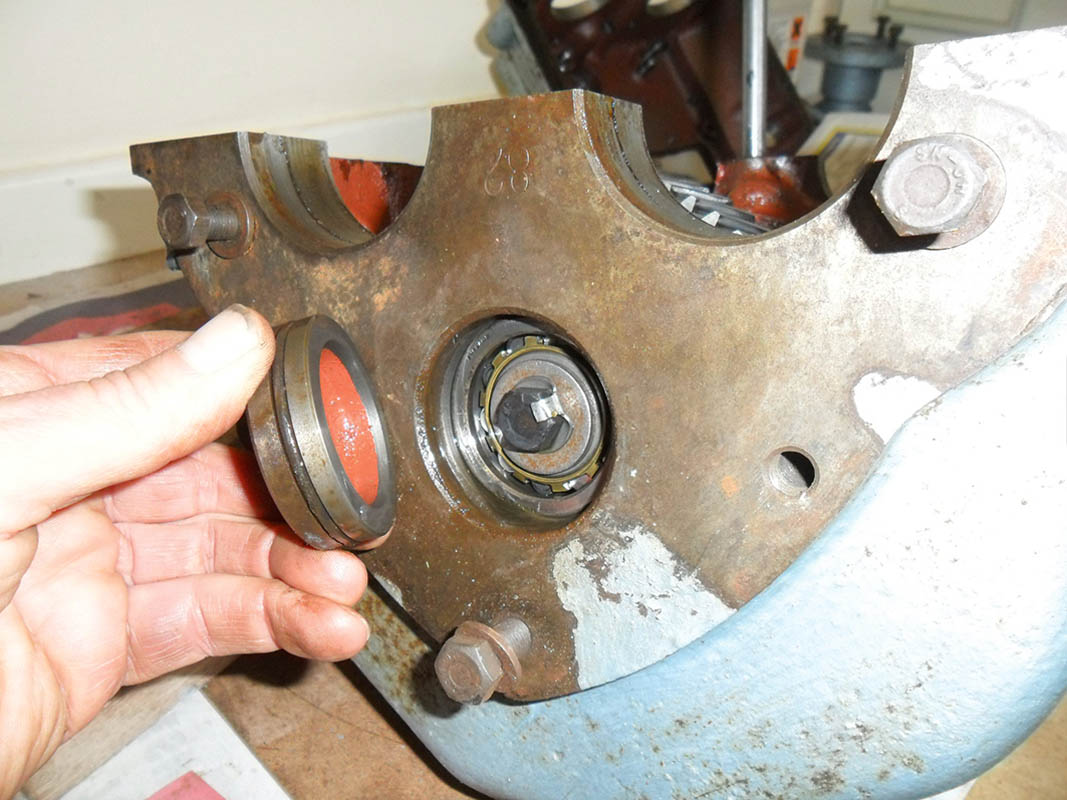
7. Beneath the cap is a set screw in the end of the shaft. Prise open its tab washer and unscrew it to remove the retaining washer beneath.
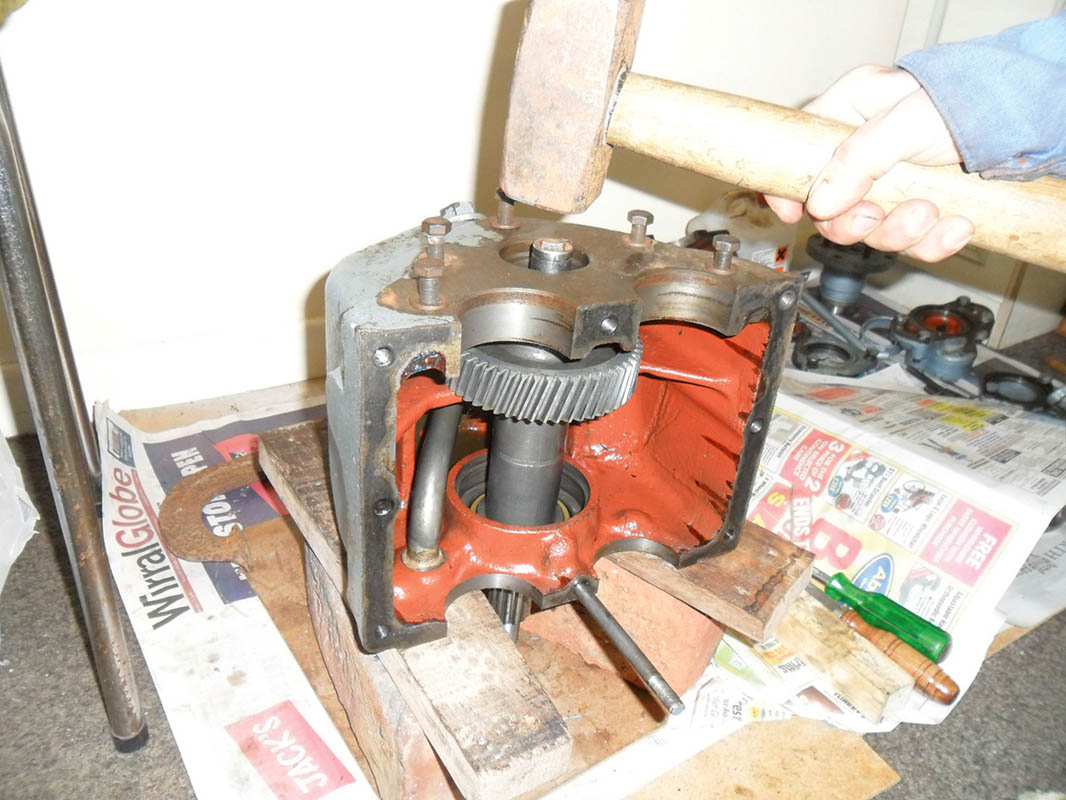
8. Now upend the gearbox and support the casing on blocks so that you can apply your big hammer CAREFULLY to the front end of the shaft, thus driving the shaft and the large rear thrust bearing downwards (ie rearwards) out of the casing, leaving the pesky circlip in place. Hammering looks brutal and it’s essential to do this carefully as the large output gearwheel comes to bear against the internal webs of the casing. It’s the weight of the hammer rather than heavy blows that does the trick. Use a socket as a drift.
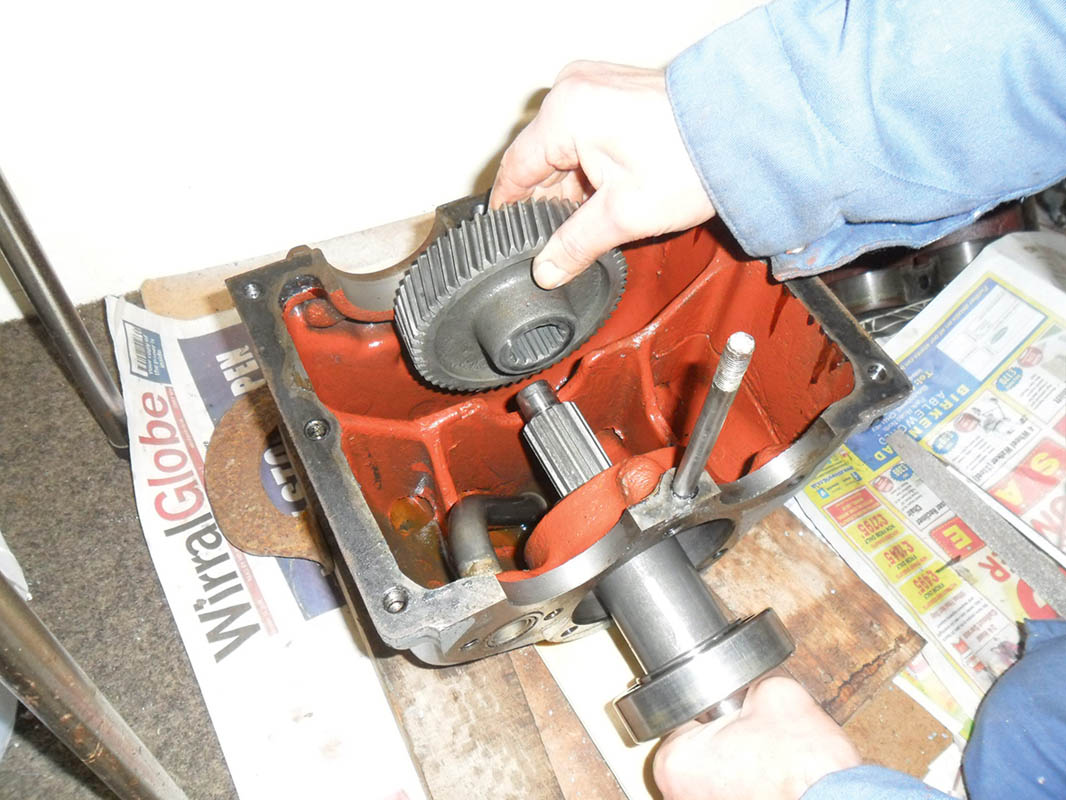
9. As the shaft is driven out it leaves behind the gearwheel and front roller bearing which can now be lifted out of the casing and the shaft itself removed endwise.
Looking for worn components
You can now examine the bits that wear and decide what, if anything, needs to be renewed.
Bespoke parts like gearwheels are no longer available and serious faults thereof will cause the gearbox to be scrapped. But bearings, oil seals and O-rings are available from simplybearings.co.uk or bearingboys.co.uk.
Bearings have a number engraved on the inner and outer races. If the number is no longer listed search for a suitable alternative.
Seals are ordered by diameter of the shaft and of the housing and the thickness of the seal and whether it has one lip or two.
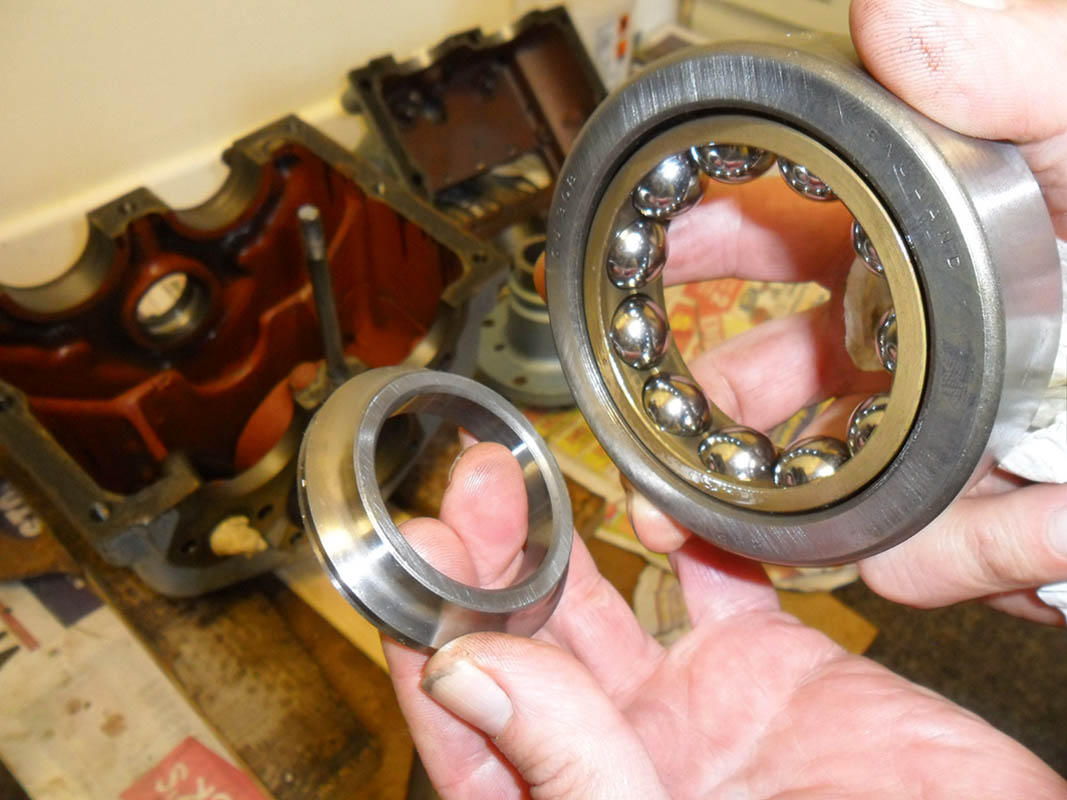
My gearbox’s four-point-contact bearing was in surprisingly good condition. So where was the noise coming from?
So here is the target of my exploration. This type of bearing, with inner race in two parts and designed to take prop shaft thrust, is called a four-point-contact bearing.
I expected to find the main output thrust bearing worn but as you can see the balls look perfect and the races are clean and shiny with no striations, grooves, scuffing or cracks. When assembled the bearing rotated smoothly and silently and altogether I could not find fault enough to justify spending £140 or so for a replacement.
The bearings on my input shaft and layshaft were also in good order and since the gearbox was working perfectly well there was no call to interfere with the clutch packs.
The output shaft front roller bearing was the only one I could find fault with. The bearing certainly was not about to collapse or seize or anything so drastic as to render the gearbox inoperable, but since the ‘box was in bits I elected to replace this bearing anyway at a cost of about £35.
PRM told me the bearing has not been available (from them at least) for many years so I chose an alternative from simplybearings by size and features.
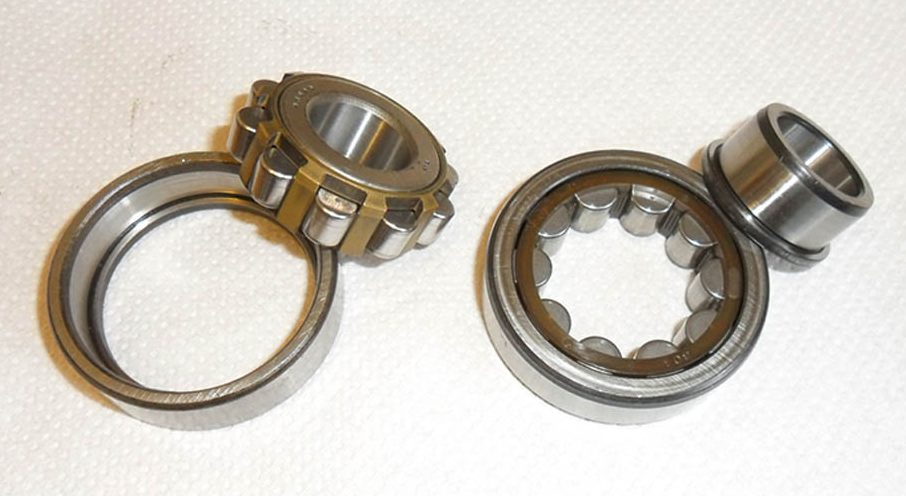
New and old bearings: The old bearing RHP MRJA 20 is on the left and its replacement SKF NJ 304 ETVP is on the right.
The old bearing RHP MRJA 20 is on the left and its replacement SKF NJ 304 ETVP is on the right. They are both cylindrical roller bearings but differ in that the old bearing has the rollers captive around the inner race and one shoulder only on the outer race, whereas the new one has rollers captive in the outer race and one shoulder only on the inner race.
In either case the bearing should be fitted such that the single shoulder and the rollers together prevent the outer race being driven in too far. Having all the bits in your hand will make this clearer.
Reassembling PRM 100 gearbox
Reassembly is mainly the reverse of dismantling but the following notes may be helpful:
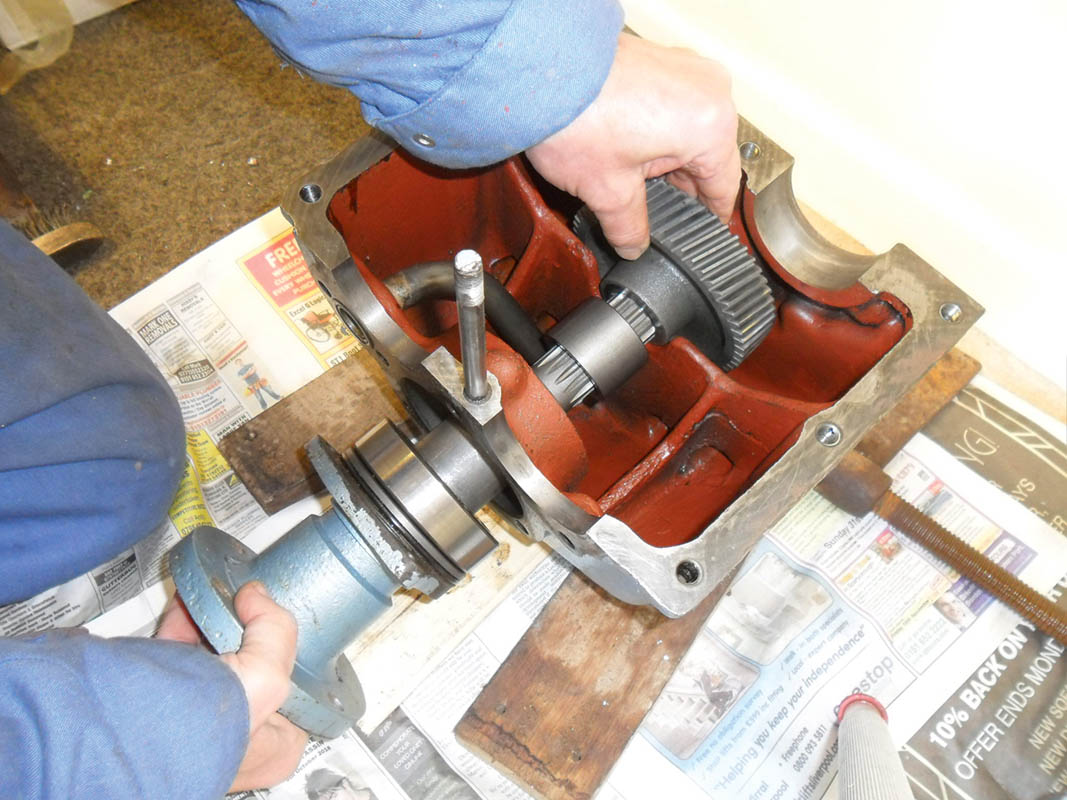
1. Assemble the thrust bearing, half coupling, oil seal and its housing onto the output shaft and nip up the coupling nut (you can tighten it fully later). Insert the shaft into the casing, sliding on the spacer and gearwheel as you go. The spacer must have its inner chamfer toward the shoulder in the shaft.
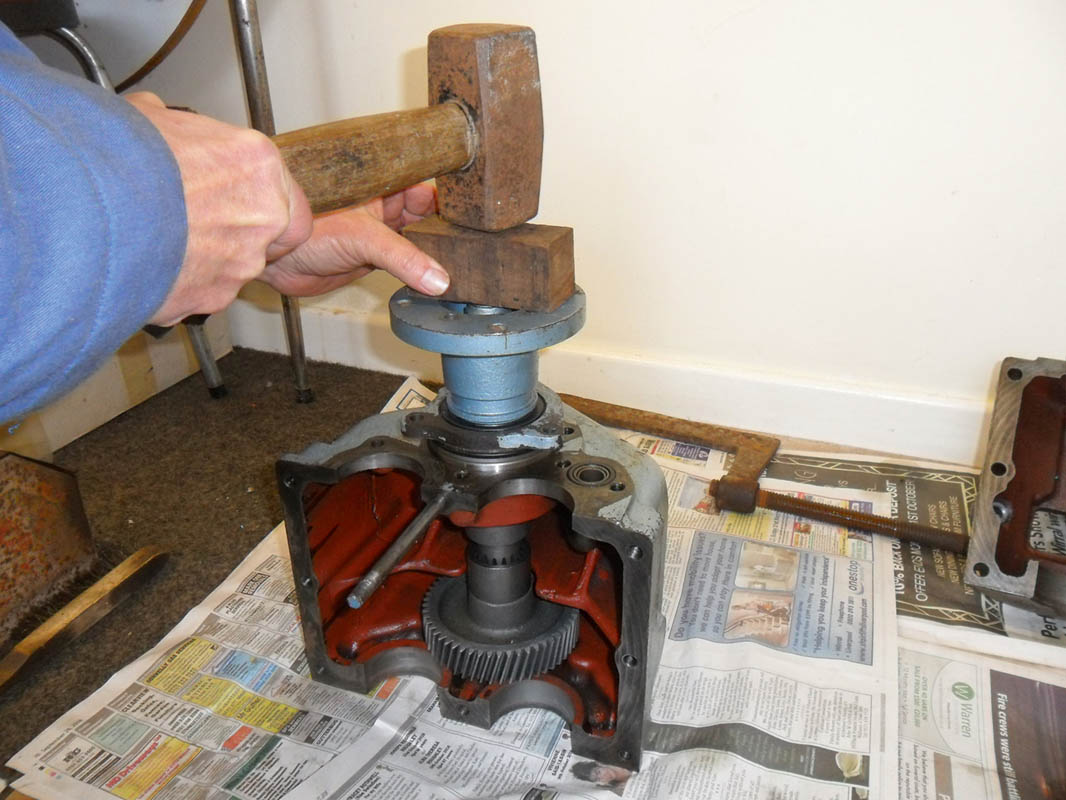
2. Upend the casing and drive the shaft in fully by tapping on the coupling until the thrust bearing bears against the big circlip. Now you can bolt up the oil seal housing taking care not to damage its O-ring. A smear of oil helps it squeeze into place.
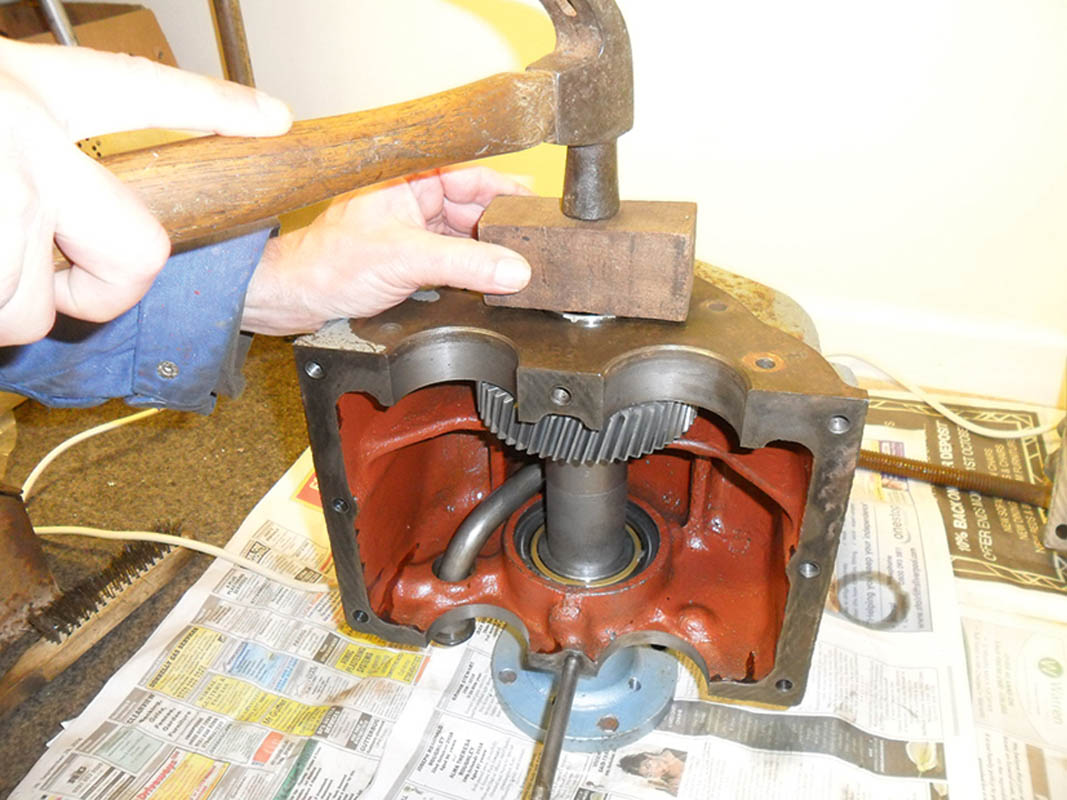
3. Turn the whole caboodle over and stand it on the half coupling flange. Place the inner spacer washer onto the shaft followed by the front bearing inner race and drive down, using a conveniently sized socket as a drift, until they bear against the gearwheel. Then insert the front bearing outer race and drive in until properly home. For this I used a block of wood and an old wheel bearing race, slightly smaller, as a drift. Provided you arranged the bearing the right way round you can’t really drive it in too far but there’s no need to welly it down so hard as to bind the rollers against the race shoulder. Now replace the bearing retaining washer, tab washer and set screw, and re-bend the tab to lock in place.
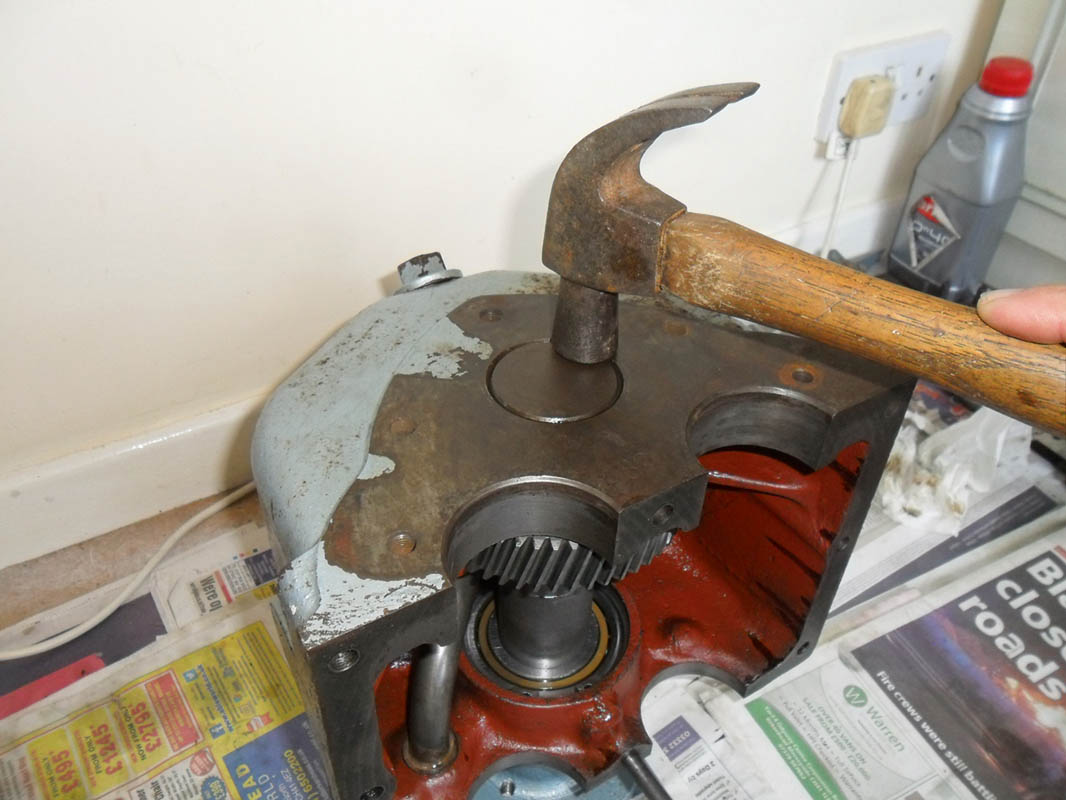
4. Insert the front end cap (watch out for that O-ring) and tap it down flush with the casing. Check that the shaft rotates smoothly without obvious end float, radial slackness or grating.
The instructions say to assemble the output shaft into the casing as above, then lay the input shaft and layshaft into place, and finally place the upper casing and bolt down.
However as the oil feeder spigots must be aligned with their galleries in the control block, working alone I found it easier to turn the upper casing upside down and lay the input shaft and layshaft onto that, then turn the main casing upside down and lower it into place.
It’s a heavy lift so I improvised a handle anchored by the drain plug.
If you do it upside down like this don’t forget that the input and layshafts will appear to be transposed left for right. If you get them wrong way round no harm will be done but you may only notice when you laboriously hoist the dead weight back aboard and find you can’t bolt it up to the engine again.
Clean the casing mating surfaces carefully beforehand and smear thinly with jointing compound (Halfords offer a choice) as this joint has no gasket.
Take care to align the end faces of the two halves as there are no dowels to ensure perfect alignment and the single stud is not that accurate.
Finish by bolting on the input shaft rear end cover and the oil pump.
When replacing the top access plate you can cut an adequate new gasket, if need be, out of thin card – the side of a cereal box is ideal.
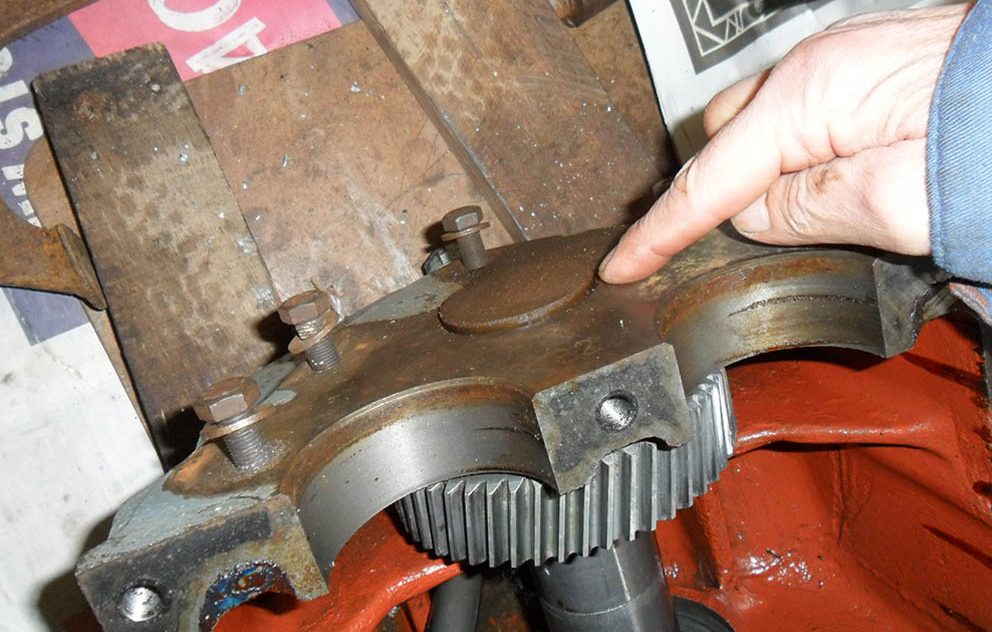
Be sure to fit the access plate so that the emergency drive selector plate holds the emergency drive dog ring forward out of engagement (see the very first photo in step by step section).
The dog ring might be on the input shaft or on the layshaft depending which way the engine and propeller rotate to give ahead.
Special mentions and top tips
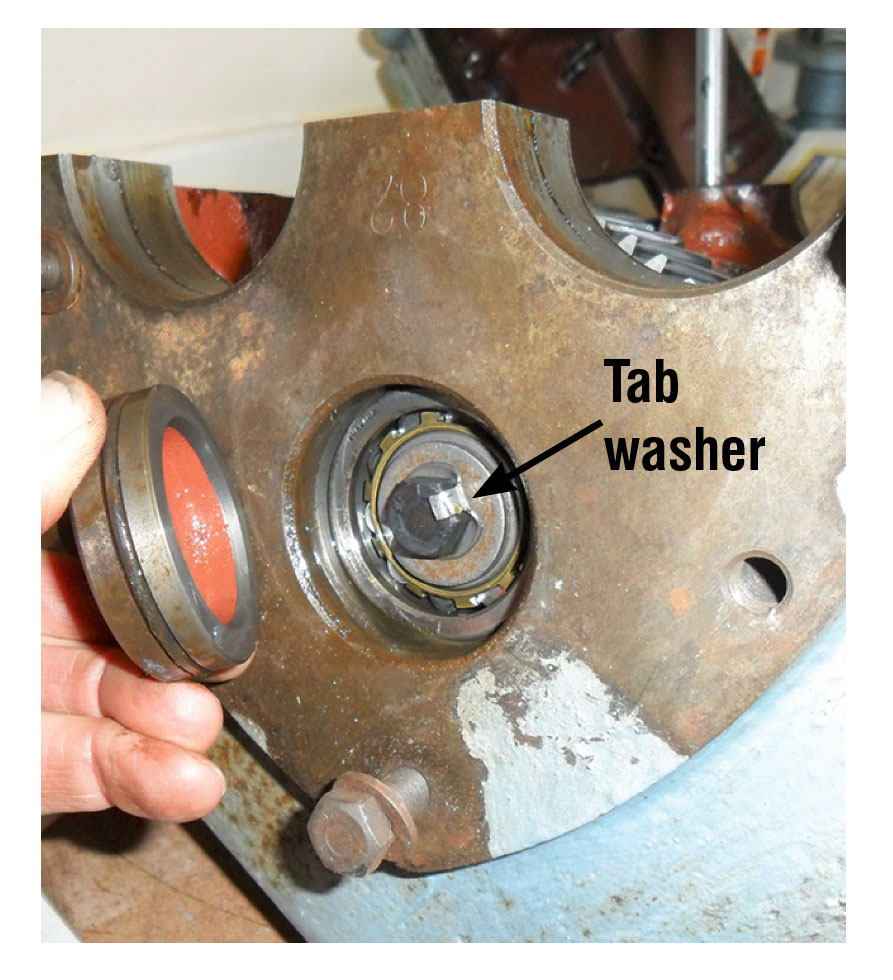 Strictly speaking the tab washer mentioned (above) should be renewed. It would also be a good idea to replace elderly hydraulic hoses that connect to the oil cooler. Mine were made up specially in about 10 minutes and cost £22 each from a local hydraulics company.
Eagle-eyed readers will also spot that the oil filter is missing from my gearbox. Doubtless suitable filters are obtainable somewhere but PRM confirmed that since the oil filter was omitted from later models anyway it is permissible simply to blank off the filter port, which merely sends the oil back down to the sump.
Speaking of which, don’t forget to fill up with oil again before you try the thing out. Notwithstanding that the PRM 100 and 140 et al are described as hydraulically operated gearboxes they use ordinary 15w40 engine oil (mineral, not synthetic). Do not use hydraulic fluid, which will give the box a sad case of palsy, but note that there are some mechanically operated PRM models that do use hydraulic fluid. Check the operating manual.
And finally, what was the use of all this work in my case? Even though I found no serious fault and only renewed one bearing I gained a lot of insight and new confidence in my gearbox. Half way through the season following the (slight) refurbishment it is giving excellent service and the previous noise is now unnoticeable even to me, which either means the new bearing was justified or my hearing is deteriorating faster than I thought.
Whatever, having seen what is inside my gearbox and the robustness of it all I can put to sea confident that the thing is not about to collapse in a grating heap of worn out parts.
I have also learned how to engage that emergency get-you-home mechanical drive dog with which the PRM is blessed in case of dire hydraulic or clutch failure.
All in all I’m very glad I took the trouble to do this job.
Originally published in PBO Dec19


