Paul Diamond creates a specialised valve removal tool from a socket spanner in order to repair his inflatable tender
I had a hole in my 15-year-old Excel SD230 inflatable tender, and the first stumbling block to carrying out a dinghy repair was removing the valves to enable an inside patch to be applied, writes Paul Diamond.
To do a permanent and durable repair, it is better to first patch from the inside and then put a cover patch on the outside once the tubes are inflated.
A polythene bag can be placed behind the patch to prevent the tubes from being glued together when pressing and rollering the inside patch on.

A 12-sided socket was easier to modify than a six-sided one. Credit: Paul Diamond
I tied a string to the bag so I could pull it back out through the valve hole once completed.
However, the plastic valve wrench bought specifically for this job snapped when I attempted to unscrew the valves from their seats.
I guess years of saltwater use had bound the valves to their holes.
The solution was to find a socket that fitted, in my case a 24mm one with 12 sides.
Using an angle grinder and a thin metal cutting disc, I cut six slots into the socket to align with the valve splines.

Modified 24mm socket spanner was just the right size. Credit: Paul Diamond
Once the slots were cut the socket almost fitted, but was just slightly too narrow to fit over the valve internals.
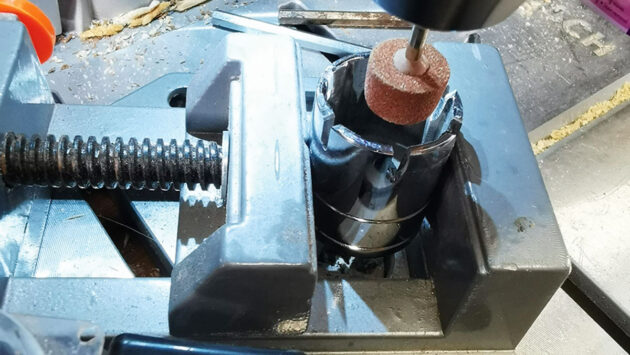
So I ground out the internal edges with a Dremmel stone tool mounted in my pillar drill, and the socket securely held in a vice.
This took a bit of fettling to get just right, as I didn’t want to remove more material than necessary.
It would have been difficult to do this successfully with a hexagonal six-sided socket.

Socket in use with a drive handle on the valve. Credit: Paul Diamond
I was then able to use a normal socket driver to apply the pressure needed to loosen the valve.
I found by holding the back of the valve and applying continuous pressure with the socket driver, I soon had the valve unscrewing.
I used garden wire to tie the valve backs near their holes, to save having to fish for them later once the repair was completed.
Inflatable boat valve replacement: step by step
A failed inner valve could spell the end of an inflatable tender – but Jake Frith has a fix
Boat towing and berthing by tender
If your engine fails to start, being able to berth your boat using the tender is an extremely useful skill,…
Best inflatable boat: 9 compact tenders put to the test
Inflatables are everywhere: paddleboards, canoes, kayaks, tents, kites and wings – and inflatable boat technology has long been a practical…
Choosing a boat dinghy – top tips for buying and maintaining tenders
From getting on and off the yacht to collecting supplies, visiting friends or simply going fishing, tenders play an important…
Want to read more practical articles like How I made a specialist tool to repair my dinghy?

A subscription to Practical Boat Owner magazine costs around 40% less than the cover price.
Print and digital editions are available through Magazines Direct – where you can also find the latest deals.
PBO is packed with information to help you get the most from boat ownership – whether sail or power.
-
-
-
- Take your DIY skills to the next level with trusted advice on boat maintenance and repairs
- Impartial in-depth gear reviews
- Practical cruising tips for making the most of your time afloat
-
-
Follow us on Facebook, Instagram, TikTok and Twitter


